I did not trust the gingersnap crust. That was my first thought when a friend handed me these creamy pumpkin cheesecake bars at a fall potluck a few years ago. I mean, graham cracker crusts are the standard for cheesecake, right? They’re neutral, they’re buttery, and they don’t compete with the filling. Gingersnaps felt like a gamble—too bold, too spicy, too likely to overpower the delicate pumpkin and cream cheese situation happening on top. But I took a bite anyway, mostly out of politeness, and honestly? I had to stop myself from grabbing a second one before I even finished the first. The crust wasn’t fighting the filling—it was holding it up. That warm, molasses-y snap of ginger and clove cut right through the richness of the cheesecake in a way that made perfect sense. It was the kind of moment where you realize the version you’ve been making for years was just fine, but this one was actually right.
The thing about these bars is they solve a very specific problem. You want the deep, spiced comfort of pumpkin pie and the creamy, tangy satisfaction of cheesecake, but you don’t want to deal with a water bath or a springform pan or any of the fuss that usually comes with baking a full cheesecake. These bars are the shortcut that doesn’t taste like one. The gingersnap crust presses together in minutes, the filling comes together in one bowl, and the whole thing bakes while you clean up the kitchen. I’ve made them for Thanksgiving, for random Tuesday cravings, and for when I needed a dessert that looked impressive without requiring a lot of effort. They always deliver. So if you’re someone who usually skips the pumpkin desserts in favor of something chocolate or fruit-based, I get it. But this one might change your mind.
Why You’ll Love This Recipe
These pumpkin cheesecake bars have earned a permanent spot in my fall baking rotation, and not just because they taste incredible. They’re practical in a way that a lot of dessert recipes aren’t. You can make them ahead of time, they travel well, and they slice cleanly into neat little squares that look like you bought them from a bakery. Here’s what makes them stand out:
- No Water Bath Required: Full-sized cheesecakes are notorious for cracking without a water bath, but these bars bake low and slow in a standard 9×13 pan. No leaking foil, no burnt fingers, no stress.
- Gingersnap Crust Is a Game-Changer: The spicy, molasses-forward flavor of gingersnaps pairs with pumpkin better than any graham cracker ever could. It adds depth without being overwhelming.
- Perfect Make-Ahead Dessert: These bars actually taste better after a few hours in the fridge. The flavors meld together, and the texture sets up perfectly. You can make them a day ahead without losing any quality.
- Simple Ingredients, Big Flavor: Nothing fancy here. Canned pumpkin, cream cheese, eggs, sugar, and a box of store-bought gingersnaps. You probably already have most of it in your pantry.
- Crowd-Pleaser for All Ages: I’ve brought these to gatherings where half the people claimed they didn’t like pumpkin desserts. They all came back for seconds. The cheesecake layer is mild enough to win over skeptics, while the pumpkin layer delivers that cozy fall flavor without being too aggressive.
This isn’t just another pumpkin bar recipe. The ratio of creamy filling to crunchy crust is carefully balanced, and the spices are measured so that no single flavor dominates. It’s the kind of dessert that makes people close their eyes after the first bite—and that’s not something I say lightly.
What Ingredients You Will Need
This recipe relies on a short list of pantry-friendly ingredients that work together to create layers of flavor and texture. Each component has a specific job, and understanding what they bring to the table will help you get the best results.
For the Gingersnap Crust:
- 2 cups (about 8 ounces) gingersnap cookie crumbs – I use Nabisco Gingersnaps, but any brand works. You can crush them in a food processor or by hand in a sealed bag with a rolling pin. The fine crumbs create a sturdy base that holds together without crumbling.
- 5 tablespoons unsalted butter, melted – Butter binds the crumbs and adds richness. Use salted butter if that’s what you have, but reduce any added salt elsewhere.
- 2 tablespoons granulated sugar – Just a little sweetness to balance the spicy cookies.
For the Cream Cheese Layer:
- 16 ounces (two 8-ounce blocks) cream cheese, softened – Full-fat cream cheese gives the best texture. Low-fat or Neufchatel will work but won’t be as rich or set as firmly. Let it sit on the counter for at least an hour before starting.
- ½ cup granulated sugar – Sweetens the cheesecake layer without making it cloying.
- 2 large eggs, room temperature – Room-temperature eggs incorporate more smoothly into the batter, preventing lumps. If you forget to take them out ahead of time, place them in a bowl of warm water for 5 minutes.
- 1 teaspoon vanilla extract – Pure vanilla extract adds warmth and depth. Imitation vanilla works in a pinch but won’t have the same complexity.
For the Pumpkin Layer:
- 1 cup (about 8 ounces) canned pumpkin puree – Make sure you’re buying pure pumpkin, not pumpkin pie filling. Libby’s is my go-to brand because it’s consistently thick and not watery.
- ½ cup granulated sugar – Balances the earthy flavor of the pumpkin.
- 1 large egg, room temperature – Helps the pumpkin layer set up properly.
- 1 teaspoon pumpkin pie spice – You can use store-bought or make your own by mixing ½ teaspoon cinnamon, ¼ teaspoon ginger, ¼ teaspoon nutmeg, and a pinch of cloves.
- ½ teaspoon ground cinnamon – Adds an extra layer of warmth.
For the Swirl and Topping (Optional):
- 2 tablespoons sour cream – Creates a beautiful marbled effect on top and adds a slight tang.
- Whipped cream, for serving – Not strictly necessary, but highly recommended. A dollop of fresh whipped cream takes these bars over the top.
Equipment Needed
You don’t need any specialized baking equipment to pull off these bars, which is part of their appeal. Here’s what you’ll need:
- 9×13-inch baking pan – A metal or glass pan works fine. If using glass, reduce the oven temperature by 25°F to prevent over-browning.
- Parchment paper – Lining the pan with parchment paper makes lifting the bars out cleanly a breeze. Leave a few inches of overhang on the long sides to create handles.
- Food processor or rolling pin – For crushing the gingersnaps into fine crumbs. A food processor is faster and more consistent, but a sealed zip-top bag and a rolling pin work just as well.
- Electric hand mixer or stand mixer – You’ll need something to beat the cream cheese until smooth. A whisk and some elbow grease can work, but a mixer saves time and ensures a lump-free filling.
- Medium mixing bowls – One for the crust, one for the cream cheese layer, and one for the pumpkin layer.
- Spatula – For spreading the crust evenly and smoothing the layers.
- Sharp knife – For cutting clean slices after the bars have chilled. A warm, damp knife between cuts helps prevent sticking.
Preparation Method
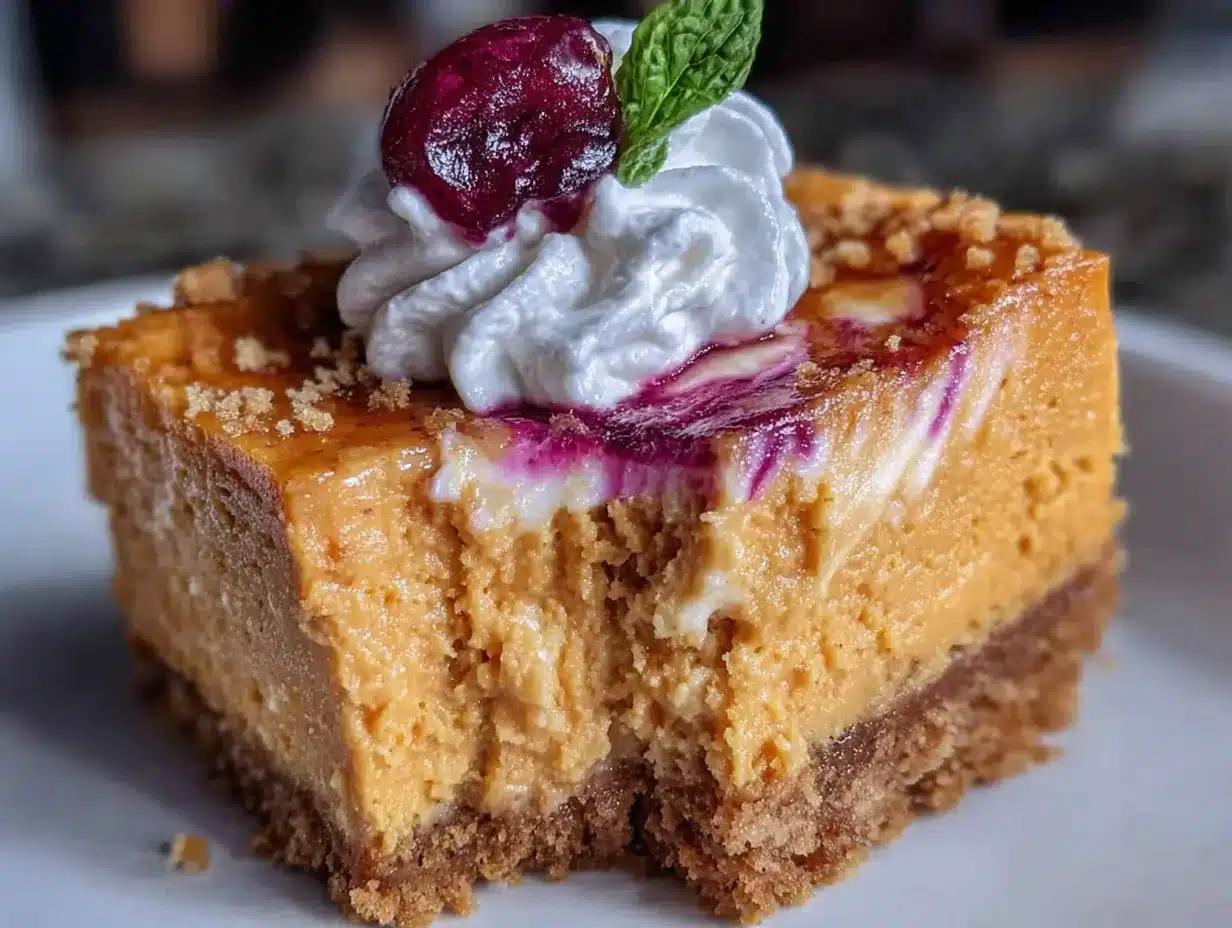
Let’s walk through this step by step. The process is straightforward, but a few small details make a big difference in the final result.
Step 1: Preheat and Prepare the Pan
Preheat your oven to 350°F (175°C). Line your 9×13-inch baking pan with parchment paper, leaving a 2-inch overhang on the long sides. This will act as handles to lift the bars out later. Lightly spray the parchment with non-stick cooking spray for extra insurance.
Step 2: Make the Gingersnap Crust
Place the gingersnap cookies in a food processor and pulse until you have fine, uniform crumbs. You should have about 2 cups. Transfer the crumbs to a medium bowl, add the melted butter and 2 tablespoons of sugar, and stir with a fork until the mixture looks like wet sand. Press the mixture firmly into the bottom of the prepared pan. Use the bottom of a measuring cup or a flat glass to really compact it down. A loose crust will fall apart when you cut the bars. Bake the crust for 10 minutes, then remove it from the oven and let it cool while you make the fillings. Reduce the oven temperature to 325°F (163°C).
Step 3: Make the Cream Cheese Layer
In a large bowl, beat the softened cream cheese with an electric mixer on medium speed until smooth and creamy, about 2 minutes. Scrape down the sides of the bowl with a spatula. Add the ½ cup of sugar and beat until combined, about 1 minute. Add the eggs one at a time, beating on low speed after each addition just until incorporated. Over-mixing at this stage can incorporate too much air, which can cause the cheesecake to puff up and crack. Stir in the vanilla extract. Set the mixture aside.
Step 4: Make the Pumpkin Layer
In a separate bowl, whisk together the pumpkin puree, ½ cup sugar, egg, pumpkin pie spice, and cinnamon until smooth. That’s it. No mixer needed for this part.
Step 5: Assemble the Layers
Pour the cream cheese mixture over the cooled crust and spread it into an even layer using a spatula. Gently spoon the pumpkin mixture over the top, dropping it in dollops rather than pouring it all in one spot. Use a butter knife or a skewer to gently swirl the two layers together. You don’t want to over-swirl—just a few figure-eight motions will create a beautiful marbled effect. If you prefer distinct layers, spread the pumpkin mixture evenly without swirling.
Step 6: Bake
Place the pan in the preheated 325°F (163°C) oven and bake for 35 to 40 minutes. The edges should look set and slightly puffed, but the center should still have a slight jiggle when you gently shake the pan. This is normal—the bars will continue to set as they cool. Over-baking will result in a dry, crumbly texture.
Step 7: Cool and Chill
Remove the pan from the oven and let it cool on a wire rack for 1 hour at room temperature. Then transfer the pan to the refrigerator and chill for at least 4 hours, preferably overnight. This step is non-negotiable. The bars need time to fully set so they slice cleanly. If you try to cut them while they’re still warm, you’ll end up with a delicious but messy situation.
Step 8: Slice and Serve
Once fully chilled, lift the bars out of the pan using the parchment paper handles. Place them on a cutting board and use a sharp knife to slice them into squares. Wipe the knife clean between cuts for the neatest edges. Serve cold or at room temperature, topped with whipped cream if desired.
Cooking Tips & Techniques
I’ve made these bars more times than I can count, and I’ve learned a few things the hard way. Here are the tips that will save you from making the same mistakes I did.
Don’t Skip the Room-Temperature Ingredients
Cold cream cheese and cold eggs will leave you with a lumpy batter. Lumpy batter doesn’t bake evenly, and you’ll end up with pockets of dense, uncooked cream cheese in your bars. Set everything out on the counter at least an hour before you start mixing. If you’re short on time, cut the cream cheese into cubes and microwave it in 10-second bursts until softened but not melted.
Press the Crust Firmly
The first time I made these, I was too gentle with the crust. The result was a crumbly mess that fell apart the moment I tried to lift a bar out of the pan. Use the bottom of a measuring cup or a flat glass to really compact the crumbs. You want them to feel almost like a solid sheet when you’re done pressing.
Watch the Bake Time Closely
Every oven runs a little differently. Start checking your bars at the 30-minute mark. The center should jiggle slightly when you shake the pan. If it looks completely liquid, give it another 5 minutes and check again. If the edges are browning too quickly, tent the pan loosely with aluminum foil for the remaining bake time.
Let Them Chill Overnight
I know it’s hard to wait, but overnight chilling makes a noticeable difference. The flavors deepen, the texture becomes creamier, and the bars slice into perfect, Instagram-worthy squares. If you’re making these for a party, plan to make them the day before.
Variations & Adaptations
One of the best things about this recipe is how easily it adapts to different tastes and dietary needs. Here are a few variations I’ve tried and loved.
Gluten-Free Version
Swap the gingersnap cookies for gluten-free gingersnaps. Many brands are available now, and they work exactly the same way. The texture and flavor are virtually identical.
Pecan Crust Variation
If you’re not a fan of gingersnaps, or if you want an even nuttier flavor, try using a pecan crust instead. Combine 1 ½ cups finely ground pecans, ¼ cup melted butter, and 2 tablespoons sugar. Press and bake as directed. This version pairs beautifully with the pumpkin and cream cheese. For another take on this combination, check out our best pumpkin pie cheesecake bars with pecan crust.
Dairy-Free Adaptation
Use dairy-free cream cheese and a plant-based butter substitute for the crust. The texture will be slightly softer, but the flavor still holds up well. Let the bars chill for a full 8 hours to ensure they set properly.
Extra Spiced Version
For those who love bold fall flavors, add ¼ teaspoon of ground cloves and ¼ teaspoon of allspice to the pumpkin layer. You can also mix a pinch of cayenne pepper into the crust for a subtle warmth that catches you by surprise.
Mini Bar Option
Line a muffin tin with paper liners and press a spoonful of crust into each cup. Top with the cream cheese and pumpkin mixtures, then bake for 18 to 22 minutes. These mini bars are perfect for parties or portion control.
Serving & Storage Suggestions
These bars are versatile when it comes to serving. They’re delicious straight from the fridge on a warm fall afternoon, but they also shine as a dessert centerpiece after a hearty meal. For a cozy fall gathering, I like to serve them alongside a warm drink like our easy copycat Starbucks pumpkin cream cold brew recipe. The cold brew’s coffee notes balance the sweetness of the bars perfectly.
Serving Temperature
I prefer these bars chilled, straight from the refrigerator. The texture is firmer and the flavors are more pronounced. If you prefer a softer, more cake-like texture, let them sit at room temperature for 15 to 20 minutes before serving. Top each bar with a generous dollop of lightly sweetened whipped cream and a sprinkle of cinnamon or crushed gingersnaps for garnish.
Storage
Store leftover bars in an airtight container in the refrigerator for up to 5 days. Place a sheet of parchment paper between layers to prevent sticking. The bars actually taste better on day two, as the flavors have more time to meld together.
Freezing Instructions
These bars freeze beautifully. Wrap individual bars tightly in plastic wrap, then place them in a freezer-safe bag or container. They’ll keep for up to 3 months. To thaw, transfer a bar to the refrigerator overnight or let it sit at room temperature for about 30 minutes. Do not microwave frozen bars—it will ruin the texture.
Reheating
I don’t recommend reheating these bars. They’re meant to be served cold or at room temperature. If you want a warm dessert, consider pairing a chilled bar with a warm caramel sauce or a scoop of vanilla ice cream.
Nutritional Information & Benefits
While these bars are definitely a treat, they do offer a few nutritional bright spots worth noting. The pumpkin puree is packed with vitamin A, fiber, and antioxidants. It’s also low in calories and adds moisture to the bars without requiring extra fat. The cream cheese provides calcium and protein, though it’s also high in saturated fat, so moderation is key.
Estimated Nutritional Values (per bar, based on 16 servings):
- Calories: 285
- Total Fat: 18g
- Saturated Fat: 10g
- Cholesterol: 85mg
- Sodium: 220mg
- Total Carbohydrates: 28g
- Dietary Fiber: 1g
- Sugars: 20g
- Protein: 5g
Dietary Considerations:
- Contains dairy, gluten, and eggs
- Can be adapted for gluten-free and dairy-free diets (see variations above)
- Not suitable for vegan diets without significant modifications
If you’re looking for a lighter option that still satisfies that pumpkin cheesecake craving, try reducing the sugar in the cream cheese layer by a few tablespoons. You can also swap the full-fat cream cheese for a reduced-fat version, though the texture will be slightly less creamy.
Conclusion
These creamy pumpkin cheesecake bars with gingersnap crust are the kind of recipe that makes you look forward to fall all year long. They combine everything I love about pumpkin season—the warm spices, the cozy textures, the way a good dessert can make an ordinary evening feel special—into one easy, foolproof bar. The gingersnap crust was the part I doubted most, and now it’s the part I look forward to the most. Funny how that works.
I hope you give these bars a try, whether you’re a seasoned baker or someone who usually sticks to boxed mixes. They’re forgiving, adaptable, and genuinely impressive. If you make them, I’d love to hear how they turned out. Leave a comment below and let me know if you stuck with the gingersnap crust or tried one of the variations. And if you’re looking for more easy fall desserts, you might enjoy our easy candy corn bark or this no-bake pumpkin pie with gingersnap crust for those days when you don’t want to turn on the oven. Happy baking, friends.
Frequently Asked Questions
Can I use fresh pumpkin instead of canned?
Yes, but you’ll need to roast and puree the pumpkin first, then drain off any excess liquid by pressing it through a fine-mesh sieve or cheesecloth. Fresh pumpkin has a higher water content than canned, which can make the bars soggy if not properly drained.
Why did my cheesecake layer crack?
Cracking is usually caused by over-baking or over-mixing the batter. Make sure you’re baking just until the edges are set and the center still jiggles. Also, avoid beating the cream cheese mixture on high speed, which incorporates too much air.
Can I use a different type of cookie for the crust?
Absolutely. Shortbread cookies, vanilla wafers, or even chocolate graham crackers would work. Just keep in mind that the flavor profile will change. Gingersnaps complement the pumpkin best, but feel free to experiment.
How do I get clean slices?
Chill the bars for at least 4 hours, preferably overnight. Use a sharp knife and wipe it clean with a damp paper towel between each cut. For the cleanest edges, dip the knife in hot water and dry it off before slicing.
Can I make these bars ahead of time for a party?
Yes, and I actually recommend it. These bars taste better after a day in the fridge. Make them up to 48 hours in advance, keep them covered in the refrigerator, and add the whipped cream topping just before serving.
Pin This Recipe!
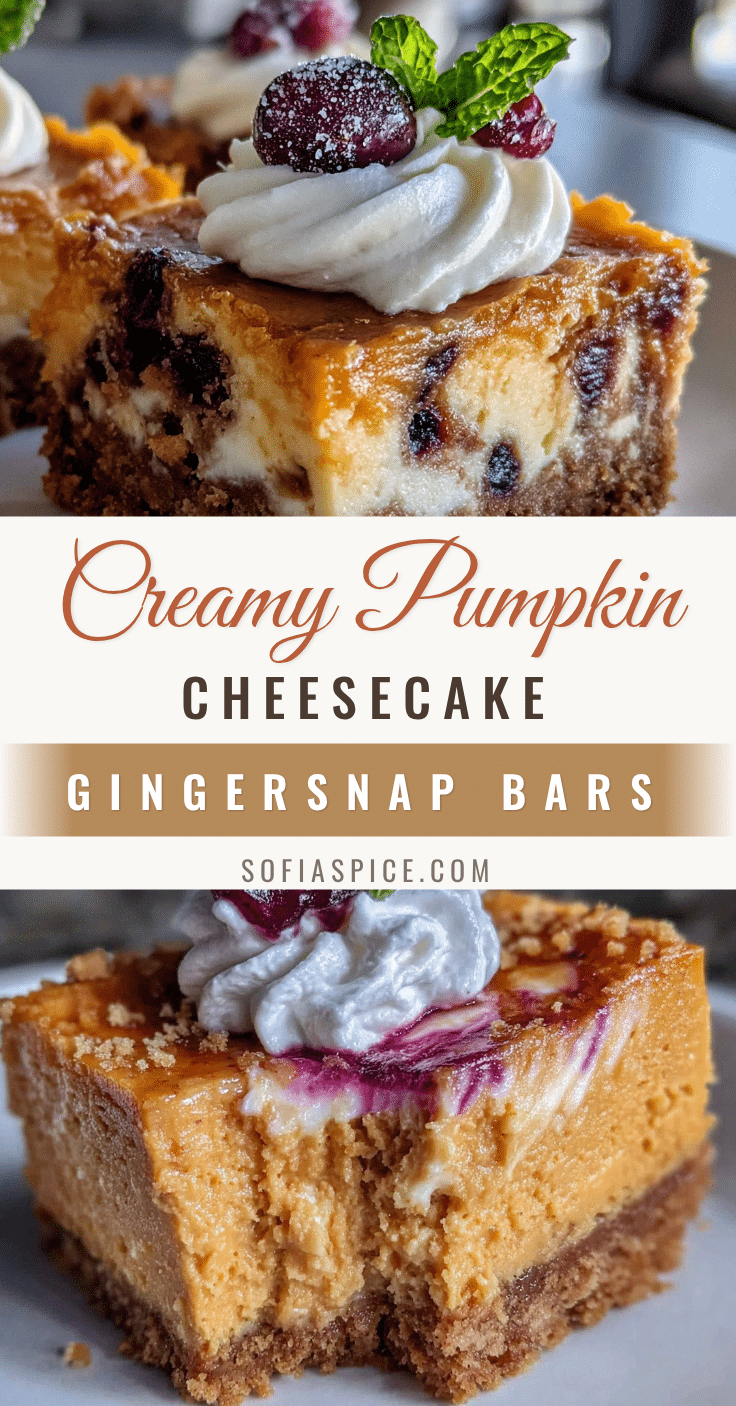
Pumpkin Cheesecake Bars with Gingersnap Crust
These creamy pumpkin cheesecake bars feature a spicy gingersnap crust and a rich, tangy filling. They’re an easy, no-water-bath fall dessert that’s perfect for make-ahead entertaining.
- Prep Time: 20 minutes
- Cook Time: 40 minutes
- Total Time: 5 hours (includes chilling time)
- Yield: 16 servings 1x
- Category: Dessert
- Cuisine: American
Ingredients
- 2 cups (about 8 ounces) gingersnap cookie crumbs
- 5 tablespoons unsalted butter, melted
- 2 tablespoons granulated sugar
- 16 ounces (two 8-ounce blocks) cream cheese, softened
- ½ cup granulated sugar
- 2 large eggs, room temperature
- 1 teaspoon vanilla extract
- 1 cup (about 8 ounces) canned pumpkin puree
- ½ cup granulated sugar
- 1 large egg, room temperature
- 1 teaspoon pumpkin pie spice
- ½ teaspoon ground cinnamon
- 2 tablespoons sour cream (optional, for swirl)
- Whipped cream, for serving (optional)
Instructions
- Preheat your oven to 350°F (175°C). Line a 9×13-inch baking pan with parchment paper, leaving a 2-inch overhang on the long sides. Lightly spray the parchment with non-stick cooking spray.
- Make the gingersnap crust: Place gingersnap cookies in a food processor and pulse until fine crumbs form. Transfer to a medium bowl, add melted butter and 2 tablespoons sugar, and stir until the mixture looks like wet sand. Press firmly into the bottom of the prepared pan. Bake for 10 minutes, then remove and let cool. Reduce oven temperature to 325°F (163°C).
- Make the cream cheese layer: In a large bowl, beat softened cream cheese with an electric mixer on medium speed until smooth, about 2 minutes. Add ½ cup sugar and beat until combined, about 1 minute. Add eggs one at a time, beating on low speed just until incorporated. Stir in vanilla extract. Set aside.
- Make the pumpkin layer: In a separate bowl, whisk together pumpkin puree, ½ cup sugar, egg, pumpkin pie spice, and cinnamon until smooth.
- Assemble the layers: Pour the cream cheese mixture over the cooled crust and spread evenly. Gently spoon the pumpkin mixture over the top in dollops. Use a butter knife or skewer to gently swirl the two layers together (or spread evenly for distinct layers).
- Bake at 325°F (163°C) for 35 to 40 minutes, until edges are set and center jiggles slightly when shaken. Do not over-bake.
- Cool on a wire rack for 1 hour at room temperature, then refrigerate for at least 4 hours, preferably overnight.
- Once fully chilled, lift bars out using parchment handles. Slice into squares with a sharp knife, wiping the knife clean between cuts. Serve cold or at room temperature, topped with whipped cream if desired.
Notes
Room-temperature ingredients are crucial for a smooth batter. Press the crust firmly to prevent crumbling. Chill overnight for best texture and clean slices. Bars can be frozen for up to 3 months.
Nutrition
- Serving Size: 1 bar
- Calories: 285
- Sugar: 20
- Sodium: 220
- Fat: 18
- Saturated Fat: 10
- Carbohydrates: 28
- Fiber: 1
- Protein: 5
Keywords: pumpkin cheesecake bars, gingersnap crust, fall dessert, easy cheesecake bars, pumpkin dessert, no water bath cheesecake


