The third Thursday of November, and the only thing I wanted was a turkey that didn’t feel like a performance. Not the massive, twenty-pound bird that requires a crowd and a carving station and a week of leftovers you’ll eventually freeze and forget about. Just a smaller bird. Something intimate. Something that didn’t announce itself like a centerpiece at a banquet hall, but rather sat quietly on the table, golden and fragrant, asking nothing more than to be passed around and enjoyed. The kitchen smelled like sage and thyme and butter melting into something good. I had my small roasting pan, a single bundle of kitchen twine, and that particular quiet that settles over a house when you’re cooking for people you actually want to impress—but not stress over.
I’d spent years watching larger turkeys dry out in ovens, watching hosts panic over carving, watching everyone pretend the white meat was just as good as the dark. And I thought, there has to be a better way for those of us who aren’t feeding a crowd. For the Thanksgivings that are just four people. For the Sunday dinners that feel special but not overwhelming. For the times you want a roasted turkey, but you don’t want the production. This herb butter roasted turkey for a small gathering was born from that exact feeling. It’s not about scaling down a big recipe—it’s about making something that was always meant to be this size. And honestly? It’s the best turkey I’ve ever made.
Why You’ll Love This Recipe
This isn’t just a smaller turkey. It’s a better approach to turkey altogether. Here’s why this recipe works so well for small gatherings:
- Perfect for 4-6 People : No mountains of leftovers. Just enough for a generous meal and maybe a sandwich or two the next day.
- Incredibly Juicy Every Time : The herb butter goes under the skin and all over the outside, locking in moisture and flavor. You won’t need to brine for hours.
- Simple Ingredients, Big Flavor : Butter, fresh herbs, garlic, salt, and pepper. That’s it. No complicated rubs or marinades.
- Shorter Roasting Time : A 10-12 pound turkey roasts in about 2.5 to 3 hours. No getting up at dawn to start cooking.
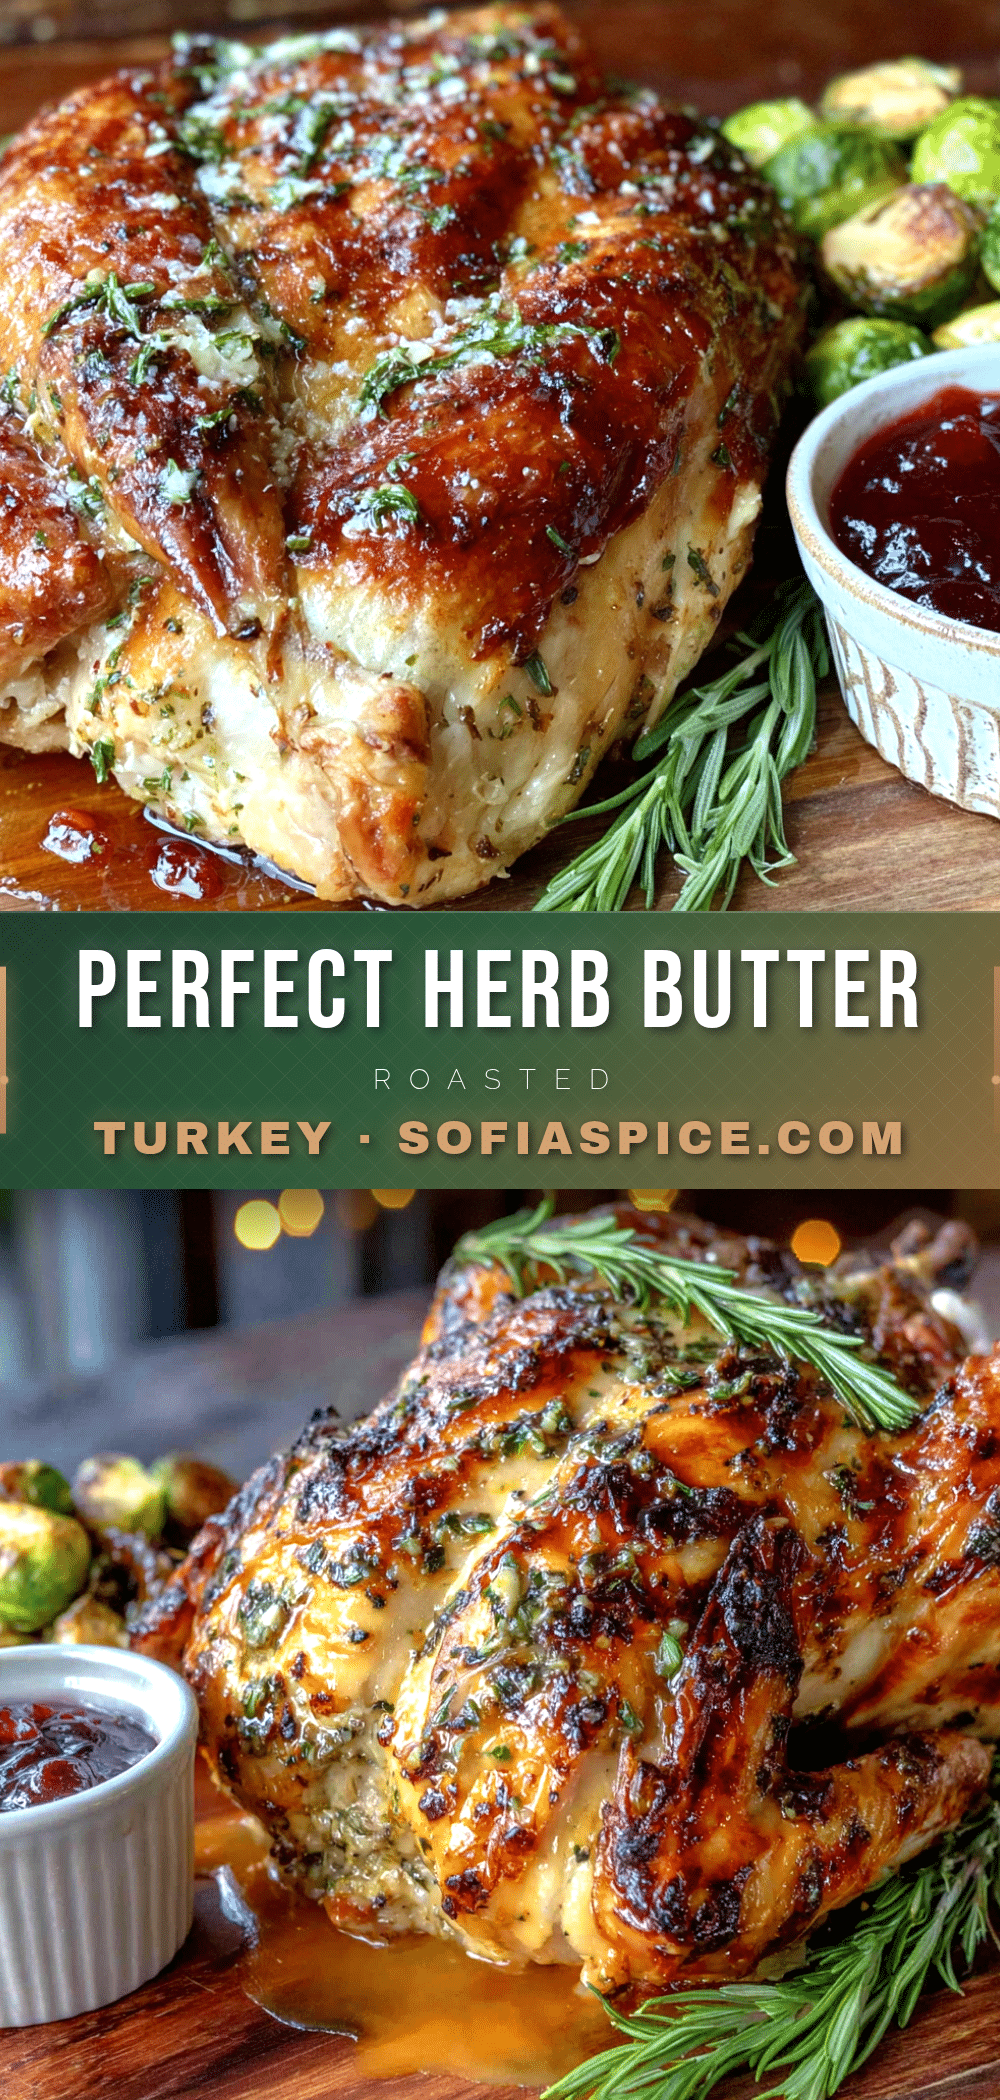
- Impressive Without the Stress : This bird looks stunning on the table—golden brown, herb-flecked, and picture-perfect. Your guests will think you spent all day on it.
- Foolproof Method : I’ve tested this technique more times than I can count. The butter bastes the meat from the inside out, and the low-and-slow-then-high approach gives you crispy skin and tender meat.
I remember the first time I served this to my sister and her husband. We sat at my small dining table, the turkey resting on a wooden board between us. She took one bite and just closed her eyes. That’s the kind of reaction this recipe gets. It’s not just good—it’s the kind of meal that makes you slow down and appreciate what’s on your plate.
What Ingredients You Will Need
This recipe uses straightforward ingredients, but each one plays a specific role. Don’t skimp on the fresh herbs—they’re the heart of this dish.
- 1 whole turkey (10-12 pounds) — Look for a fresh or fully thawed turkey. I prefer a smaller bird for this recipe. If you’re using a frozen turkey, give it 3-4 days to thaw in the refrigerator. (Pat it very dry with paper towels before you start—this is crucial for crispy skin.)
- 1 cup unsalted butter, softened — Unsalted lets you control the salt level. Let it sit out for at least an hour to reach room temperature. (I use Kerrygold for its rich flavor, but any good-quality butter works.)
- 4 cloves garlic, minced — Fresh garlic only. The jarred stuff won’t distribute evenly through the butter. Grate it on a microplane for the smoothest paste.
- 2 tablespoons fresh rosemary, finely chopped — Strip the leaves from the woody stems before chopping. Rosemary is strong, so don’t overdo it.
- 2 tablespoons fresh thyme leaves — Run your fingers down the stems to strip the leaves. No need to chop further.
- 2 tablespoons fresh sage, finely chopped — Sage has a velvety texture that melts beautifully into the butter. Roll the leaves into a cigar shape and slice thinly for a clean chop.
- 1 tablespoon fresh parsley, finely chopped — Parsley adds a fresh, bright note. Flat-leaf (Italian) parsley is best.
- 2 teaspoons kosher salt — I use Diamond Crystal. If you’re using table salt, reduce to 1 teaspoon.
- 1 teaspoon black pepper, freshly ground — Freshly ground pepper makes a difference here. Pre-ground pepper is too dusty.
- 1 lemon, halved — For stuffing inside the cavity. It adds a subtle citrus note that lifts the richness of the butter.
- 1 small onion, quartered — Yellow or white onion works. Adds sweetness and aroma to the cavity.
- 4 sprigs fresh thyme — For stuffing inside the cavity. These will steam and perfume the meat from the inside.
- 2 sprigs fresh rosemary — Same as above. Don’t skip these—they’re not just for show.
- 1 cup low-sodium chicken or turkey broth — For the bottom of the roasting pan. This keeps the drippings from burning and creates a base for gravy. (I like Swanson’s low-sodium chicken broth.)
For the Gravy (optional but highly recommended):
- 2 tablespoons all-purpose flour — For thickening. Use gluten-free flour if needed.
- 2 cups turkey drippings and broth mixture — From the roasting pan.
- Salt and pepper to taste
Equipment Needed
You don’t need a professional kitchen for this, but a few key tools make the process smoother.
- Small roasting pan with a rack — A 12×15-inch pan works perfectly for a 10-12 pound bird. The rack keeps the turkey elevated so air circulates evenly. If you don’t have a rack, use thick carrot and celery stalks as a makeshift rack.
- Kitchen twine — For trussing the legs. Don’t skip this—it helps the turkey cook evenly and keeps the stuffing inside. You can find it in the baking aisle or near the butcher counter.
- Instant-read thermometer — This is non-negotiable. A digital one gives the most accurate reading. I use a ThermoPro and it’s never let me down.
- Pastry brush or silicone brush — For applying the herb butter. A silicone brush is easier to clean and doesn’t shed bristles.
- Small bowl — For mixing the herb butter.
- Cutting board — For carving. Use one with a groove to catch juices.
- Sharp carving knife — A long, thin knife works best. A serrated knife can tear the skin.
- Aluminum foil — For tenting the turkey if the skin browns too quickly.
- Basting bulb or large spoon — For spooning pan juices over the turkey during roasting.
I’ve made this turkey with a cheap roasting pan from the grocery store and it turned out just fine. Don’t overthink the equipment. If you have a pan that fits the bird and a thermometer, you’re set.
Preparation Method
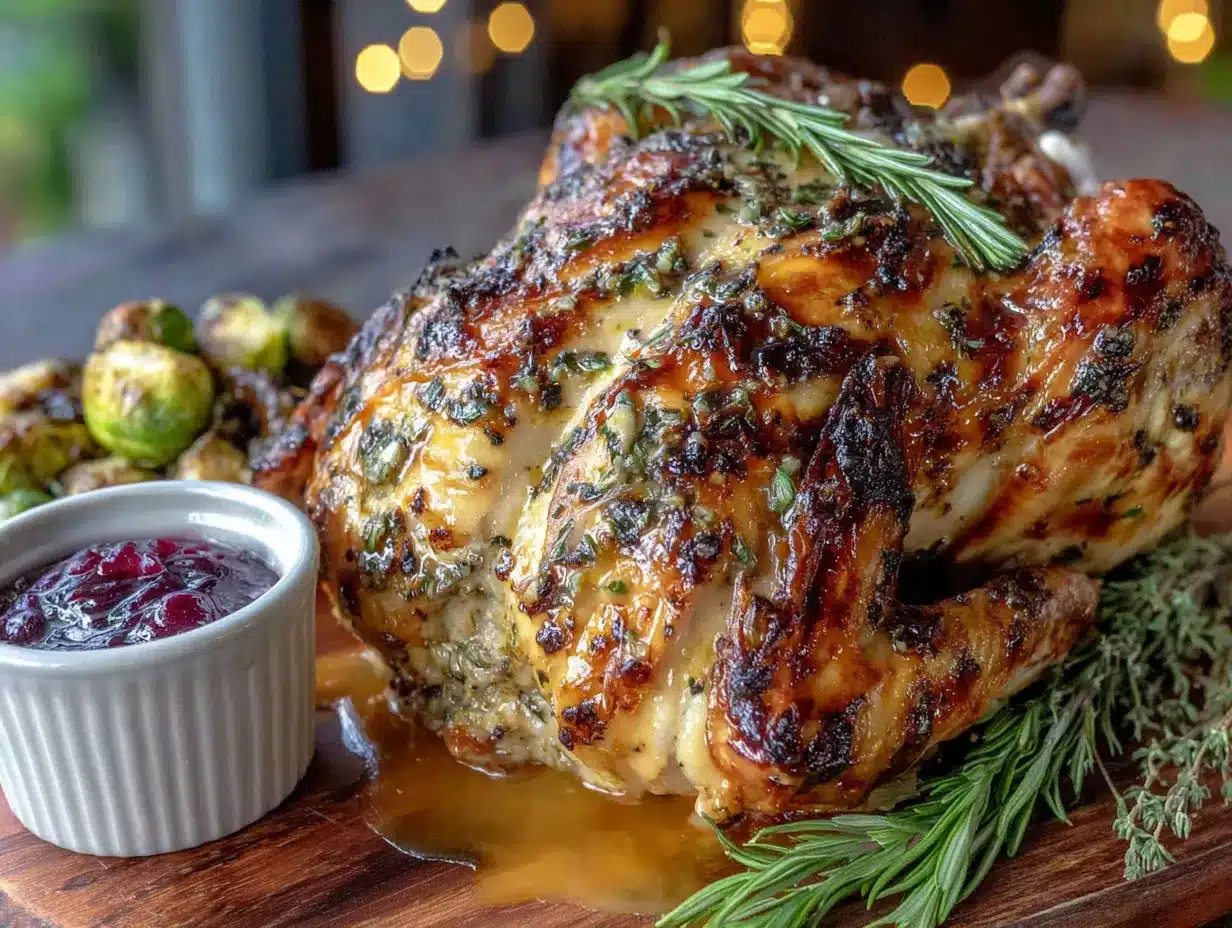
Let’s get to the good part. Follow these steps carefully, and you’ll have a turkey that’s golden, juicy, and full of herb flavor.
- Preheat your oven to 325°F (163°C). Position the rack in the lower third of the oven. This ensures the turkey cooks evenly without the top browning too fast.
- Make the herb butter. In a small bowl, combine the softened butter, minced garlic, chopped rosemary, thyme, sage, parsley, salt, and pepper. Mix until everything is evenly distributed. The butter should be spreadable but not melted. Set aside at room temperature. (If your kitchen is cold, microwave the butter for 5-10 seconds to soften it further.)
- Prepare the turkey. Remove the turkey from its packaging. Take out the giblets and neck from the cavity—save them for stock if you like, or discard them. Pat the turkey completely dry with paper towels, inside and out. This is the most important step for crispy skin. Let the turkey sit at room temperature for 30 minutes to take the chill off.
- Loosen the skin. Gently slide your fingers under the skin of the turkey breast, starting at the neck end. Work your way down to the thighs and drumsticks, being careful not to tear the skin. You want to create pockets for the butter.
- Apply the herb butter. Take about two-thirds of the herb butter and push it under the skin, spreading it evenly over the breast meat and thighs. Massage the skin from the outside to distribute the butter. Use the remaining butter to coat the outside of the turkey, including the legs and wings. Don’t forget the back side.
- Stuff the cavity. Place the halved lemon, quartered onion, thyme sprigs, and rosemary sprigs inside the cavity. These aromatics will steam and infuse the meat with flavor from the inside out.
- Truss the turkey. Cut a piece of kitchen twine about 24 inches long. Cross the legs and tie them together at the ankles. Tuck the wing tips under the body of the turkey—this prevents them from burning. Trussing helps the turkey cook evenly and gives it a nice shape.
- Place in the roasting pan. Set the turkey breast-side up on the rack in the roasting pan. Pour the 1 cup of broth into the bottom of the pan, not over the turkey. The broth will create steam and keep the drippings from scorching.
- Roast the turkey. Place the turkey in the preheated oven. Roast for about 13-15 minutes per pound. For a 10-pound turkey, that’s roughly 2 hours and 10 minutes to 2 hours and 30 minutes. For a 12-pound turkey, aim for 2 hours and 36 minutes to 3 hours. Start checking the temperature about 30 minutes before you think it’ll be done.
- Baste occasionally. Every 45 minutes, open the oven and spoon the pan juices over the turkey. This keeps the meat moist and builds flavor. Work quickly so the oven doesn’t lose too much heat. If the skin starts browning too fast, tent the turkey loosely with aluminum foil.
- Check for doneness. The turkey is done when an instant-read thermometer inserted into the thickest part of the thigh (without touching bone) reads 165°F (74°C). Also check the breast—it should read 160°F (71°C). The temperature will rise a few degrees while resting. The juices should run clear when you pierce the thigh, not pink.
- Rest the turkey. This is not optional. Transfer the turkey to a cutting board and let it rest for 20-30 minutes, loosely tented with foil. Resting allows the juices to redistribute throughout the meat. If you carve too soon, all those juices will end up on the cutting board instead of in the meat.
- Make the gravy (while the turkey rests). Pour the pan drippings through a fine-mesh strainer into a fat separator or a glass measuring cup. Let the fat rise to the top. Skim off the fat, reserving about 2 tablespoons. Place the roasting pan on the stove over medium heat. Add the reserved fat and whisk in the flour. Cook for 1-2 minutes, stirring constantly. Slowly whisk in the defatted drippings and enough broth to make 2 cups of liquid. Bring to a simmer and cook until thickened, about 3-5 minutes. Season with salt and pepper to taste.
- Carve and serve. Remove the twine. Carve the turkey by first removing the legs and thighs, then slicing the breast meat against the grain. Arrange on a platter and serve with the gravy on the side.
One thing I learned the hard way—don’t skip the resting step. My first time making this turkey, I was so excited to serve it that I carved it after 10 minutes. The meat was still good, but it was noticeably drier than when I let it rest the full 30 minutes. Patience pays off here.
Cooking Tips & Techniques
I’ve made this turkey more times than I can count, and I’ve made every mistake in the book. Here’s what I’ve learned so you don’t have to.
Dry the skin thoroughly. I cannot overstate this. Moisture is the enemy of crispy skin. Use paper towels and really press them into the skin to absorb any hidden moisture. Let the turkey sit uncovered in the refrigerator overnight if you have time—this dries out the skin even more and gives you an incredibly crispy finish.
Don’t overstuff the cavity. You want the aromatics to fit loosely so hot air can circulate. If you cram the cavity full, the inside won’t cook evenly. Just the lemon, onion, and a few herb sprigs are enough.
Use a thermometer, not the pop-up timer. Those plastic pop-up timers that come with some turkeys are notoriously unreliable. They usually trigger at a higher temperature, which means your turkey will be overcooked. Trust your instant-read thermometer instead.
Butter under the skin is the secret. This is the technique that makes this turkey so juicy. The butter melts and bastes the breast meat from the inside, keeping it moist even if you accidentally overcook it a little. Don’t skip this step, and don’t be shy with the butter.
Let the turkey come to room temperature. A cold turkey straight from the fridge will cook unevenly. Let it sit out for 30-60 minutes before roasting. This is especially important for a small bird, which cooks faster and needs a more even start.
Baste with pan juices, not butter. I know the recipe is called herb butter roasted turkey, but the butter is already under the skin and on the outside. Basting with more butter can make the skin greasy instead of crispy. Use the pan juices—they’re flavorful enough.
Check the temperature in multiple spots. The thigh and the breast cook at different rates. Always check both. If the breast hits 160°F but the thigh is only 155°F, let it keep cooking. The dark meat can handle a higher temperature without drying out.
I once forgot to loosen the skin before applying the butter. I just slathered it on top and hoped for the best. The turkey was still decent, but the breast meat was noticeably less moist. That little step of getting the butter under the skin? It’s the whole point of this recipe.
Variations & Adaptations
This recipe is flexible. Here are some ways to make it your own.
Citrus Herb Butter: Add the zest of one lemon and one orange to the herb butter. It adds a bright, fresh note that cuts through the richness of the turkey. I tried this for a friendsgiving and everyone asked what the secret ingredient was.
Spiced Herb Butter: Add 1 teaspoon of smoked paprika and ½ teaspoon of cayenne pepper to the butter. This gives the turkey a subtle warmth and a beautiful golden-red color. It’s perfect if you like a little heat.
Gluten-Free Gravy: Use cornstarch or arrowroot powder instead of flour to thicken the gravy. Mix 2 tablespoons of cornstarch with 2 tablespoons of cold water to form a slurry, then whisk it into the simmering drippings. It thickens just as well and is naturally gluten-free.
Dairy-Free Option: Substitute the butter with a high-quality vegan butter or ghee (if you can tolerate dairy but not lactose). I’ve used Miyoko’s European Style Cultured Vegan Butter and it worked beautifully. The texture was slightly different, but the flavor was still rich and herbaceous.
Smaller Bird: This recipe works for turkeys as small as 8 pounds. Just adjust the cooking time accordingly—about 13-15 minutes per pound. A 9-pound turkey will roast in about 2 hours. Check the temperature early to avoid overcooking.
Herb Swap: Don’t have fresh rosemary? Use dried—just reduce the amount to 1 teaspoon. Same for thyme and sage. Fresh herbs are better, but dried will still give you good flavor. Just don’t use dried parsley—it has no flavor.
One of my favorite variations is adding a tablespoon of Dijon mustard to the herb butter. It gives the turkey a subtle tanginess that pairs perfectly with the herbs. I stumbled on this by accident when I was out of garlic and needed something to round out the flavor. Now I make it that way half the time.
Serving & Storage Suggestions
This turkey is best served fresh, but there are ways to enjoy it for days afterward.
Serving: Let the turkey rest for 20-30 minutes before carving. Serve it warm, arranged on a platter with fresh herbs and lemon slices for garnish. The gravy should be served on the side in a warm gravy boat. I like to serve this with roasted vegetables like carrots, parsnips, and Brussels sprouts. A simple creamy dill cucumber salad on the side adds a refreshing crunch that balances the richness of the turkey. For a heartier meal, pair it with maple brown sugar roasted sweet potatoes—the sweetness complements the savory herbs beautifully.
Storage: Remove the meat from the bones and store it in an airtight container in the refrigerator for up to 4 days. Keep the gravy separate to prevent the meat from getting soggy. The bones can be used to make turkey stock—just cover them with water, add some onion, carrot, and celery, and simmer for 2-3 hours.
Reheating: The best way to reheat turkey is in the oven. Place the slices in a baking dish, add a splash of broth or gravy, cover with foil, and warm at 300°F (150°C) for 10-15 minutes. This prevents the meat from drying out. You can also reheat it in a skillet over medium-low heat with a little butter or broth. Microwave reheating works in a pinch, but it tends to dry out the meat—use short 30-second bursts and cover the plate with a damp paper towel.
Freezing: Cooked turkey freezes well for up to 3 months. Wrap the meat tightly in plastic wrap, then in aluminum foil, or use a freezer-safe bag. Thaw in the refrigerator overnight before reheating. The gravy also freezes well—store it in a freezer-safe container for up to 3 months.
Leftover Ideas: This turkey makes incredible sandwiches. Layer slices on sourdough with cranberry sauce, a little mayo, and some arugula. Or use it in a healthy turkey chili for a completely different meal. I’ve also made turkey pot pie and turkey soup with the leftovers. The herb butter flavor carries through beautifully in all of them.
Nutritional Information & Benefits
Here’s an approximate nutritional breakdown for a 4-ounce serving of roasted turkey breast (without skin or gravy):
- Calories: 180
- Protein: 34g
- Fat: 4g (mostly from the butter)
- Carbohydrates: 0g
- Fiber: 0g
- Sugar: 0g
- Sodium: 350mg (varies with salt used)
Turkey is an excellent source of lean protein, which supports muscle health and keeps you feeling full. It’s also rich in B vitamins, particularly B6 and B12, which are important for energy metabolism and brain function. The fresh herbs in this recipe add antioxidants and anti-inflammatory compounds—rosemary and thyme are particularly high in rosmarinic acid, which has been studied for its potential health benefits.
If you’re watching your sodium intake, reduce the salt in the herb butter and avoid adding extra salt during cooking. The gravy can also be made with low-sodium broth. For a lower-fat option, remove the skin before eating—most of the butter and fat are in the skin. The meat underneath is still flavorful and moist from the herb butter that melted into it during roasting.
This recipe is naturally gluten-free (use a gluten-free thickener for the gravy) and can be made dairy-free with vegan butter. It’s also suitable for paleo and whole30 diets if you use ghee instead of butter and skip the flour in the gravy.
I’m not a nutritionist, but I’ve always felt good about serving this turkey. It’s a whole food, minimally processed, and packed with protein and herbs. It’s comfort food that doesn’t leave you feeling heavy or sluggish.
Conclusion
This herb butter roasted turkey for a small gathering is the recipe I turn to whenever I want something special but not overwhelming. It’s the turkey that fits on a smaller table, the one that lets you actually enjoy the meal instead of spending the whole time in the kitchen. The herb butter method is foolproof—it gives you juicy, flavorful meat and crispy, golden skin every single time.
I love this recipe because it proves you don’t need a crowd to make a roasted turkey. You just need good ingredients, a little patience, and the willingness to let the oven do the work. It’s the kind of meal that makes a Tuesday night feel like a celebration or turns a small Thanksgiving into something deeply memorable.
If you make this turkey, I’d love to hear about it. Leave a comment below and let me know how it turned out—did you use the citrus variation? Did your guests close their eyes after the first bite? Share your photos and tag me on social media. And if you have a favorite side dish that pairs perfectly with this bird, tell me about that too. Happy roasting, my friend. You’ve got this.
Frequently Asked Questions
Can I use dried herbs instead of fresh?
Yes, but reduce the amount by about two-thirds. Dried herbs are more concentrated than fresh. Use 1 teaspoon of dried rosemary, 1 teaspoon of dried thyme, and 1 teaspoon of dried sage. Skip the dried parsley—it has almost no flavor. The texture won’t be the same, but the flavor will still be good.
How do I know when the turkey is fully thawed?
A fully thawed turkey should feel pliable and have no ice crystals in the cavity. The legs and wings should move freely. If you’re using a frozen turkey, thaw it in the refrigerator for 24 hours per 4-5 pounds. A 10-pound turkey will take about 2-3 days. You can also thaw it in a sink of cold water, changing the water every 30 minutes—this takes about 30 minutes per pound.
Can I stuff the turkey with traditional bread stuffing?
I don’t recommend it for a small turkey. The stuffing needs to reach 165°F to be safe, and by the time the stuffing is done, the breast meat is often overcooked. Instead, make my make-ahead creamy green bean casserole on the side. It’s easier, safer, and tastes just as good.
Why did my turkey skin turn out soggy?
This usually happens if the skin wasn’t dried thoroughly before roasting, or if the oven temperature was too low. Make sure you pat the turkey completely dry with paper towels, including inside the cavity. Also, avoid adding too much liquid to the roasting pan—1 cup of broth is enough. If the skin is still soggy, try roasting at 425°F for the last 15-20 minutes to crisp it up.
How long can I keep leftover turkey in the refrigerator?
Cooked turkey will stay fresh in the refrigerator for 3-4 days if stored properly. Remove the meat from the bones and store it in an airtight container. Keep the gravy separate. If you won’t eat it within 4 days, freeze it for up to 3 months. Reheat gently in the oven or on the stovetop to avoid drying it out.
Pin This Recipe!
Perfect Herb Butter Roasted Turkey for a Small Gathering Easy
A smaller, intimate turkey recipe perfect for 4-6 people, featuring herb butter under the skin for incredibly juicy meat and crispy golden skin. No brining required, just simple ingredients and a foolproof method.
- Prep Time: 30 minutes
- Cook Time: 2 hours 30 minutes
- Total Time: 3 hours 30 minutes
- Yield: 4-6 servings 1x
- Category: Main Course
- Cuisine: American
Ingredients
- 1 whole turkey (10–12 pounds)
- 1 cup unsalted butter, softened
- 4 cloves garlic, minced
- 2 tablespoons fresh rosemary, finely chopped
- 2 tablespoons fresh thyme leaves
- 2 tablespoons fresh sage, finely chopped
- 1 tablespoon fresh parsley, finely chopped
- 2 teaspoons kosher salt
- 1 teaspoon black pepper, freshly ground
- 1 lemon, halved
- 1 small onion, quartered
- 4 sprigs fresh thyme
- 2 sprigs fresh rosemary
- 1 cup low-sodium chicken or turkey broth
- 2 tablespoons all-purpose flour (for gravy)
- 2 cups turkey drippings and broth mixture (for gravy)
- Salt and pepper to taste (for gravy)
Instructions
- Preheat your oven to 325°F (163°C). Position the rack in the lower third of the oven.
- Make the herb butter: In a small bowl, combine the softened butter, minced garlic, chopped rosemary, thyme, sage, parsley, salt, and pepper. Mix until evenly distributed. Set aside at room temperature.
- Prepare the turkey: Remove the turkey from packaging. Take out the giblets and neck. Pat the turkey completely dry with paper towels, inside and out. Let it sit at room temperature for 30 minutes.
- Loosen the skin: Gently slide your fingers under the skin of the turkey breast, starting at the neck end. Work down to the thighs and drumsticks, being careful not to tear the skin.
- Apply the herb butter: Take about two-thirds of the herb butter and push it under the skin, spreading evenly over the breast meat and thighs. Use the remaining butter to coat the outside of the turkey, including legs and wings.
- Stuff the cavity: Place the halved lemon, quartered onion, thyme sprigs, and rosemary sprigs inside the cavity.
- Truss the turkey: Cut a piece of kitchen twine about 24 inches long. Cross the legs and tie them together at the ankles. Tuck the wing tips under the body.
- Place in the roasting pan: Set the turkey breast-side up on the rack in the roasting pan. Pour the 1 cup of broth into the bottom of the pan.
- Roast the turkey: Roast for about 13-15 minutes per pound. For a 10-pound turkey, about 2 hours 10 minutes to 2 hours 30 minutes. Start checking temperature 30 minutes before you think it’ll be done.
- Baste occasionally: Every 45 minutes, spoon the pan juices over the turkey. If the skin browns too fast, tent loosely with aluminum foil.
- Check for doneness: Turkey is done when an instant-read thermometer inserted into the thickest part of the thigh (without touching bone) reads 165°F (74°C). The breast should read 160°F (71°C). Juices should run clear.
- Rest the turkey: Transfer to a cutting board and let rest for 20-30 minutes, loosely tented with foil.
- Make the gravy (while turkey rests): Pour pan drippings through a fine-mesh strainer into a fat separator. Skim off fat, reserving about 2 tablespoons. Place roasting pan on stove over medium heat. Add reserved fat and whisk in flour. Cook 1-2 minutes. Slowly whisk in defatted drippings and enough broth to make 2 cups. Simmer until thickened, 3-5 minutes. Season with salt and pepper.
- Carve and serve: Remove twine. Carve by first removing legs and thighs, then slicing breast meat against the grain. Arrange on a platter and serve with gravy.
Notes
Dry the skin thoroughly for crispy skin. Don’t overstuff the cavity. Use a thermometer, not the pop-up timer. Butter under the skin is the secret to juiciness. Let the turkey come to room temperature before roasting. Baste with pan juices, not butter. Check temperature in multiple spots. Don’t skip the resting step.
Nutrition
- Serving Size: 4 ounces
- Calories: 180
- Sodium: 350
- Fat: 4
- Saturated Fat: 2
- Protein: 34
Keywords: herb butter roasted turkey, small turkey, Thanksgiving turkey, roasted turkey, small gathering turkey, juicy turkey, herb butter