I was supposed to be making a creamy stovetop mac and cheese for a potluck. The kind that comes together in one pot, you know, the one everyone raves about because it is so simple. But I got distracted—honestly, it was a Tuesday, and I was already running late because I had to stop for gas, and the store was out of my usual cheddar. So I grabbed a block of sharp white cheddar instead, and a bag of panko breadcrumbs that I had no plan for. The power went out halfway through my prep—just for ten minutes, but long enough to throw off my timing. I stood there in the dim kitchen, staring at my half-made cheese sauce, and I just thought, well, this is going to be a disaster.
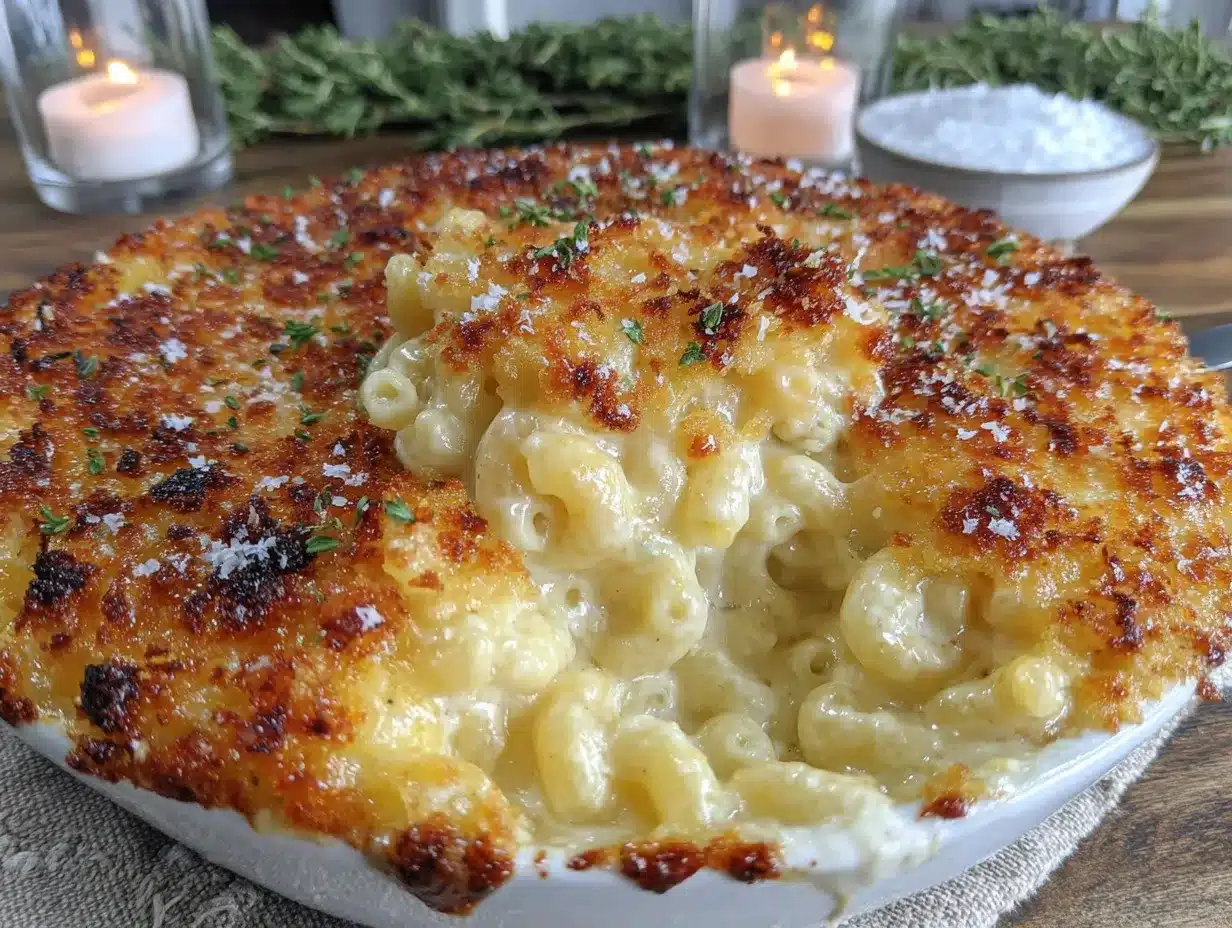
So I did what any reasonable person would do when a recipe goes sideways: I poured the sauce over the pasta anyway, threw a ridiculous amount of panko on top, and baked it. Not because I had a vision, but because I had no backup plan. I mean, what else was I going to do? Toss it all out? The potluck was in two hours, and I was not showing up empty-handed. I slid the dish into the oven, crossed my fingers, and prayed for a miracle. When I pulled it out, the top was golden and crispy, and the cheese was bubbling up around the edges. It looked nothing like the stovetop version I had planned—and honestly, it was better.
That first bite had this unexpected crunch that gave way to the creamiest, most decadent cheese sauce I had ever made. My neighbor, who was hosting the potluck, actually asked me for the recipe before I even sat down. I had to laugh because I barely knew what I had done. But that is the thing about cooking, right? Sometimes the best recipes come from the moments when everything goes wrong. This cozy make-ahead baked mac and cheese with panko crust is now my go-to for every cold evening, every rough day, every time I need a little comfort. Maybe you have been there—standing in your kitchen, wondering how you ended up with a dish you never planned to make. Trust me, this one is worth the detour.
Why You Will Love This Recipe
Let me tell you why this baked mac and cheese is different from every other version you have tried. I have tested this recipe more times than I care to count, tweaking the cheese blend and the baking time until it was absolutely perfect. It is the kind of dish that makes you close your eyes after the first bite. Seriously, I caught myself doing that just last week.
- Make-Ahead Magic: Assemble it the night before, pop it in the fridge, and bake it when you are ready. Perfect for busy weeknights or holiday dinners when you have a million other things to do.
- Simple Ingredients: No fancy grocery trips needed. You probably already have butter, milk, and cheese in your kitchen. The panko is the only thing you might need to grab, and it is worth it for that crunch.
- Perfect for Cozy Evenings: This is the ultimate comfort food for cold weather, a rough day, or just a slow evening at home when you need something warm and satisfying.
- Crowd-Pleaser: Kids love the creamy pasta, and adults cannot resist that golden panko crust. It has never failed me at potlucks, family dinners, or holiday gatherings.
- Unbelievably Delicious: The texture is what sets this apart—silky smooth cheese sauce with a crunchy, buttery topping. It is next-level comfort food, and I am not exaggerating.
What makes this recipe truly special is the technique. I blend two types of cheddar with a touch of Gruyère for that nutty, melt-in-your-mouth quality. The panko crust is toasted with melted butter before baking, so it stays crispy even after you reheat leftovers. This is not just another mac and cheese recipe—it is the one you will come back to again and again.
What Ingredients You Will Need
This recipe uses simple, wholesome ingredients to deliver bold flavor and satisfying texture without the fuss. Most of these are pantry staples, so you can whip this up anytime the craving hits.
- Elbow macaroni (16 oz / 450 g) – The classic choice, but you can use cavatappi or shells if you prefer. Cook it al dente since it will continue cooking in the oven.
- Unsalted butter (6 tbsp / 85 g, divided) – Half goes into the cheese sauce, the other half gets melted for the panko topping. I use unsalted to control the salt level.
- All-purpose flour (1/4 cup / 30 g) – This thickens the cheese sauce. No need for anything fancy here.
- Whole milk (3 cups / 720 ml) – Whole milk gives the creamiest results. If you need a lighter option, 2% works, but avoid skim milk—it can make the sauce grainy.
- Heavy cream (1 cup / 240 ml) – Adds richness and helps the sauce stay smooth when reheated. You can substitute with half-and-half if needed.
- Sharp cheddar cheese (2 cups / 200 g, shredded) – I recommend Tillamook or Cabot for the best flavor. Shred it yourself—pre-shredded cheese has anti-caking agents that mess with the texture.
- White cheddar cheese (1 cup / 100 g, shredded) – Adds a milder, creamier note. Look for a block and shred it fresh.
- Gruyère cheese (1 cup / 100 g, shredded) – Optional but highly recommended. It melts beautifully and adds a nutty depth. If you cannot find it, use Gouda as a substitute.
- Dijon mustard (1 tsp / 5 ml) – Do not skip this. It does not make the mac and cheese taste like mustard; it just enhances the cheesy flavor.
- Garlic powder (1/2 tsp / 2 g) – A subtle savory boost that rounds out the sauce.
- Salt (1 tsp / 5 g) – Season the pasta water and the sauce. Adjust to taste.
- Black pepper (1/2 tsp / 1 g) – Freshly ground is best.
- Panko breadcrumbs (1 cup / 80 g) – These create that signature crunchy crust. I prefer Kikkoman panko for its light, flaky texture.
- Paprika (1 tsp / 2 g) – A sprinkle on top for color and a hint of smokiness.
For substitutions: Use gluten-free pasta and a 1:1 gluten-free flour blend if needed. Replace the heavy cream with canned coconut milk for a dairy-free option (though the flavor will shift slightly). If you are watching your sodium, use low-sodium cheese and reduce the added salt.
Equipment Needed
You do not need a fancy kitchen to pull this off. Here is what I use every time I make this cozy make-ahead baked mac and cheese with panko crust.
- Large pot (6-8 quart / 6-8 L) – For boiling the pasta. I use my trusty stainless steel one, but any heavy-bottomed pot works.
- Medium saucepan (3 quart / 3 L) – For the cheese sauce. A non-stick one makes cleanup easier, but I prefer stainless steel for even heating.
- Whisk – Essential for a smooth, lump-free sauce. A silicone-coated whisk is gentle on non-stick pans.
- 9×13-inch baking dish (23×33 cm) – This is the standard size for this recipe. A glass or ceramic dish works best for even baking.
- Mixing bowls – One for shredding cheese, one for the panko mixture. I use glass bowls because they do not absorb odors.
- Box grater or food processor – Shredding cheese by hand takes five minutes and is worth the effort. If you are in a rush, the food processor does it in seconds.
- Aluminum foil – For covering the dish if the top browns too quickly. I always keep a roll handy.
- Wooden spoon – For stirring the pasta and sauce. It is gentle on your cookware and gives you good control.
Budget-friendly tip: You do not need a fancy whisk or pot. A basic set from a discount store works just fine. I used a $10 saucepan for years, and it never let me down.
Preparation Method
Let me walk you through this step by step. I have made this recipe so many times that I have the process down to a science. Trust me, even if you are a beginner, you can nail this.
- Preheat your oven to 375°F (190°C). Grease your 9×13-inch baking dish with a little butter or non-stick spray. Set it aside.
- Cook the pasta. Bring a large pot of salted water to a boil. Add the elbow macaroni and cook for 1 minute less than the package directions—about 7-8 minutes. You want it al dente because it will continue cooking in the oven. Drain the pasta, but do not rinse it. The starch helps the sauce cling to the noodles.
- Make the cheese sauce. In a medium saucepan, melt 4 tablespoons of unsalted butter over medium heat. Whisk in the flour and cook for 1-2 minutes, stirring constantly. This is called a roux, and it should smell nutty but not brown. Slowly pour in the milk and heavy cream, whisking continuously to prevent lumps. Bring the mixture to a gentle simmer—you will see bubbles around the edges—and cook for 3-4 minutes until it thickens enough to coat the back of a spoon.
- Add the cheese. Remove the saucepan from heat. Stir in the sharp cheddar, white cheddar, and Gruyère one handful at a time. Keep stirring until the cheese is fully melted and the sauce is smooth. Add the Dijon mustard, garlic powder, salt, and pepper. Taste it—yes, right now—and adjust the seasoning. The sauce should be slightly salty because it will mellow out when mixed with the pasta.
- Combine the pasta and sauce. Pour the drained pasta into the pot with the cheese sauce. Stir gently with a wooden spoon until every piece of macaroni is coated. The sauce will seem a little thin, but do not worry—it will thicken as it bakes.
- Prepare the panko crust. In a small bowl, melt the remaining 2 tablespoons of butter. Mix in the panko breadcrumbs and paprika until the crumbs are evenly coated. The mixture should look like wet sand. If it seems dry, add another teaspoon of melted butter.
- Assemble the dish. Transfer the mac and cheese to your greased baking dish. Spread it out evenly with a spatula. Sprinkle the panko mixture over the top in an even layer. Do not press it down—you want those crumbs to stay light and crispy.
- Bake. Place the dish on the middle rack of your oven. Bake for 20-25 minutes, or until the sauce is bubbly around the edges and the top is golden brown. If the panko is browning too quickly, tent the dish with aluminum foil for the last 5 minutes.
- Rest before serving. Let the mac and cheese sit for 5-10 minutes after you pull it out of the oven. This allows the sauce to set, so it does not turn into a soupy mess when you scoop it. I know it is hard to wait, but trust me on this one.
Sensory cues: The roux should smell toasty but not burnt. The sauce should look glossy and smooth, not grainy. When you stir the pasta, you should hear a gentle slurping sound as the sauce coats each piece. The final dish should have a golden, crunchy top with creamy, tender pasta underneath.
Cooking Tips and Techniques
I have made every mistake in the book with this recipe, so you do not have to. Here is what I learned the hard way.
Do not overcook the pasta. I once boiled the macaroni until it was fully tender, and after baking, it turned into mush. Cook it al dente—firm to the bite—so it holds up during baking. Your teeth should feel a slight resistance when you test a piece.
Shred your own cheese. Pre-shredded cheese is coated with cellulose and potato starch to prevent clumping, which means it does not melt as smoothly. I learned this after a batch of grainy sauce that broke my heart. Spend the five minutes shredding a block—it makes a world of difference.
Low and slow for the sauce. When you add the milk to the roux, pour it in slowly while whisking constantly. If you dump it all at once, you will get lumps. I have done it, and it is a nightmare to fix. Keep the heat at medium, not high, to avoid scorching the milk.
Toast the panko ahead of time. For an extra-crispy crust, toast the panko in a dry skillet over medium heat for 2-3 minutes before mixing it with butter. I discovered this trick after a soggy topping ruined my first attempt. It is a small step with big results.
Multitasking is your friend. While the pasta boils, shred your cheese and make the roux. This way, everything comes together in under 30 minutes. I usually set a timer for the pasta and use that time to whisk the sauce. It keeps me from getting frazzled.
If the sauce separates. This happens when the cheese gets too hot. Remove the pot from the heat immediately and whisk in a tablespoon of cold milk. It usually brings the sauce back together. I have saved many a batch this way.
Variations and Adaptations
One of the best things about this cozy make-ahead baked mac and cheese with panko crust is how easy it is to customize. Here are some variations I have tried and loved.
- Add protein: Stir in 1 cup of cooked, crumbled bacon or diced ham before baking. I made this for a Super Bowl party, and it disappeared in minutes. You can also add shredded rotisserie chicken for a heartier meal.
- Vegetable boost: Fold in 1 cup of steamed broccoli florets or roasted cauliflower. The slight bitterness of the broccoli balances the rich cheese sauce. My kids actually eat their veggies this way, and that is saying something.
- Spicy kick: Add 1/2 teaspoon of cayenne pepper or a diced jalapeño to the cheese sauce. I tried this on a whim one winter, and it added such a nice warmth. Pair it with a crisp green salad to cool things down.
- Gluten-free version: Use gluten-free pasta and a 1:1 gluten-free flour blend for the roux. The texture is slightly different, but still delicious. I have served this to gluten-sensitive friends, and they never complained.
- Dairy-free adaptation: Substitute the butter with vegan butter, use unsweetened oat milk, and swap the cheese for a dairy-free cheddar shred. The panko crust stays the same. It is not exactly the same, but it scratches the comfort food itch.
- Seasonal twist: In the fall, mix in 1/2 cup of roasted butternut squash puree into the cheese sauce. It adds a subtle sweetness and a gorgeous orange color. I did this for Thanksgiving, and it was a hit.
My personal favorite variation is the bacon and broccoli combo. The salty crunch of the bacon pairs perfectly with the creamy sauce and the tender broccoli. I have made it three times this month alone.
Serving and Storage Suggestions
This dish is best served warm, straight from the oven, with the panko crust still crispy. Let it rest for 5-10 minutes after baking to let the sauce set. Scoop it onto plates with a large spoon, making sure each serving gets some of the crunchy topping.
For presentation, I like to garnish with a sprinkle of fresh parsley or chives. It adds a pop of color and a fresh note that cuts through the richness. Serve it alongside a simple green salad with a lemon vinaigrette or roasted vegetables like asparagus or green beans. For a cozy dinner, pair it with a bowl of tomato soup or a crusty baguette.
Storage: Leftovers can be stored in an airtight container in the refrigerator for up to 4 days. The panko crust will soften, but the flavor remains amazing. To reheat, place individual portions in the microwave for 1-2 minutes, or reheat the whole dish in a 350°F (175°C) oven for 15-20 minutes. If you want to revive the crunch, sprinkle a little extra panko on top before reheating.
Freezer instructions: This mac and cheese freezes beautifully. Assemble the dish completely, but do not bake it. Cover it tightly with aluminum foil and freeze for up to 3 months. When you are ready to bake, thaw it in the refrigerator overnight, then bake as directed, adding 10-15 minutes to the cooking time. I always keep one in the freezer for emergency comfort food cravings.
The flavors actually deepen after a day in the fridge. I honestly prefer the leftovers sometimes—the cheese sauce gets even creamier, and the pasta absorbs all that goodness. Just do not expect the crust to stay crispy after storage. That is a small trade-off for the convenience.
Nutritional Information and Benefits
Here is the estimated nutritional breakdown for one serving (based on 8 servings):
| Nutrient | Amount per Serving |
|---|---|
| Calories | 485 |
| Total Fat | 28 g |
| Saturated Fat | 17 g |
| Cholesterol | 85 mg |
| Sodium | 620 mg |
| Total Carbohydrates | 40 g |
| Dietary Fiber | 2 g |
| Sugars | 6 g |
| Protein | 20 g |
| Calcium | 350 mg |
| Iron | 2 mg |
This dish is a good source of calcium from the cheese and milk, which supports bone health. The protein content makes it a satisfying meal, especially when paired with a vegetable side. If you are watching your sodium, use low-sodium cheese and reduce the added salt. For a lighter version, substitute the heavy cream with evaporated milk and use reduced-fat cheese. It will not be as decadent, but it is still delicious.
From a wellness perspective, I believe comfort food has a place in a balanced diet. This mac and cheese is not an everyday meal, but it is perfect for those days when you need a little warmth and nostalgia. I always feel better after a bowl, and that counts for something.
Conclusion
This cozy make-ahead baked mac and cheese with panko crust is more than just a recipe—it is a hug in a baking dish. It started as a happy accident in my kitchen, and now it is the dish I turn to whenever I need comfort. Whether you are cooking for a crowd, meal-prepping for the week, or just treating yourself on a cold evening, this recipe delivers every time.
I encourage you to make it your own. Add your favorite mix-ins, adjust the cheese blend, or experiment with the toppings. That is the beauty of cooking—you get to put your own spin on things. And if you discover a variation you love, I would love to hear about it. Drop a comment below and share your creation. It makes my day when readers tell me how they made this recipe their own.
Thank you for spending time in my kitchen today. I hope this mac and cheese brings you the same warmth and joy it has brought me. Now go preheat that oven—your cozy night in is waiting.
Frequently Asked Questions
Can I use pre-shredded cheese for this recipe?
I really do not recommend it. Pre-shredded cheese has anti-caking agents that prevent it from melting smoothly, which can make your sauce grainy. Shredding a block of cheese takes just a few minutes and makes a huge difference in the texture.
How far in advance can I make this mac and cheese?
You can assemble the dish up to 24 hours before baking. Just cover it tightly with foil and store it in the refrigerator. When you are ready to bake, add 5-10 minutes to the cooking time since it starts cold. I have even prepped it two days ahead, and it was still perfect.
Why did my cheese sauce turn out lumpy?
Lumpy sauce usually happens when you add the milk too quickly or the heat is too high. Make sure to whisk constantly and pour the milk in a slow, steady stream. If you end up with lumps, you can use an immersion blender to smooth it out—I have done this more times than I care to admit.
Can I freeze this baked mac and cheese?
Absolutely. Assemble the dish without baking it, wrap it tightly in foil, and freeze for up to 3 months. Thaw it in the refrigerator overnight, then bake as directed, adding 10-15 minutes. I always keep one in the freezer for busy weeks.
What is the best pasta shape for this recipe?
Elbow macaroni is the classic choice, but I also love cavatappi or shells. The key is to use a shape with nooks and crannies that can hold onto the cheese sauce. Avoid long pasta like spaghetti—it just does not work as well for baked mac and cheese.
Pin This Recipe!
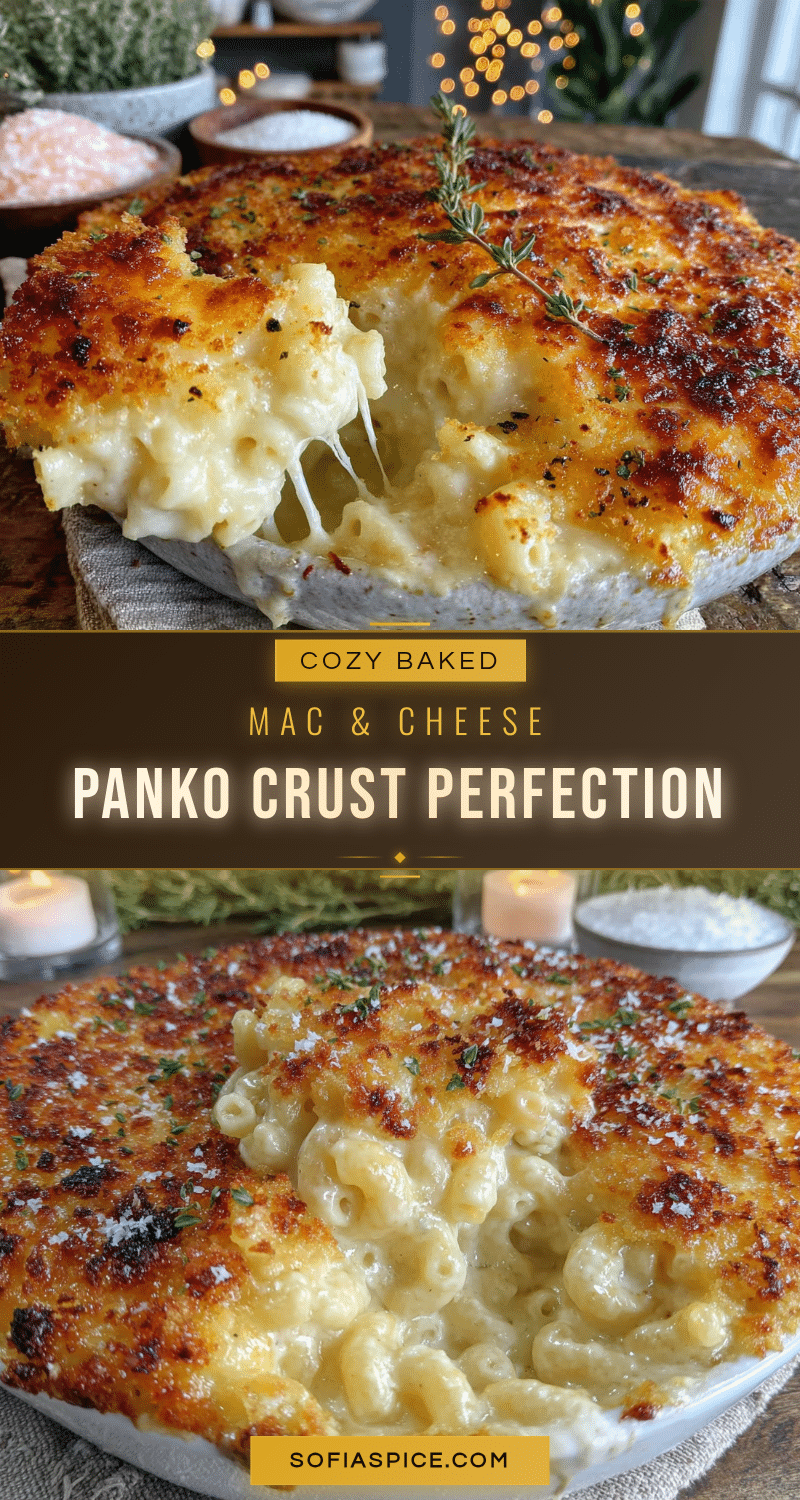
Cozy Make-Ahead Baked Mac and Cheese with Panko Crust
This creamy, decadent baked mac and cheese features a silky cheese sauce and a golden, crunchy panko crust. Perfect for make-ahead meals, potlucks, or cozy evenings, it’s the ultimate comfort food that started as a happy accident.
- Prep Time: 15 minutes
- Cook Time: 30 minutes
- Total Time: 45 minutes
- Yield: 8 servings 1x
- Category: Main Course
- Cuisine: American
Ingredients
- 16 oz (450 g) elbow macaroni
- 6 tbsp (85 g) unsalted butter, divided
- 1/4 cup (30 g) all-purpose flour
- 3 cups (720 ml) whole milk
- 1 cup (240 ml) heavy cream
- 2 cups (200 g) sharp cheddar cheese, shredded
- 1 cup (100 g) white cheddar cheese, shredded
- 1 cup (100 g) Gruyère cheese, shredded
- 1 tsp (5 ml) Dijon mustard
- 1/2 tsp (2 g) garlic powder
- 1 tsp (5 g) salt
- 1/2 tsp (1 g) black pepper
- 1 cup (80 g) panko breadcrumbs
- 1 tsp (2 g) paprika
Instructions
- Preheat your oven to 375°F (190°C). Grease a 9×13-inch baking dish with butter or non-stick spray.
- Cook the pasta: Bring a large pot of salted water to a boil. Add the elbow macaroni and cook for 1 minute less than package directions (about 7-8 minutes) until al dente. Drain, but do not rinse.
- Make the cheese sauce: In a medium saucepan, melt 4 tablespoons of unsalted butter over medium heat. Whisk in the flour and cook for 1-2 minutes, stirring constantly, until the roux smells nutty but not brown.
- Slowly pour in the milk and heavy cream, whisking continuously to prevent lumps. Bring to a gentle simmer and cook for 3-4 minutes until thickened enough to coat the back of a spoon.
- Remove the saucepan from heat. Stir in the sharp cheddar, white cheddar, and Gruyère one handful at a time until fully melted and smooth. Add the Dijon mustard, garlic powder, salt, and pepper. Adjust seasoning to taste.
- Combine pasta and sauce: Pour the drained pasta into the pot with the cheese sauce. Stir gently until every piece is coated.
- Prepare the panko crust: In a small bowl, melt the remaining 2 tablespoons of butter. Mix in the panko breadcrumbs and paprika until the crumbs are evenly coated (like wet sand).
- Assemble the dish: Transfer the mac and cheese to the greased baking dish and spread evenly. Sprinkle the panko mixture over the top in an even layer. Do not press down.
- Bake: Place the dish on the middle rack and bake for 20-25 minutes, until the sauce is bubbly around the edges and the top is golden brown. If browning too quickly, tent with aluminum foil for the last 5 minutes.
- Rest before serving: Let the mac and cheese sit for 5-10 minutes to allow the sauce to set before serving.
Notes
For extra-crispy panko, toast the breadcrumbs in a dry skillet over medium heat for 2-3 minutes before mixing with butter. If the sauce separates, remove from heat and whisk in a tablespoon of cold milk. Shred your own cheese for the smoothest sauce.
Nutrition
- Serving Size: 1 serving (about 1/8
- Calories: 485
- Sugar: 6
- Sodium: 620
- Fat: 28
- Saturated Fat: 17
- Carbohydrates: 40
- Fiber: 2
- Protein: 20
Keywords: baked mac and cheese, panko crust, make-ahead mac and cheese, comfort food, easy mac and cheese, creamy mac and cheese, potluck recipe, cozy dinner