I was standing in the Halloween aisle at the grocery store, staring at a bag of candy eyes and feeling a little defeated. Every cute dessert I saw online involved piping bags, melted chocolate that seized up on me, and hours I just did not have. My niece’s Halloween party was the next day, and I had promised to bring something spooky. I wanted it to look like I tried, but honestly, I needed it to be easy. I grabbed a pack of Oreos on a whim, threw some cream cheese in my cart, and figured I would just make truffles. The black cat idea hit me when I saw a bag of candy corn—those little orange triangles looked just like tiny cat ears. That night, standing over my mixing bowl, I realized I had finally found a Halloween treat that did not require a pastry degree. It was just three ingredients, zero baking, and somehow, it turned into the cutest thing I had ever made. These Easy Black Cat Oreo Truffles have been my go-to ever since.
Why You Will Love This Recipe
Let me tell you, these truffles check every box you could want for a Halloween dessert. They are ridiculously simple, but they look like you spent hours. That is the kind of magic we all need in October.
- No Baking Required: Seriously, you do not even turn on the oven. This is a no-bake recipe from start to finish, which means no heating up your kitchen and no worrying about burning anything.
- Only a Few Ingredients: You only need Oreos, cream cheese, and melting chocolate. Everything else is just for decoration. You probably have most of this in your pantry already.
- Perfect for Halloween Parties: These little black cats are the star of any spooky spread. Kids go crazy for them, and adults sneak them when they think no one is looking.
- Totally Customizable: You can swap the candy eyes for different colors or use white chocolate for a ghost version. The base recipe is a blank canvas.
- Make-Ahead Friendly: You can prep these days in advance. They actually taste better after they have sat in the fridge for a day.
What makes these different from other Oreo truffle recipes is the shaping. I spent an afternoon figuring out how to get the ears just right without them falling off. The trick is to chill the truffle balls before you attach the ears, and to use a tiny dab of melted chocolate as glue. It sounds simple, but it saves you so much frustration. These truffles are the kind of treat that makes you close your eyes after the first bite—creamy, crunchy, and perfectly sweet. They are comfort food for the Halloween season, made in minutes, with the same soul-soothing satisfaction as a classic cookie.
What Ingredients You Will Need
This recipe uses simple, pantry-friendly ingredients to deliver big flavor and adorable results without any fuss. You likely have most of these on hand already.
- 1 (14.3 oz) package Oreo cookies (regular, not Double Stuf) – You will use the whole cookie, cream filling and all. I recommend using the original Oreos for the best texture. Double Stuf makes the truffle too soft and sticky to shape.
- 8 oz cream cheese, softened to room temperature – This is the binder. Full-fat cream cheese gives the best creamy texture. Let it sit out for about 30 minutes before you start so it mixes smoothly. I prefer Philadelphia brand for consistent results.
- 12 oz (about 2 cups) black melting wafers or dark chocolate chips – Black candy melts give that perfect cat color. If you use dark chocolate chips, add a teaspoon of coconut oil to thin them out for dipping. I like the Wilton brand candy melts for their smooth finish.
- 1 tablespoon coconut oil or vegetable shortening (optional, for thinning chocolate) – This helps the chocolate coating stay thin and smooth. Skip it if your candy melts are already very fluid.
- Candy eyes (about 24 pairs) – You can find these at any craft store or online. The small 6mm size works best for these truffles.
- Yellow or orange candy corn (about 48 pieces) – These become the cat ears. Look for the classic brach’s brand. You will cut the white tip off each piece.
- Pink or black decorating icing (optional, for noses and whiskers) – A tiny tube of icing is perfect for drawing faces. I use the black gel icing for whiskers and pink for little noses.
- Parchment paper or a silicone baking mat – For setting the dipped truffles. Nothing sticks to parchment.
Substitution Tip: If you cannot find black candy melts, use dark chocolate and add a tiny bit of black food coloring gel. Do not use liquid food coloring, or the chocolate will seize. For a gluten-free version, use gluten-free chocolate sandwich cookies. They work exactly the same way.
Equipment Needed
You do not need a lot of fancy tools for this recipe. That is part of the beauty.
- Food processor – For crushing the Oreos into fine crumbs. A blender works too, but a food processor is faster and more consistent.
- Large mixing bowl – To combine the Oreo crumbs and cream cheese.
- Small cookie scoop or tablespoon – For portioning the truffle mixture evenly. A #70 scoop is perfect for this size.
- Baking sheet lined with parchment paper – For chilling the truffle balls and setting the dipped truffles.
- Microwave-safe bowl – For melting the chocolate. Glass or ceramic works best.
- Fork or dipping tool – For dipping the truffles into the melted chocolate. A regular dinner fork works fine.
- Toothpicks – Helpful for attaching the candy eyes and ears before the chocolate sets.
Budget-Friendly Tip: If you do not own a food processor, put the Oreos in a zip-top bag and crush them with a rolling pin. It takes a little elbow grease, but it works perfectly. I have done it that way plenty of times when my food processor was in the dishwasher.
Preparation Method
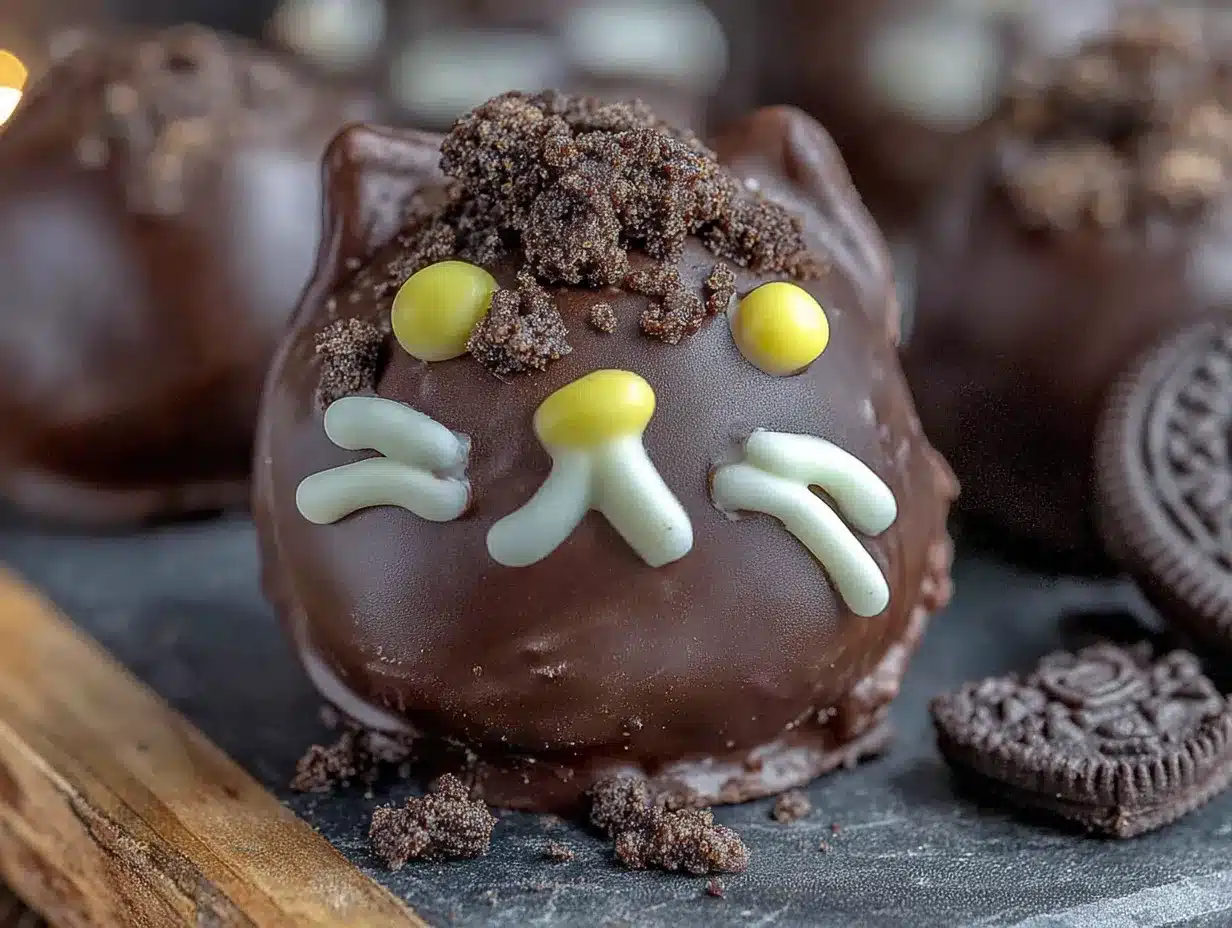
Follow these steps carefully, and you will have a tray of the cutest black cat truffles you have ever seen. Take your time with the chilling steps—they make all the difference.
- Crush the Oreos: Place the entire package of Oreos (cream filling included) into your food processor. Pulse until you have fine, sand-like crumbs. No large chunks should remain. Set aside about 2 tablespoons of the crumbs for later decoration if you want.
- Mix the dough: In a large bowl, combine the Oreo crumbs with the softened cream cheese. Use a spatula or your hands to mix until fully incorporated. The mixture should look like a thick, dark dough. It will be slightly sticky but should hold together when pressed.
- Chill the mixture: Cover the bowl with plastic wrap and refrigerate for at least 30 minutes. This step is non-negotiable. A chilled mixture is much easier to roll into balls without it sticking to your hands.
- Form the truffle bodies: Using your cookie scoop or a tablespoon, portion out the mixture. Roll each portion into a smooth ball, about 1 inch in diameter. Place each ball on the parchment-lined baking sheet. You should get about 24 truffles.
- Second chill: Place the baking sheet with the truffle balls in the refrigerator for another 20 minutes. They need to be firm before you dip them.
- Prepare the ears: While the truffles chill, prepare your candy corn ears. Take each piece of candy corn and cut off the white tip with a sharp knife. You only want the orange or yellow triangle part. You will need two triangles per truffle.
- Melt the chocolate: Put the black melting wafers in a microwave-safe bowl. Microwave in 30-second intervals, stirring after each, until completely smooth. If the chocolate is too thick, stir in the coconut oil or shortening. It should be thin enough to coat the back of a spoon.
- Dip the truffles: Remove the truffle balls from the fridge. Working one at a time, drop a truffle ball into the melted chocolate. Use a fork to gently roll it around until fully coated. Lift it out with the fork and tap the handle against the bowl to let excess chocolate drip off. Gently slide the truffle off the fork onto the parchment paper.
- Attach the ears and eyes (while chocolate is wet): Immediately after placing the dipped truffle on the parchment, press two candy corn triangles (pointy side up) into the top of the truffle for ears. Then, press two candy eyes into the front. The wet chocolate acts as glue. Work quickly before the chocolate sets.
- Set the truffles: Let the truffles sit at room temperature until the chocolate is completely set, about 15-20 minutes. If you are in a hurry, pop the baking sheet in the refrigerator for 10 minutes.
- Add faces (optional): Once the chocolate is firm, use the decorating icing to draw tiny pink noses and black whiskers on each cat. This step is purely for cuteness, but it really brings them to life.
- Final chill: Refrigerate the finished truffles for at least 30 minutes before serving. This allows the filling to fully firm up and the flavors to meld.
Sensory Cue: When you mix the cream cheese into the Oreo crumbs, the dough should feel like soft, pliable play-dough. It should not be greasy or sticky. If it feels too sticky, add a few more crushed Oreos. If it feels too dry, add another tablespoon of cream cheese.
Cooking Tips and Techniques
I have made these truffles more times than I can count, and I have definitely learned a few things the hard way. Here are my best tips to save you from my mistakes.
Keep everything cold. This is the number one rule for truffles. If your mixture gets too warm, it becomes a sticky mess that is impossible to roll. I learned this the hard way when I tried to rush the process and ended up with Oreo paste all over my fingers. Chill the dough, chill the balls, and work in batches if your kitchen is warm.
Use a fork for dipping. A fork lets the excess chocolate drip off cleanly. Do not use tongs or your fingers. The chocolate will pool at the bottom of the truffle if you do not let the excess drip off. Give the fork a few good taps on the edge of the bowl.
Work in small batches. Only take 3-4 truffle balls out of the fridge at a time. If you take them all out at once, they will warm up and get soft. Keep the rest chilled until you are ready to dip them.
Do not over-melt the chocolate. Chocolate burns easily. Microwave in short bursts and stir often. If your chocolate looks thick or grainy, you have overheated it. Add a teaspoon of coconut oil and stir vigorously to try to save it.
Timing is everything for the decorations. The candy eyes and ears need to go on while the chocolate is still wet. If you wait too long, the chocolate will form a skin and the decorations will just slide off. I usually dip one truffle, decorate it, then move to the next one.
Variations and Adaptations
These truffles are incredibly versatile. Once you have the basic technique down, you can change them up for any holiday or occasion.
- Pumpkin Cat Truffles: Use orange candy melts instead of black. Attach green candy corn for ears and draw a little stem on top. These are perfect for a fall party or Thanksgiving. I made these for a friend’s autumn brunch, and they were gone in ten minutes.
- White Chocolate Ghost Truffles: Dip the truffles in white chocolate. Use mini chocolate chips for eyes and a tiny dot of black icing for a mouth. They look like adorable little ghosts. This is a great option if you cannot find black candy melts.
- Gluten-Free Version: Simply swap the regular Oreos for gluten-free chocolate sandwich cookies. The rest of the recipe stays exactly the same. Nobody will taste the difference.
- Peanut Butter Cat Truffles: Add 2 tablespoons of creamy peanut butter to the cream cheese mixture before mixing in the Oreo crumbs. It adds a salty, nutty depth that pairs beautifully with the chocolate. You can also use peanut butter Oreos for an even stronger flavor.
- Vegan Adaptation: Use vegan cream cheese and dairy-free chocolate sandwich cookies. Most dark chocolate candy melts are naturally dairy-free, but always check the label. This version is just as creamy and delicious.
Serving and Storage Suggestions
These truffles are best served cold, straight from the refrigerator. The filling is firm and creamy, and the chocolate shell has a satisfying snap. Arrange them on a platter lined with black or orange tissue paper for a spooky presentation. You can also place each truffle in a mini cupcake liner for easy grabbing at parties.
Storage: Keep the truffles in an airtight container in the refrigerator. They will stay fresh for up to one week. I actually think they taste better on day two or three, after the flavors have had time to meld together.
Freezing: These truffles freeze beautifully. Place them in a single layer on a baking sheet and freeze until solid, about 1 hour. Then transfer them to a freezer-safe bag or container. They will keep for up to 3 months. Thaw them in the refrigerator overnight before serving. Do not thaw them at room temperature, or they will get soggy.
Reheating: You do not need to reheat these. Just take them out of the fridge about 5 minutes before serving to take the chill off. They are best enjoyed cold.
Flavor Development: The Oreo crumbs soften slightly over time, creating a texture that is almost like a fudgy cake ball. The cream cheese flavor mellows out and blends with the chocolate. This is why I always recommend making them a day ahead.
Nutritional Information and Benefits
These are a treat, so they are not exactly health food. But knowing what is in them helps you enjoy them mindfully. Here is the estimated nutrition for one truffle (based on 24 servings).
- Calories: ~150
- Fat: 9g
- Carbohydrates: 18g
- Protein: 2g
- Sugar: 12g
Health Benefits: The cream cheese provides a small amount of calcium and protein. Oreos contain a little bit of iron from the enriched flour. The dark chocolate (if you use it) contains antioxidants. Honestly, the biggest benefit is the joy they bring. A little sweetness goes a long way for your mood.
Dietary Considerations: This recipe is vegetarian. It can be made gluten-free and vegan with simple substitutions. It contains dairy, gluten (unless substituted), and soy (from the chocolate). Always check your ingredient labels if you are cooking for someone with allergies.
I personally love that I can make a big batch of these and not feel guilty about having one or two. They are portion-controlled treats that satisfy a sweet craving without sending you into a sugar coma.
Conclusion
These Easy Black Cat Oreo Truffles are the Halloween treat you have been looking for. They are simple enough for a weeknight baking session with your kids, but cute enough to impress at a costume party. The combination of crunchy Oreo, creamy filling, and smooth chocolate is timeless. And honestly, watching people’s faces light up when they see these little cats is the best part.
I encourage you to make these your own. Use different colored candy melts for different holidays. Add a little peppermint extract for Christmas. Swap the candy corn for pretzel sticks to make spider legs. The base recipe is foolproof, so feel free to experiment. If you are looking for another easy no-bake dessert, try my Easy Candy Corn Bark for another three-ingredient winner.
I would love to see your creations. Tag me in your photos or leave a comment below telling me how they turned out. Did you add whiskers? Did you make them into ghosts? Share your versions. And if you are hosting a full Halloween spread, these pair perfectly with a batch of Peanut Butter Football Rice Krispie Treats for a themed dessert table. Happy Halloween, and happy snacking!
Frequently Asked Questions
Can I use Double Stuf Oreos for this recipe?
I do not recommend it. Double Stuf Oreos have too much cream filling, which makes the truffle mixture too soft and sticky. It becomes very difficult to roll into balls, and the final texture is more gooey than creamy. Stick with the original Oreos for the best results.
How far in advance can I make these truffles?
You can make them up to one week ahead of time. Store them in an airtight container in the refrigerator. They actually taste better after a day or two because the flavors have time to meld. You can also freeze them for up to three months.
My chocolate seized up and became grainy. What went wrong?
This usually happens when the chocolate gets too hot or when a tiny amount of water gets into the bowl. Always microwave in short 30-second bursts and stir well. Make sure your bowl and utensils are completely dry. If your chocolate seizes, you can try to save it by stirring in a teaspoon of coconut oil or vegetable shortening.
Can I use white chocolate instead of black candy melts?
Absolutely! White chocolate makes adorable ghost truffles. Just use mini chocolate chips for the eyes and a dot of black icing for the mouth. You can also color the white chocolate with gel food coloring to make orange pumpkins or green monsters.
How do I keep the candy eyes from falling off?
The key is to attach them while the chocolate coating is still wet. Work one truffle at a time. Dip it, place it on the parchment, and immediately press the eyes and ears into the wet chocolate. If the chocolate starts to set before you are done, dip the candy pieces in a tiny bit of melted chocolate before pressing them on to act as glue.
Pin This Recipe!

Easy Black Cat Oreo Truffles: Best Homemade Halloween Treat

These Easy Black Cat Oreo Truffles are a no-bake Halloween treat made with just Oreos, cream cheese, and chocolate. They are simple to make, adorable, and perfect for parties.
- Prep Time: 30 minutes
- Cook Time: 0 minutes
- Total Time: 1 hour 20 minutes
- Yield: 24 servings 1x
- Category: Dessert
- Cuisine: American
Ingredients
- 1 (14.3 oz) package Oreo cookies (regular, not Double Stuf)
- 8 oz cream cheese, softened to room temperature
- 12 oz (about 2 cups) black melting wafers or dark chocolate chips
- 1 tablespoon coconut oil or vegetable shortening (optional, for thinning chocolate)
- Candy eyes (about 24 pairs)
- Yellow or orange candy corn (about 48 pieces)
- Pink or black decorating icing (optional, for noses and whiskers)
- Parchment paper or a silicone baking mat
Instructions
- Crush the Oreos: Place the entire package of Oreos (cream filling included) into your food processor. Pulse until you have fine, sand-like crumbs. No large chunks should remain. Set aside about 2 tablespoons of the crumbs for later decoration if you want.
- Mix the dough: In a large bowl, combine the Oreo crumbs with the softened cream cheese. Use a spatula or your hands to mix until fully incorporated. The mixture should look like a thick, dark dough. It will be slightly sticky but should hold together when pressed.
- Chill the mixture: Cover the bowl with plastic wrap and refrigerate for at least 30 minutes. This step is non-negotiable. A chilled mixture is much easier to roll into balls without it sticking to your hands.
- Form the truffle bodies: Using your cookie scoop or a tablespoon, portion out the mixture. Roll each portion into a smooth ball, about 1 inch in diameter. Place each ball on the parchment-lined baking sheet. You should get about 24 truffles.
- Second chill: Place the baking sheet with the truffle balls in the refrigerator for another 20 minutes. They need to be firm before you dip them.
- Prepare the ears: While the truffles chill, prepare your candy corn ears. Take each piece of candy corn and cut off the white tip with a sharp knife. You only want the orange or yellow triangle part. You will need two triangles per truffle.
- Melt the chocolate: Put the black melting wafers in a microwave-safe bowl. Microwave in 30-second intervals, stirring after each, until completely smooth. If the chocolate is too thick, stir in the coconut oil or shortening. It should be thin enough to coat the back of a spoon.
- Dip the truffles: Remove the truffle balls from the fridge. Working one at a time, drop a truffle ball into the melted chocolate. Use a fork to gently roll it around until fully coated. Lift it out with the fork and tap the handle against the bowl to let excess chocolate drip off. Gently slide the truffle off the fork onto the parchment paper.
- Attach the ears and eyes (while chocolate is wet): Immediately after placing the dipped truffle on the parchment, press two candy corn triangles (pointy side up) into the top of the truffle for ears. Then, press two candy eyes into the front. The wet chocolate acts as glue. Work quickly before the chocolate sets.
- Set the truffles: Let the truffles sit at room temperature until the chocolate is completely set, about 15-20 minutes. If you are in a hurry, pop the baking sheet in the refrigerator for 10 minutes.
- Add faces (optional): Once the chocolate is firm, use the decorating icing to draw tiny pink noses and black whiskers on each cat. This step is purely for cuteness, but it really brings them to life.
- Final chill: Refrigerate the finished truffles for at least 30 minutes before serving. This allows the filling to fully firm up and the flavors to meld.
Notes
Keep everything cold for easy handling. Use a fork for dipping to let excess chocolate drip off. Work in small batches, taking only 3-4 truffle balls out of the fridge at a time. Attach decorations while chocolate is still wet. For best flavor, make a day ahead.
Nutrition
- Serving Size: 1 truffle
- Calories: 150
- Sugar: 12
- Sodium: 95
- Fat: 9
- Saturated Fat: 4
- Carbohydrates: 18
- Fiber: 1
- Protein: 2
Keywords: Halloween treats, Oreo truffles, no-bake dessert, black cat truffles, easy Halloween dessert, Oreo balls, candy corn ears


