The lunchbox came home empty. Not just the turkey roll-ups, but the little container of cucumber slices too. My second-grader, who has a habit of trading half her lunch away, actually ate everything. She asked me to make them again the next morning before I’d even finished my coffee. That’s when I knew these healthy turkey roll-ups for school lunches were something special.
Honestly, I stumbled into this recipe out of desperation. Mornings at our house are chaotic enough without trying to assemble a Pinterest-worthy lunch at 7 AM. I needed something fast, something my kids would actually eat, and something that wouldn’t make me feel guilty about what I was packing. Most store-bought lunch options are either processed within an inch of their life or so boring they end up in the trash. These roll-ups solved all of that.
The first batch I made was a little messy. The cream cheese was too cold, the turkey tore when I rolled it, and I used way too much filling. But even that imperfect version got devoured. Over the next few weeks, I tweaked and tested until I landed on this version. It’s the one I make on Sunday nights while meal-prepping, the one my kids request for field trips, and the one that makes other parents ask for the recipe at pickup. These healthy turkey roll-ups for school lunches have become our go-to, and I think they’ll become yours too.
Why You’ll Love This Recipe
Let me tell you why these roll-ups have earned a permanent spot in our lunch rotation. I’ve tested a lot of lunch ideas over the years, and most of them fall into one of two categories: too complicated for a weekday morning or so simple they’re boring. These turkey roll-ups hit that sweet spot in between.
- Quick & Easy: Each roll-up takes about two minutes to assemble. You can make a whole week’s worth in under fifteen minutes on Sunday. That’s less time than you’d spend standing in the school drop-off line.
- Simple Ingredients: You need four main ingredients, and you probably already have three of them in your fridge. No trips to specialty stores or hunting for obscure items. Just real food that works.
- Perfect for Lunchboxes: These hold up beautifully in a lunchbox. They don’t get soggy, they don’t leak, and they’re easy for little hands to manage. My kids say they’re “lunchable but better,” which I take as high praise.
- Crowd-Pleaser: I’ve served these at playdates, packed them for school field trips, and even brought them to a work potluck. Kids and adults both go for them. My husband steals them from the fridge when he’s looking for a quick snack.
- Unbelievably Delicious: The combination of creamy cheese, savory turkey, and fresh veggies wrapped in a soft tortilla is simple but so satisfying. The texture is perfect, and the flavor is mild enough for picky eaters but interesting enough for adults.
What makes these different from every other turkey roll-up recipe out there is the technique. I add a thin layer of cream cheese mixed with ranch seasoning, which gives it that tangy, herby flavor kids love. Then I layer fresh spinach leaves and shredded carrots for crunch and nutrition. The trick is to spread the cream cheese all the way to the edges of the tortilla so every bite has flavor. No dry, boring bites in these roll-ups.
This is the kind of lunch that makes you feel good about what you’re sending to school. It’s protein-packed, full of veggies, and actually tastes like something your kid would choose to eat. Not because you tricked them, but because it’s genuinely good. That’s the kind of win we all need on a busy school morning.
What Ingredients You Will Need
This recipe uses simple, wholesome ingredients to deliver bold flavor and satisfying texture without the fuss. Most of these are pantry staples, and the ones that aren’t are easy to find at any grocery store.
- Flour tortillas (8-inch) – Look for soft, pliable tortillas that won’t crack when you roll them. I prefer Mission brand for their consistency, but any brand works. You can also use whole wheat tortillas for extra fiber, or spinach wraps for a fun green color that kids love.
- Turkey slices – Use deli-style turkey breast, preferably oven-roasted or smoked. I buy Boar’s Head or Applegate Farms for the cleanest ingredients, but any good-quality turkey works. Avoid honey-roasted or flavored varieties, as they can be too sweet. You’ll need about 2 slices per roll-up.
- Cream cheese – Full-fat cream cheese works best for spreading and holding the roll-ups together. Let it soften at room temperature for about 15 minutes before mixing. If you’re dairy-free, Kite Hill makes a great plant-based cream cheese alternative.
- Ranch seasoning mix – A single packet of Hidden Valley ranch seasoning is perfect. You won’t use the whole packet for one batch, so save the rest for another use. If you want to make your own, mix dried dill, dried parsley, garlic powder, onion powder, salt, and pepper.
- Fresh spinach leaves – Baby spinach works best because it’s tender and won’t create a bulky texture. Wash and dry the leaves thoroughly before using. You can substitute arugula for a peppery kick or leave the greens out entirely for pickier eaters.
- Shredded carrots – Pre-shredded carrots from the store save time, but you can also shred your own. They add a subtle sweetness and a nice crunch. If you don’t like carrots, try shredded zucchini (squeeze out the moisture first) or finely chopped bell peppers.
- Shredded cheddar cheese – Sharp cheddar adds the most flavor, but mild cheddar works too. Shred your own cheese from a block for better melting and less starch. You can substitute Monterey Jack, pepper jack for heat, or leave the cheese out for a dairy-free version.
One thing I’ve learned from making these so many times: the quality of your tortillas matters more than you think. Cheap tortillas tend to crack when you roll them, especially if they’re not fresh. Warm them slightly in the microwave for about 10 seconds if they feel stiff. That extra step makes a huge difference in how easy they are to work with.
For the cream cheese mixture, I like to let it sit out for a bit before mixing. Cold cream cheese doesn’t spread evenly and will tear your tortilla. If you’re in a hurry, microwave it for 10 seconds, but watch it carefully. You want it softened, not melted.
Equipment Needed
You don’t need fancy equipment for these turkey roll-ups. That’s part of what makes them so great for busy mornings. Here’s what you’ll need:
- Cutting board – A large, flat surface for assembling the roll-ups. I prefer a wooden board because it doesn’t slide around, but plastic works fine too.
- Butter knife or offset spatula – For spreading the cream cheese mixture evenly across the tortilla. An offset spatula gives you the smoothest layer, but a regular butter knife works perfectly.
- Sharp knife – For slicing the finished roll-ups into pinwheels. A serrated knife works best because it cuts through the tortilla without squishing it. A chef’s knife also works if it’s sharp.
- Small mixing bowl – To mix the cream cheese and ranch seasoning together. Any small bowl will do, even a cereal bowl.
- Plastic wrap or wax paper – To wrap the roll-ups tightly before chilling. This helps them hold their shape and keeps them fresh.
- Toothpicks – Optional, but helpful for keeping the roll-ups secure if you’re packing them for lunch. Kids can remove them before eating.
If you don’t have a serrated knife, don’t worry. I’ve made these with a regular chef’s knife for years, and they turn out fine. The key is to use a gentle sawing motion rather than pressing down hard. That prevents the tortilla from getting squished.
For storage, I recommend using glass meal prep containers with tight-fitting lids. They keep the roll-ups fresh without making them soggy. If you’re packing them directly into a lunchbox, place them in a small container or wrap them tightly in beeswax wrap.
Preparation Method
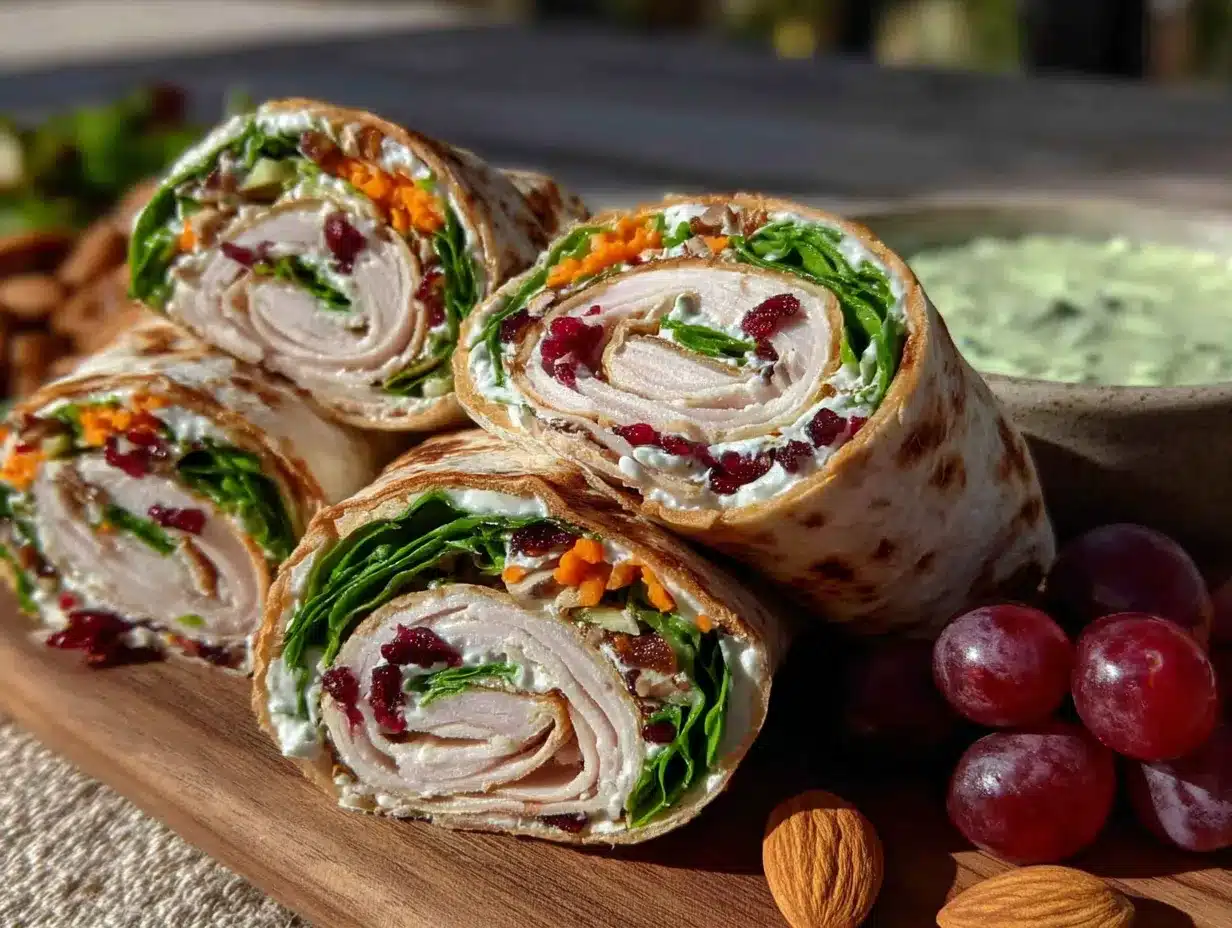
Let me walk you through how to make these turkey roll-ups step by step. I’ve included all my little tricks and tips so yours turn out perfect the first time.
- Soften the cream cheese – Take your cream cheese out of the fridge about 15 minutes before you start. Cut it into smaller pieces to speed up the softening process. If you’re short on time, microwave it for 10 seconds, then check it. You want it soft enough to spread easily but not warm or runny.
- Mix the cream cheese spread – In a small bowl, combine 4 ounces of softened cream cheese with 1 tablespoon of ranch seasoning mix. Stir until smooth and well combined. Taste it and adjust the seasoning if needed. I like mine on the tangier side, so I sometimes add an extra half teaspoon of seasoning.
- Prepare your work surface – Lay a flour tortilla flat on your cutting board. Make sure the surface is clean and dry. If your tortillas are cold, warm them in the microwave for 10 seconds to make them more pliable.
- Spread the cream cheese mixture – Using your butter knife or offset spatula, spread a thin, even layer of the cream cheese mixture over the entire surface of the tortilla. Go all the way to the edges. This is important because it helps everything stick together and ensures every bite has flavor. Don’t use too much, or it will squeeze out when you roll it.
- Layer the turkey – Place 2 slices of turkey evenly over the cream cheese. Overlap them slightly to cover the tortilla completely. If your turkey slices are small, use 3 slices. The turkey should cover the tortilla in a single layer without big gaps.
- Add the cheese – Sprinkle about 2 tablespoons of shredded cheddar cheese over the turkey. Spread it evenly, leaving a small border around the edges. If you’re using a different cheese, make sure it’s finely shredded so it distributes evenly.
- Add the veggies – Place a small handful of fresh spinach leaves over the cheese, then sprinkle about 1 tablespoon of shredded carrots on top. Don’t overstuff it, or the roll-up will be too thick to roll easily. You want a thin, even layer of veggies.
- Roll it up tightly – Starting at the bottom edge, roll the tortilla away from you as tightly as you can without tearing it. Use your fingers to tuck in the filling as you go. When you reach the end, place the roll seam-side down. The cream cheese acts as glue to hold it closed.
- Wrap and chill – Wrap each roll tightly in plastic wrap or wax paper. Place them in the refrigerator for at least 30 minutes. This step is crucial because it allows the cream cheese to firm up, which makes slicing much easier. If you’re making these for the next day, you can leave them wrapped overnight.
- Slice into pinwheels – Once the rolls are chilled, unwrap them and place them on your cutting board. Using a sharp serrated knife, slice each roll into 1-inch pieces. Use a gentle sawing motion and don’t press down hard. You should get about 6 to 8 pinwheels per roll-up.
One thing I learned the hard way: don’t skip the chilling step. The first time I made these, I was in a hurry and sliced them right after rolling. The cream cheese was still soft, and the pinwheels fell apart. They still tasted good, but they looked like a mess. Chilling them for even 20 minutes makes a huge difference.
If you’re packing these for lunch, arrange the pinwheels in a single layer in your container. Place a small piece of parchment paper between layers if you’re stacking them. They’ll stay fresh in the fridge for up to 4 days.
Cooking Tips & Techniques
After making these turkey roll-ups dozens of times, I’ve picked up a few tricks that make them turn out better every time. Let me share what I’ve learned so you can skip the trial and error.
Don’t overfill your roll-ups. This is the most common mistake I see. It’s tempting to pile on the ingredients, especially if you’re trying to make them more filling. But too much filling makes the tortilla hard to roll and causes everything to squeeze out the ends. Stick to thin, even layers. If you want more protein or veggies, make an extra roll-up instead of overstuffing one.
Warm your tortillas slightly. Cold tortillas crack when you roll them, especially if they’ve been in the fridge. Microwave them for 10 seconds, or warm them in a dry skillet for about 15 seconds per side. They should be pliable but not hot. This small step prevents those frustrating tears that ruin a perfectly good roll-up.
Use a serrated knife for slicing. I can’t stress this enough. A serrated knife cuts through the tortilla cleanly without squishing the filling. If you use a dull knife, you’ll end up with flattened, misshapen pinwheels. If you don’t have a serrated knife, make sure your chef’s knife is very sharp.
Chill before slicing. I mentioned this in the method, but it’s worth repeating. Chilling the rolled tortillas firms up the cream cheese and makes the whole structure more stable. If you’re in a rush, pop them in the freezer for 10 minutes instead of the fridge for 30. That works in a pinch.
Pat your veggies dry. If you’re using fresh spinach or shredded carrots, make sure they’re dry before adding them to the roll-up. Excess moisture will make the tortilla soggy, especially if you’re making these ahead of time. I lay my spinach on a paper towel and pat it dry before using.
Make them ahead of time. These roll-ups actually taste better after they’ve sat in the fridge for a few hours. The flavors meld together, and the texture firms up nicely. I make a batch on Sunday evening and pack them for the whole week. They stay fresh for up to 4 days in an airtight container.
Double the batch for busy weeks. These freeze surprisingly well. Wrap each roll tightly in plastic wrap, then place them in a freezer bag. They’ll keep for up to 2 months. When you’re ready to use them, thaw them in the fridge overnight, then slice them in the morning. This is a lifesaver on those weeks when you know mornings will be chaotic.
Variations & Adaptations
One of the best things about this recipe is how easy it is to customize. I’ve tried dozens of variations over the years, and here are my favorites.
Mediterranean Turkey Roll-Ups – Swap the cheddar cheese for crumbled feta and replace the ranch seasoning with a mix of dried oregano, garlic powder, and a squeeze of lemon juice. Add sliced Kalamata olives and roasted red peppers instead of carrots. This version is perfect for adults who want something more sophisticated. I make these for my own lunch when I want a break from the kid-friendly version.
Low-Carb Turkey Roll-Ups – Replace the flour tortilla with large lettuce leaves, like romaine or butter lettuce. Spread the cream cheese mixture directly on the lettuce, then layer the turkey, cheese, and veggies. Roll it up carefully and secure with a toothpick. These are great for anyone watching their carb intake, and they’re surprisingly sturdy. I’ve been known to make these for myself when I’m trying to cut back on bread.
Spicy Turkey Roll-Ups – Add a thin layer of sriracha or chipotle mayo to the cream cheese mixture for a kick of heat. Use pepper jack cheese instead of cheddar, and add sliced jalapeños if you’re feeling brave. My husband loves this version, and it’s become his go-to lunchbox option for work.
Veggie-Packed Roll-Ups – For kids who need extra vegetables, add thin slices of cucumber, bell pepper, or avocado. Just make sure to pat them dry first to prevent sogginess. I’ve also tried adding shredded zucchini (squeeze out the moisture first) and finely chopped broccoli. My kids don’t even notice the extra veggies.
Dairy-Free Turkey Roll-Ups – Use dairy-free cream cheese and omit the shredded cheese. Most dairy-free cream cheeses spread well and have a similar tangy flavor. I’ve used Kite Hill and Violife brands with good results. The roll-ups still hold together perfectly.
Breakfast Turkey Roll-Ups – Add a scrambled egg to the filling for a breakfast version. Spread the cream cheese, add the turkey, then layer on a scrambled egg and some shredded cheese. Roll and slice as usual. These are great for busy mornings when you need breakfast on the go.
If you love easy lunchbox ideas, you might also enjoy these mini chicken Caesar wraps or these no-bake peanut butter oat energy bars. Both are perfect for busy school mornings and use similar simple ingredients.
Serving & Storage Suggestions
These turkey roll-ups are incredibly versatile when it comes to serving. Here’s how I like to pack them and serve them.
Serving temperature – These are best served cold or at room temperature. If you’re packing them for lunch, they’ll be perfect by the time lunch rolls around. If you’re serving them as a snack, take them out of the fridge about 10 minutes before serving to take the chill off.
Presentation ideas – For school lunches, I arrange the pinwheels in a bento box with compartments. I add some grapes or apple slices, a small container of ranch dressing for dipping, and a fun treat like a soft frosted sugar cookie for dessert. The colorful pinwheels look so appealing in the lunchbox, and my kids love the variety.
What to serve with them – These roll-ups pair well with fresh fruit, veggie sticks, yogurt cups, or a small salad. For a complete lunch, add some cherry tomatoes, cucumber slices, and a handful of pretzels or crackers. My kids also love them with a side of apple slices and a small cheese stick.
Storage instructions – Store the sliced pinwheels in an airtight container in the refrigerator for up to 4 days. Place a paper towel at the bottom of the container to absorb any excess moisture. If you’re storing the whole rolls (unsliced), wrap them tightly in plastic wrap and refrigerate for up to 5 days.
Freezing instructions – To freeze, wrap each whole roll tightly in plastic wrap, then place them in a freezer-safe bag or container. They’ll keep for up to 2 months. When you’re ready to use them, thaw them in the refrigerator overnight. Slice them in the morning before packing. I don’t recommend freezing the sliced pinwheels because they can get mushy when thawed.
Reheating tips – These are meant to be eaten cold, so reheating isn’t necessary. If you prefer them slightly warm, you can microwave a few pinwheels for 15 seconds, but the texture will be softer. For a warm lunch option, try these easy turkey pesto pinwheel wraps instead.
How flavors develop – These roll-ups actually taste better after they’ve sat in the fridge for a few hours. The flavors meld together, and the cream cheese firms up to create a perfect texture. If you can, make them the night before you plan to serve them. The difference is subtle but noticeable.
Nutritional Information & Benefits
These turkey roll-ups are packed with nutrition, which is one of the reasons I feel so good about packing them for my kids’ lunches. Here’s a breakdown of what you’re getting in each serving.
Estimated nutritional values per serving (4 pinwheels):
- Calories: 220
- Protein: 18g
- Carbohydrates: 16g
- Fat: 10g
- Fiber: 2g
- Sugar: 3g
- Sodium: 480mg
Health benefits of key ingredients:
- Turkey is a lean source of protein that helps keep kids full and focused throughout the school day. It’s also rich in B vitamins, which support energy metabolism.
- Spinach is packed with iron, vitamin K, and antioxidants. Even a small handful adds a nutritional boost without changing the flavor.
- Carrots are an excellent source of beta-carotene, which supports eye health and immune function. The natural sweetness also makes them kid-friendly.
- Cream cheese provides calcium and vitamin A, plus a small amount of protein. Using full-fat cream cheese helps with satiety.
- Cheddar cheese adds calcium, protein, and vitamin D, all of which are important for growing bones.
Dietary considerations: This recipe can be made gluten-free by using corn tortillas or large lettuce leaves. It can be made dairy-free by using dairy-free cream cheese and omitting the shredded cheese. It’s naturally low in sugar and can be made lower in sodium by using low-sodium turkey and reduced-sodium seasoning.
Potential allergens: This recipe contains dairy (cream cheese, cheddar cheese) and gluten (flour tortillas). It does not contain nuts, eggs, or soy, making it a safe option for many school lunchboxes.
I personally love that these roll-ups give my kids a balanced lunch with protein, vegetables, and healthy fats. They’re not just empty calories that will leave them hungry an hour later. They’re real food that fuels their bodies and keeps them going through a busy school day.
Conclusion
These healthy turkey roll-ups for school lunches have become a staple in our house for good reason. They’re quick to make, use simple ingredients, and actually taste good. My kids eat them without complaint, and I feel good about what I’m packing in their lunchboxes. That’s a win-win in my book.
I encourage you to make these your own. Add your kids’ favorite veggies, swap in different cheeses, or try the Mediterranean version for yourself. The beauty of this recipe is how adaptable it is. You can tailor it to your family’s preferences and still end up with something delicious and nutritious.
What I love most about this recipe is how it’s solved a real problem in our house. Mornings are no longer a scramble to figure out what to pack for lunch. I know these roll-ups are always in the fridge, ready to go. They’ve made our mornings calmer and our lunches better.
If you try these turkey roll-ups, I’d love to hear how they turned out. Leave a comment below and let me know what variations you tried. Did your kids love them? Did you find a new favorite combination? Share your experience, and don’t forget to tag me in your photos. Happy lunch packing!
Frequently Asked Questions
Can I make these turkey roll-ups ahead of time?
Absolutely! These are perfect for meal prep. Make the whole rolls up to 4 days in advance and store them wrapped in plastic wrap in the refrigerator. Slice them right before packing to keep them fresh. You can also freeze the whole rolls for up to 2 months.
How do I keep the roll-ups from getting soggy in the lunchbox?
The key is to pat your vegetables dry before adding them to the roll-up. Excess moisture from spinach or carrots can make the tortilla soggy over time. Also, make sure your cream cheese mixture is spread all the way to the edges to create a barrier that seals out moisture.
Can I use different types of tortillas?
Yes, you can use whole wheat, spinach, tomato, or sun-dried tomato tortillas for different flavors and colors. Corn tortillas are smaller and more prone to cracking, so warm them first. For a low-carb option, use large lettuce leaves instead of tortillas.
How many roll-ups should I pack for a school lunch?
For elementary school kids, 4 to 6 pinwheels (about one full roll-up) is usually enough. For middle and high school students, 6 to 8 pinwheels (one and a half to two roll-ups) works better. Adjust based on your child’s appetite and what else you’re packing in their lunch.
Can I add other vegetables to the filling?
Definitely! Thinly sliced cucumber, bell peppers, avocado, or shredded zucchini all work well. Just make sure to pat them dry first to prevent sogginess. You can also add sprouts or microgreens for extra nutrition and crunch.
Pin This Recipe!

Healthy Turkey Roll-Ups Easy Lunchbox Idea

These healthy turkey roll-ups are a quick, easy, and delicious lunchbox idea that kids and adults love. Made with simple ingredients like turkey, cream cheese, and fresh veggies, they’re perfect for meal prep and busy mornings.
- Prep Time: 15 minutes
- Cook Time: 0 minutes
- Total Time: 45 minutes (includes 30 minutes chilling)
- Yield: 4 servings (about 24-32 pinwheels) 1x
- Category: Lunch
- Cuisine: American
Ingredients
- 4 (8-inch) flour tortillas
- 8 slices deli turkey breast (oven-roasted or smoked)
- 4 ounces cream cheese, softened
- 1 tablespoon ranch seasoning mix
- 1 cup fresh baby spinach leaves
- 1/2 cup shredded carrots
- 1/2 cup shredded cheddar cheese
Instructions
- Soften the cream cheese: Take cream cheese out of the fridge about 15 minutes before starting. Cut into smaller pieces to speed softening. If short on time, microwave for 10 seconds until soft but not runny.
- Mix the cream cheese spread: In a small bowl, combine 4 ounces softened cream cheese with 1 tablespoon ranch seasoning mix. Stir until smooth and well combined.
- Prepare your work surface: Lay a flour tortilla flat on a clean, dry cutting board. If tortillas are cold, warm in microwave for 10 seconds to make pliable.
- Spread the cream cheese mixture: Using a butter knife or offset spatula, spread a thin, even layer of the cream cheese mixture over the entire surface of the tortilla, all the way to the edges.
- Layer the turkey: Place 2 slices of turkey evenly over the cream cheese, overlapping slightly to cover the tortilla completely.
- Add the cheese: Sprinkle about 2 tablespoons of shredded cheddar cheese over the turkey, spreading evenly and leaving a small border around the edges.
- Add the veggies: Place a small handful of fresh spinach leaves over the cheese, then sprinkle about 1 tablespoon of shredded carrots on top. Do not overstuff.
- Roll it up tightly: Starting at the bottom edge, roll the tortilla away from you as tightly as possible without tearing. Use fingers to tuck in filling as you go. Place seam-side down.
- Wrap and chill: Wrap each roll tightly in plastic wrap or wax paper. Refrigerate for at least 30 minutes (or up to overnight) to firm up the cream cheese.
- Slice into pinwheels: Once chilled, unwrap and place on cutting board. Using a sharp serrated knife, slice each roll into 1-inch pieces using a gentle sawing motion. You should get about 6 to 8 pinwheels per roll-up.
Notes
Don’t skip the chilling step; it helps the roll-ups hold their shape when slicing. Pat vegetables dry to prevent sogginess. For best results, make the night before serving. Can be frozen for up to 2 months.
Nutrition
- Serving Size: 4 pinwheels
- Calories: 220
- Sugar: 3
- Sodium: 480
- Fat: 10
- Saturated Fat: 5
- Carbohydrates: 16
- Fiber: 2
- Protein: 18
Keywords: turkey roll-ups, lunchbox ideas, healthy lunch, kid-friendly, meal prep, pinwheels, easy lunch


