That first crackle of a graham cracker crust under a fork — the kind that shatters just enough before giving way to something silky and cold — still takes me straight to my aunt’s kitchen in late October. The air would smell like cinnamon and burnt sugar, and she’d always have a pan of these pumpkin cheesecake bars waiting on the counter, the edges just barely pulling away from the foil. I remember standing on my tiptoes, watching her press the crust into the pan with those experienced hands, never measuring, just knowing. She’d let me lick the spatula, and honestly, that was the best part.
Years later, I found myself craving that same feeling — that quiet moment before the chaos of the holidays, when the house is warm and the kitchen smells like fall. So I started making my own version of those bars. Not the full cheesecake, which always felt too formal and frankly, too much for a Tuesday night. But these easy pumpkin cheesecake bars? They hit every single note. The creamy pumpkin layer, the tangy cheesecake, the buttery crunch of that graham cracker crust. It’s all there, but way less fussy.
I’ve tweaked this recipe over the years — a little more spice here, a little less sugar there — until it felt just right. Not too sweet, not too dense, just perfectly balanced. The kind of dessert you make for a potluck and watch disappear in minutes. Or the kind you keep in the fridge for a late-night slice with a cup of coffee. No judgment here.
These pumpkin cheesecake bars are my little tribute to that memory, and I think you’re going to love them just as much.
Why You’ll Love This Recipe
Let me tell you why these bars have become my go-to fall dessert, year after year. First off, they’re incredibly easy to make. No water bath, no fussy springform pan, no stressing about cracks on top. Just a simple 9×13 pan, a few bowls, and about 20 minutes of active prep time. The oven does the rest.
- Simple Ingredients : You probably already have most of what you need in your pantry. Pumpkin puree, cream cheese, eggs, sugar, and a box of graham crackers. No fancy grocery store runs required.
- Perfect for Fall Gatherings : These bars are a hit at Thanksgiving, Halloween parties, or even just a cozy Sunday dinner. They travel well, slice cleanly, and look beautiful on a platter. I’ve brought them to Friendsgiving and watched them disappear before the turkey even came out.
- Crowd-Pleaser : I’ve served these to kids, adults, and even my picky uncle who “doesn’t like pumpkin.” He had two slices. The combination of creamy cheesecake and spiced pumpkin is just that good.
- Make-Ahead Friendly : These bars actually taste better the next day. The flavors meld together, and the texture gets even creamier. So you can make them a day or two ahead and cross one thing off your holiday to-do list.
What makes this version different from all the others? It’s the texture. I use a slightly higher ratio of cream cheese to pumpkin, so the cheesecake layer stays rich and tangy, not watery or thin. And the crust? I press it firmly and pre-bake it for a few minutes, which keeps it from getting soggy. Small details, but they make a big difference.
Honestly, this is the kind of dessert that makes you close your eyes after the first bite. It’s comfort food reimagined — familiar, but somehow better than you remembered.
What Ingredients You Will Need
This recipe uses simple, wholesome ingredients to deliver that perfect balance of creamy pumpkin and tangy cheesecake. Most of these are pantry staples, especially if you do a lot of fall baking. Let’s go through each one so you know exactly what to look for.
For the Graham Cracker Crust
- 2 cups graham cracker crumbs (about 16 full sheets) — You can buy pre-made crumbs, but I prefer crushing my own. It gives a better texture and you can control the consistency. I use a food processor or just a zip-top bag and a rolling pin. (The bag method is oddly satisfying.)
- ½ cup unsalted butter, melted — I use salted butter in a pinch, but unsalted lets you control the salt level. Make sure it’s melted but not hot, or it will make the crumbs greasy.
- ¼ cup granulated sugar — Just enough to sweeten the crust without making it candy-like. You can use brown sugar for a deeper flavor, but granulated keeps it classic.
- ¼ teaspoon salt — A little salt balances the sweetness and enhances the buttery flavor. Don’t skip it.
For the Cheesecake Layer
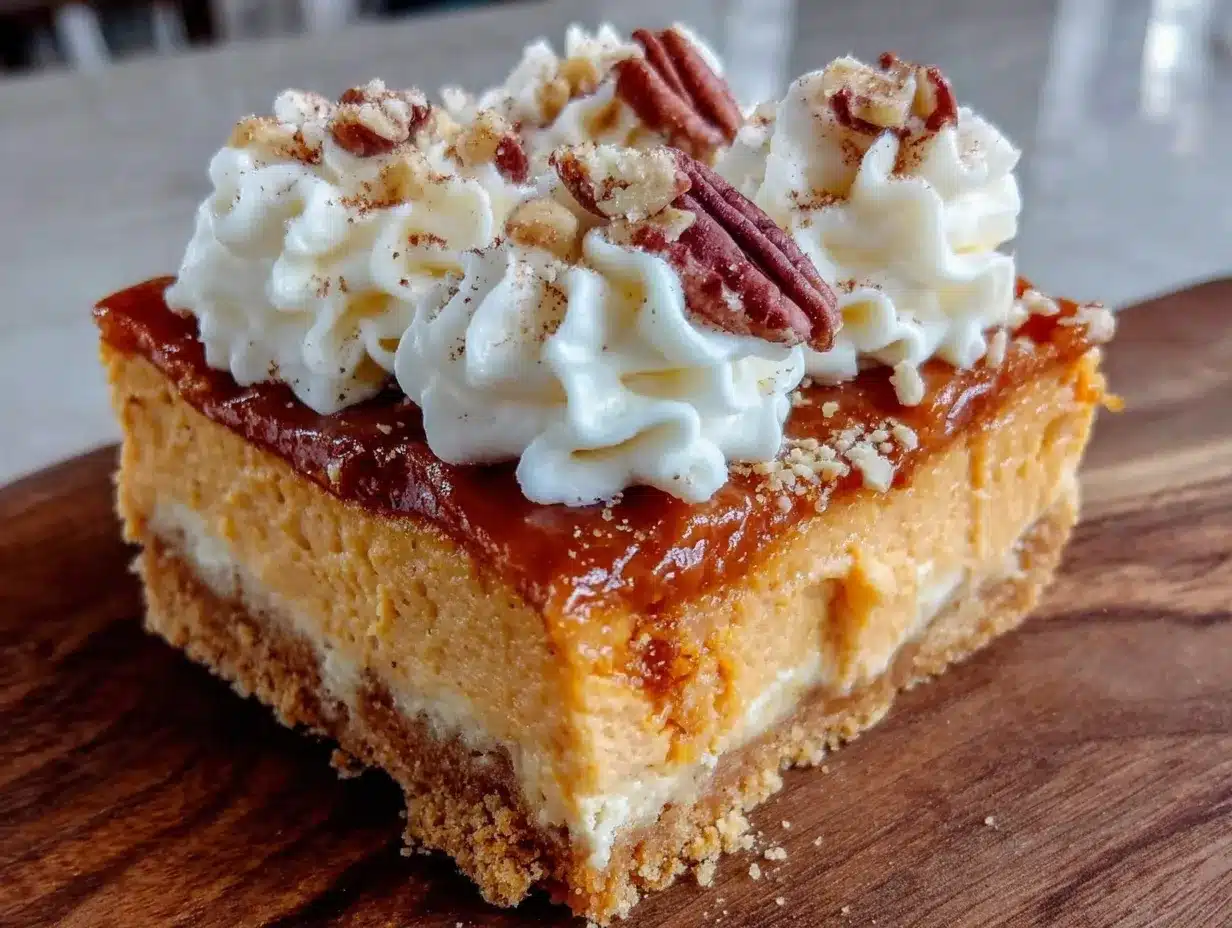
- 16 ounces cream cheese, softened — Full-fat is best here for that rich, creamy texture. I recommend Philadelphia brand, but any block-style cream cheese works. Let it sit on the counter for at least 30 minutes before you start.
- ½ cup granulated sugar — Just enough sweetness to balance the tang of the cream cheese.
- 2 large eggs, room temperature — Cold eggs can make the batter lumpy. Pop them in a bowl of warm water for 5 minutes if you forget to take them out ahead of time.
- 1 teaspoon vanilla extract — Pure vanilla extract makes a difference. Skip the imitation stuff if you can.
For the Pumpkin Layer
- 1 cup pumpkin puree — Not pumpkin pie filling! Make sure you grab 100% pure pumpkin. Libby’s is my go-to brand because it’s consistently thick and not watery.
- ½ cup granulated sugar — You could use brown sugar here for a deeper molasses flavor, but I like the clean sweetness of white sugar.
- 2 large eggs, room temperature — Same as above. Room temperature is key for a smooth batter.
- 1 teaspoon vanilla extract — Adds warmth and depth to the pumpkin layer.
- 1 teaspoon ground cinnamon — The star spice. I use Ceylon cinnamon for a milder, sweeter flavor, but cassia works too.
- ½ teaspoon ground ginger — Adds a little warmth and zing. Freshly ground is nice, but pre-ground works perfectly.
- ¼ teaspoon ground nutmeg — Freshly grated nutmeg is amazing if you have it. Just a little goes a long way.
- ¼ teaspoon ground cloves — A tiny pinch adds that classic pumpkin pie spice flavor. Don’t overdo it.
- ¼ teaspoon salt — Balances the sweetness and brings out the pumpkin flavor.
Equipment Needed
You don’t need a professional kitchen to make these bars. Here’s what you’ll need:
- 9×13-inch baking pan — Glass or metal works. If using metal, line it with parchment paper for easy removal. I prefer glass because I can see how the crust is browning.
- Electric hand mixer or stand mixer — You can mix by hand, but a mixer makes the cream cheese layer much smoother. A whisk and some elbow grease will work in a pinch.
- Large mixing bowls — At least two: one for the cheesecake layer, one for the pumpkin layer.
- Food processor or zip-top bag and rolling pin — For crushing the graham crackers. The food processor is faster, but the bag method is more fun and requires less cleanup.
- Rubber spatula — For scraping every last bit of batter. I’m a big fan of the one-bowl banana bread approach, but this recipe needs two bowls.
- Measuring cups and spoons — Standard set. I like metal ones for dry ingredients and glass for liquids.
- Parchment paper — This makes lifting the bars out of the pan so much easier. Don’t skip it.
- Cooling rack — For cooling the bars before refrigerating. A wire rack helps air circulate so the bottom doesn’t get soggy.
Budget-friendly tip: If you don’t have a food processor, just put the graham crackers in a zip-top bag and crush them with a rolling pin or even a heavy skillet. Works like a charm.
Preparation Method
Alright, let’s get to the good part. Here’s how to make these pumpkin cheesecake bars step by step. I’ll include all the little details that make a difference.
Step 1: Preheat and Prepare the Pan
Preheat your oven to 350°F (175°C). Line your 9×13-inch baking pan with parchment paper, leaving some overhang on the long sides. This will let you lift the bars out cleanly later. Lightly spray the parchment with non-stick cooking spray.
Step 2: Make the Graham Cracker Crust
In a medium bowl, combine 2 cups graham cracker crumbs, ¼ cup sugar, and ¼ teaspoon salt. Pour in ½ cup melted butter and stir until the mixture looks like wet sand and holds together when pressed. Press the mixture firmly into the bottom of your prepared pan. Use the bottom of a measuring cup or a flat glass to really pack it down. This is important — a loose crust will fall apart when you slice the bars. Bake the crust for 10 minutes, then set it aside to cool slightly while you make the fillings.
Step 3: Make the Cheesecake Layer
In a large bowl, beat 16 ounces of softened cream cheese with an electric mixer until smooth and creamy, about 2 minutes. Add ½ cup sugar and beat until combined, scraping down the sides as needed. Add 2 room-temperature eggs, one at a time, beating well after each addition. Mix in 1 teaspoon vanilla extract. The batter should be smooth and lump-free. Set this aside.
Step 4: Make the Pumpkin Layer
In another large bowl, whisk together 1 cup pumpkin puree, ½ cup sugar, 2 eggs, 1 teaspoon vanilla, 1 teaspoon cinnamon, ½ teaspoon ginger, ¼ teaspoon nutmeg, ¼ teaspoon cloves, and ¼ teaspoon salt. Whisk until smooth and well combined. The mixture will be thinner than the cheesecake batter, and that’s perfectly fine.
Step 5: Layer the Fillings
Pour the cheesecake batter over the pre-baked crust and spread it into an even layer. Then, gently spoon the pumpkin batter over the cheesecake layer. Don’t pour it all in one spot — dollop it around so it doesn’t sink through. Use a spatula to gently spread the pumpkin layer, being careful not to mix the two layers together. If you want a marbled look, you can swirl them with a knife, but I prefer the clean two-layer effect.
Step 6: Bake
Bake at 350°F (175°C) for 35-40 minutes, or until the edges are set and the center is just slightly jiggly. It will firm up as it cools. Don’t overbake — a slightly wobbly center is your friend here. Overbaked cheesecake can be dry and cracked.
Step 7: Cool and Chill
Let the bars cool completely on a wire rack, about 1 hour. Then, cover the pan with plastic wrap and refrigerate for at least 4 hours, but overnight is even better. This is the hardest part, I know. But trust me — the bars need this time to set up properly. Cold cheesecake bars slice much cleaner than room-temperature ones.
Step 8: Slice and Serve
Once fully chilled, lift the bars out of the pan using the parchment overhang. Place them on a cutting board and use a sharp knife to slice into squares. For clean cuts, wipe the knife clean between each slice. I like to cut them into 12 large squares or 24 smaller ones, depending on the occasion. Serve cold or at room temperature.
Cooking Tips & Techniques
Over the years, I’ve learned a few things the hard way. Here are my best tips for perfect pumpkin cheesecake bars every time.
- Room temperature ingredients are non-negotiable. Cold cream cheese and eggs will give you a lumpy batter. Set them out 30-60 minutes before you start. If you’re in a rush, you can cut the cream cheese into smaller cubes to help it soften faster.
- Don’t overmix the cheesecake batter. Overmixing incorporates too much air, which can cause cracks as the cheesecake bakes. Mix just until smooth, then stop.
- Press the crust firmly. I cannot stress this enough. A loose crust will crumble when you try to cut the bars. Use the bottom of a measuring cup and really press down hard.
- Pre-bake the crust. This step is key for a crisp, not-soggy crust. It only takes 10 minutes and makes a huge difference.
- Use a water bath (optional but helpful). If you’re worried about cracks, you can place the pan in a larger roasting pan and add about an inch of hot water to the outer pan. This creates a humid environment that helps the cheesecake bake more evenly. I don’t always do this, but it’s a good trick for special occasions.
- Let the bars cool gradually. Don’t put hot bars directly into the fridge. Let them cool on the counter first, then refrigerate. Rapid temperature changes can cause cracking.
I once forgot to pre-bake the crust and ended up with a sad, soggy bottom. Lesson learned. Now I never skip that step.
Variations & Adaptations
One of the best things about this recipe is how easy it is to customize. Here are some of my favorite variations.
- Gluten-Free Version : Use gluten-free graham crackers or crushed gluten-free cookies for the crust. Everything else is naturally gluten-free. I’ve used Schär brand graham-style crackers with great results.
- Dairy-Free Version : Use dairy-free cream cheese (like Kite Hill or Tofutti) and a vegan butter substitute for the crust. The texture will be slightly different, but still delicious. I’ve made this for a dairy-free friend and she couldn’t tell the difference.
- Lower Sugar Option : Reduce the sugar in the cheesecake layer to ⅓ cup and the pumpkin layer to ⅓ cup. You can also use a sugar substitute like monk fruit or allulose. The texture will be a little less creamy, but the flavor will still be great.
- Spice It Up : Add ¼ teaspoon of cardamom or allspice to the pumpkin layer for a more complex spice profile. I love cardamom with pumpkin — it’s an underrated combination.
- Add a Topping : Swirl in some caramel sauce or sprinkle chopped pecans on top before baking. For a festive touch, add a dollop of whipped cream and a dusting of cinnamon before serving. I’ve also drizzled melted white chocolate over the top for a pretty presentation.
- Make It a Pie : Press the crust into a 9-inch pie plate instead of a 9×13 pan, and adjust the baking time to 45-50 minutes. You’ll get a thicker, more traditional cheesecake texture.
I once tried adding a layer of chocolate ganache on top, and honestly, it was incredible. Pumpkin and chocolate are a surprisingly good pair.
Serving & Storage Suggestions
These bars are versatile and can be served in so many ways. Here’s what I recommend.
- Serving Temperature : I prefer these bars cold, straight from the fridge. The texture is firmer and the flavors are more pronounced. But they’re also lovely at room temperature, especially if you’re serving them after a big meal.
- Presentation : Arrange the bars on a platter and dust with a little cinnamon or powdered sugar. Add a dollop of whipped cream and a drizzle of caramel sauce for extra decadence. For a fall-themed party, I like to serve them on a wooden board with some cinnamon sticks and star anise for decoration.
- Complementary Dishes : These bars pair beautifully with a cup of hot coffee, chai tea, or a creamy pumpkin spice cold foam iced coffee. They also go well with a scoop of vanilla ice cream or a drizzle of warm caramel sauce.
- Storage : Store leftover bars in an airtight container in the refrigerator for up to 5 days. They also freeze beautifully. Wrap individual bars in plastic wrap, then place them in a freezer-safe bag or container. They’ll keep for up to 3 months. Thaw overnight in the refrigerator before serving.
- Reheating : These bars are best served cold, but if you prefer them warm, you can microwave a single bar for about 10-15 seconds. Just be careful not to overheat, or the cheesecake will become runny.
The flavors actually develop and deepen over time. I think these bars taste even better on day two or three. The spices meld together and the texture becomes even creamier.
Nutritional Information & Benefits
Here’s a rough estimate of the nutritional values per serving (based on 12 servings). Keep in mind that these numbers are approximate and can vary based on specific brands and ingredient substitutions.
- Calories : 380-420 per bar
- Fat : 24-28g
- Carbohydrates : 38-42g
- Protein : 7-9g
- Fiber : 2-3g
- Sugar : 28-32g
While these bars are definitely a treat, they do offer some nutritional benefits. Pumpkin is packed with vitamin A, which is great for eye health and immune function. It’s also a good source of fiber and antioxidants. The cream cheese provides calcium and protein, though it’s also high in saturated fat, so moderation is key.
If you’re looking for a lighter option, you can use reduced-fat cream cheese and a sugar substitute. But honestly, I think the full-fat version is worth the indulgence every now and then. It’s a dessert, after all.
For a protein-packed breakfast option, you might also enjoy these creamy pumpkin pie protein overnight oats. They’re a great way to get your pumpkin fix without all the sugar.
Conclusion
These easy pumpkin cheesecake bars with graham cracker crust are everything I love about fall baking. They’re simple enough for a weeknight dessert but impressive enough for a holiday table. The creamy cheesecake layer, the spiced pumpkin, the buttery crust — it’s a combination that just works.
I hope you give this recipe a try and make it your own. Maybe add a little extra cinnamon, or swirl in some caramel, or top it with toasted pecans. The beauty of this recipe is that it’s forgiving and adaptable. Don’t be afraid to experiment.
If you make these bars, I’d love to hear about it. Leave a comment below and let me know how they turned out. Did you make any substitutions? Did your family love them? Share your photos on social media and tag me — I always love seeing your creations.
Happy baking, friends. Here’s to cozy kitchens, warm ovens, and the simple joy of a really good dessert.
Frequently Asked Questions
Can I use pumpkin pie filling instead of pumpkin puree?
No, I wouldn’t recommend it. Pumpkin pie filling is already sweetened and spiced, so it will throw off the balance of the recipe. Stick with 100% pure pumpkin puree for the best results.
Can I make these bars without a mixer?
Absolutely. You can mix the cheesecake and pumpkin batters by hand with a whisk, but you’ll need to make sure the cream cheese is very soft. Beat it with a wooden spoon until smooth before adding the other ingredients. It’s a good arm workout.
How do I know when the bars are done baking?
The edges should be set and slightly puffed, but the center should still jiggle just a little when you gently shake the pan. It will firm up as it cools. Don’t overbake, or the texture will be dry.
Can I freeze these pumpkin cheesecake bars?
Yes, they freeze beautifully. Wrap individual bars in plastic wrap, then place them in a freezer-safe bag or container. They’ll keep for up to 3 months. Thaw overnight in the refrigerator before serving.
Why did my crust turn out soggy?
This usually happens if the crust wasn’t pre-baked long enough or if the butter wasn’t fully incorporated. Make sure to pre-bake the crust for a full 10 minutes and press it firmly into the pan. Also, let the bars cool completely before refrigerating to avoid condensation.
Pin This Recipe!
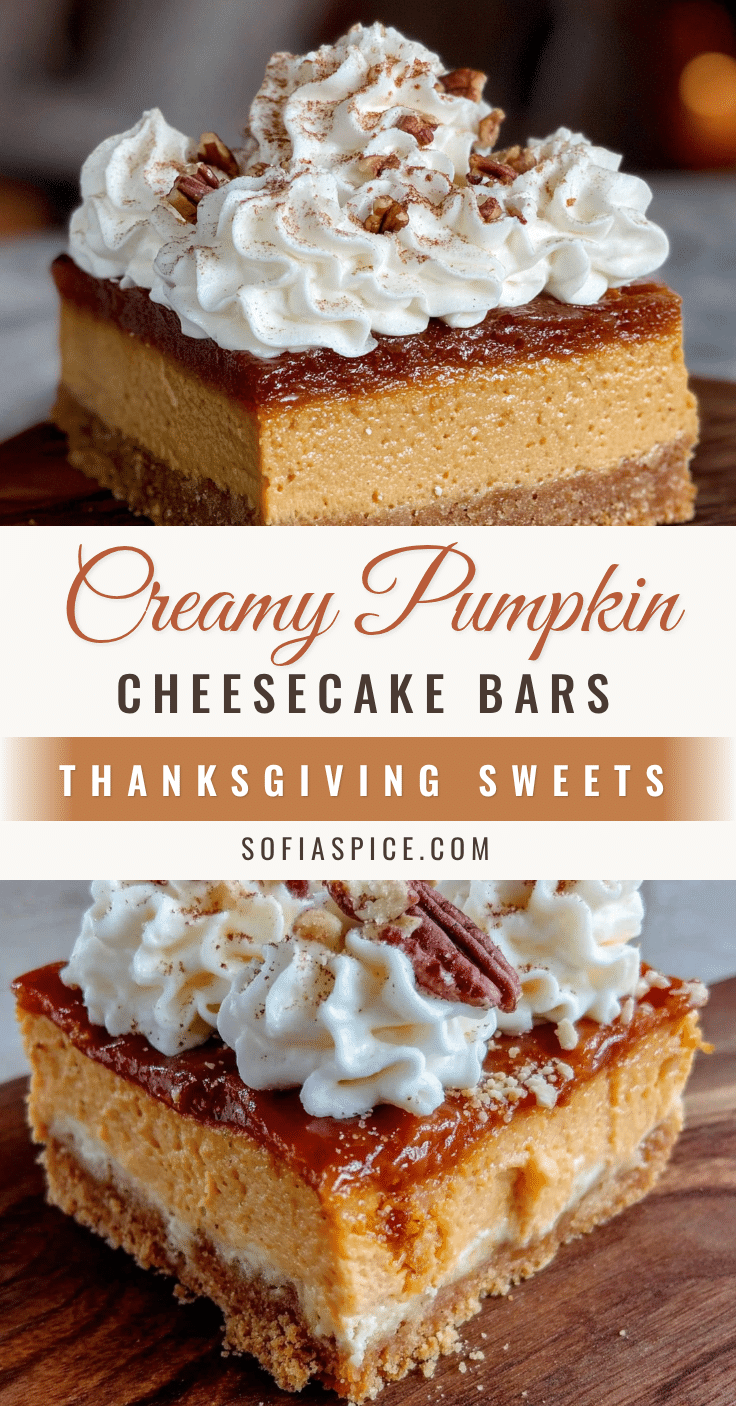
Easy Pumpkin Cheesecake Bars with Graham Cracker Crust
These easy pumpkin cheesecake bars feature a buttery graham cracker crust, a creamy cheesecake layer, and a spiced pumpkin layer. They’re simple to make, perfect for fall gatherings, and taste even better the next day.
- Prep Time: 20 minutes
- Cook Time: 35-40 minutes
- Total Time: 4 hours 55 minutes (includes chilling)
- Yield: 12 servings 1x
- Category: Dessert
- Cuisine: American
Ingredients
- 2 cups graham cracker crumbs (about 16 full sheets)
- ½ cup unsalted butter, melted
- ¼ cup granulated sugar (for crust)
- ¼ teaspoon salt (for crust)
- 16 ounces cream cheese, softened
- ½ cup granulated sugar (for cheesecake layer)
- 2 large eggs, room temperature (for cheesecake layer)
- 1 teaspoon vanilla extract (for cheesecake layer)
- 1 cup pumpkin puree (100% pure)
- ½ cup granulated sugar (for pumpkin layer)
- 2 large eggs, room temperature (for pumpkin layer)
- 1 teaspoon vanilla extract (for pumpkin layer)
- 1 teaspoon ground cinnamon
- ½ teaspoon ground ginger
- ¼ teaspoon ground nutmeg
- ¼ teaspoon ground cloves
- ¼ teaspoon salt (for pumpkin layer)
Instructions
- Preheat oven to 350°F (175°C). Line a 9×13-inch baking pan with parchment paper, leaving overhang on the long sides. Lightly spray with non-stick cooking spray.
- In a medium bowl, combine graham cracker crumbs, ¼ cup sugar, and ¼ teaspoon salt. Pour in melted butter and stir until mixture resembles wet sand and holds together when pressed.
- Press the crust mixture firmly into the bottom of the prepared pan using the bottom of a measuring cup or flat glass. Bake for 10 minutes, then set aside to cool slightly.
- In a large bowl, beat softened cream cheese with an electric mixer until smooth and creamy, about 2 minutes. Add ½ cup sugar and beat until combined, scraping down sides as needed.
- Add 2 room-temperature eggs, one at a time, beating well after each addition. Mix in 1 teaspoon vanilla extract until smooth. Set aside.
- In another large bowl, whisk together pumpkin puree, ½ cup sugar, 2 eggs, 1 teaspoon vanilla, cinnamon, ginger, nutmeg, cloves, and ¼ teaspoon salt until smooth and well combined.
- Pour the cheesecake batter over the pre-baked crust and spread into an even layer. Gently spoon the pumpkin batter over the cheesecake layer, dolloping it around, then spread carefully without mixing the layers.
- Bake at 350°F (175°C) for 35-40 minutes, or until edges are set and center is just slightly jiggly. Do not overbake.
- Let bars cool completely on a wire rack, about 1 hour. Cover with plastic wrap and refrigerate for at least 4 hours, preferably overnight.
- Once fully chilled, lift bars out of pan using parchment overhang. Place on a cutting board and slice into squares using a sharp knife, wiping knife clean between cuts. Serve cold or at room temperature.
Notes
Room temperature ingredients are key for a smooth batter. Press the crust firmly to prevent crumbling. Pre-baking the crust ensures it stays crisp. For cleaner slices, chill bars thoroughly and wipe the knife between cuts. Bars can be stored in the refrigerator for up to 5 days or frozen for up to 3 months.
Nutrition
- Serving Size: 1 bar (based on 12 s
- Calories: 380420
- Sugar: 2832
- Fat: 2428
- Carbohydrates: 3842
- Fiber: 23
- Protein: 79
Keywords: pumpkin cheesecake bars, graham cracker crust, fall dessert, easy cheesecake bars, pumpkin dessert


