Easy Graveyard Dirt Cake Cups: Best Spooky Halloween Dessert
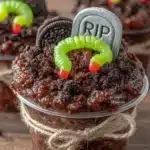
These spooky easy graveyard dirt cake cups are the perfect Halloween dessert. They are ridiculously simple to throw together, but they look incredibly impressive—like a tiny, edible cemetery scene that everyone will want to snap a picture of.
- Prep Time: 20 minutes
- Cook Time: 0 minutes
- Total Time: 2 hours 20 minutes (includes chilling)
- Yield: 8 servings 1x
- Category: Dessert
- Cuisine: American
Ingredients
Scale
- 1 (14.3-ounce) package chocolate sandwich cookies (like Oreos), finely crushed (about 2 cups of crumbs)
- 4 tablespoons unsalted butter, melted
- 1 (8-ounce) package cream cheese, softened
- 1/2 cup granulated sugar
- 1 (3.9-ounce) package instant chocolate pudding mix
- 2 cups cold whole milk
- 1 (8-ounce) container frozen whipped topping, thawed
- Assorted gummy worms
- Chocolate cookie “tombstones” (Milano cookies, chocolate wafers, or rectangular graham crackers)
- Halloween-themed sprinkles or candy eyes
- Small plastic skeletons or spider rings (optional)
Instructions
- Prepare the “Dirt” (5 minutes): Place the chocolate sandwich cookies in a food processor and pulse until they become fine crumbs. Alternatively, place them in a large zip-top bag, seal it, and crush them with a rolling pin. You want a mix of fine crumbs and slightly larger pieces for texture. Transfer the crumbs to a medium bowl and pour the melted butter over them. Stir with a fork until all the crumbs are evenly moistened. Set aside.
- Make the Creamy Filling (10 minutes): In a large bowl, beat the softened cream cheese and granulated sugar together with an electric hand mixer on medium speed until light, fluffy, and completely smooth. This usually takes about 2-3 minutes. Make sure there are no lumps. In a separate bowl, whisk the instant chocolate pudding mix with the 2 cups of cold milk for about 2 minutes, until it starts to thicken. It will be quite runny at first, but it will set in the fridge.
- Combine the Layers (5 minutes): Pour the prepared pudding into the bowl with the cream cheese mixture. Gently fold them together with a spatula until just combined. Be careful not to overmix. Then, add the thawed whipped topping and fold it in gently until the mixture is uniform, smooth, and a light chocolate color. It should be thick and creamy.
- Assemble the Cups (10 minutes): Now for the fun part! Grab your clear cups. Start with a generous spoonful of the chocolate cookie “dirt” at the bottom of each cup. Press it down lightly with the back of the spoon. Next, spoon or pipe the creamy pudding mixture on top of the dirt layer. Fill each cup about three-quarters full. Finally, top with another generous layer of the cookie crumbs, completely covering the pudding. This is your “graveyard dirt.”
- Chill and Set (2 hours minimum): This is the most important step. Place the assembled cups in the refrigerator for at least 2 hours, or up to overnight. This allows the pudding to fully set and the flavors to meld together. The longer they sit, the better they taste. The texture will be perfectly creamy and scoopable.
- Decorate (10 minutes): Just before serving, it’s time to create your graveyard scene. Gently press a chocolate cookie “tombstone” into the dirt layer of each cup. Poke a few gummy worms so they look like they are crawling out of the dirt. Sprinkle with Halloween sprinkles or add a few candy eyes for a spooky touch. If you have them, nestle a plastic skeleton or spider ring into the dirt. Get creative!
Notes
For best results, chill overnight. The cream cheese adds a tangy, cheesecake-like richness. Use cold milk for the pudding to ensure it sets properly. Crush cookies to a mix of fine crumbs and slightly larger pieces for texture. Press the first layer of dirt firmly to prevent sogginess. Add decorations just before serving to keep them fresh.
Nutrition
- Serving Size: 1 cup
- Calories: 420
- Sugar: 38
- Sodium: 380
- Fat: 24
- Saturated Fat: 14
- Carbohydrates: 50
- Fiber: 2
- Protein: 6
Keywords: Halloween dessert, dirt cake, graveyard cake, no-bake dessert, chocolate pudding, easy dessert, spooky dessert