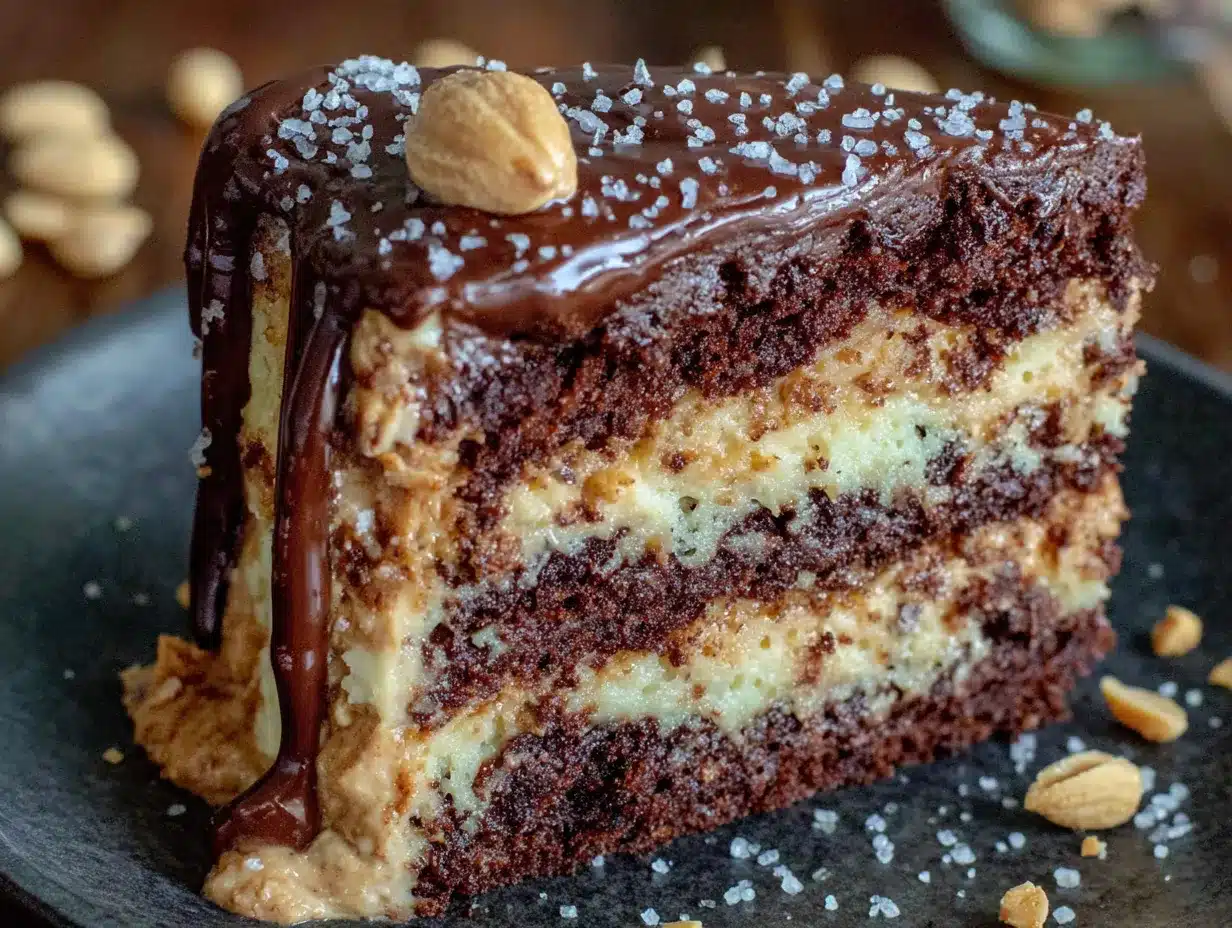
The first time I made this cake, I was standing in my kitchen at 11 PM on a Tuesday, covered in a fine dusting of cocoa powder, staring at a bowl of the shiniest, most ridiculous chocolate ganache I’d ever seen. The house was quiet except for the hum of the fridge, and I remember thinking — this is either going to be a masterpiece or a total sugar-fueled disaster. There was no in-between. That glossy, dark pour, pooling over the top and slowly dripping down the sides of the cake, looked almost too perfect to cut into. But cut into it I did, because honestly, that’s the whole point.
That first slice was messy. The layers shifted a little, and a chunk of the peanut butter frosting smeared against the plate. But the bite? That first bite was the kind of quiet moment where you just stop and let the flavors settle. The chocolate was deep, not too sweet, and the peanut butter filling was this creamy, salty, utterly addictive contrast. It tasted like the best version of a candy bar you remember from childhood, but better — because it was made with real butter, real cream, and a whole lot of patience. I knew right then I’d be making this cake again, and again, and probably again.
This isn’t just another chocolate cake recipe. It’s the one I reach for when I need to impress without a ton of stress. It’s the one that makes people close their eyes when they take a bite. And if you’re a fan of that classic peanut butter and chocolate combo — the kind that hits every single craving at once — then this is the cake you’ve been looking for. Trust me on this one.
Why You’ll Love This Recipe
Let me tell you why this cake has become my go-to for birthdays, holidays, and random Tuesday nights when I just need something spectacular. It’s not just good — it’s the kind of cake that makes you look like a professional baker without having to actually be one.
- Insanely Moist Chocolate Cake — The cake layers are made with buttermilk and hot coffee, which makes them incredibly tender and rich. No dry crumbs here, I promise.
- Perfect Peanut Butter Frosting — This isn’t your average buttercream. It’s silky, creamy, and has just the right amount of salt to balance the chocolate. It’s the kind of frosting you’ll want to eat by the spoonful.
- That Signature Reese’s Touch — We’re folding chopped Reese’s peanut butter cups right into the batter and using more as decoration. Every bite has little pockets of melty peanut butter and chocolate.
- Simple Ingredients — Nothing weird or hard to find. You probably have most of this stuff in your pantry already. No fancy pastry school required.
- Perfect for Any Occasion — Birthday parties, potlucks, holiday dinners, or just because you need a little joy in your life. This cake delivers every single time.
- Crowd-Pleaser Guaranteed — I’ve made this for picky kids, serious chocolate lovers, and even my aunt who “doesn’t really like cake.” Every single person went back for seconds. It’s that good.
What makes this recipe different from all the other chocolate peanut butter cakes out there? It’s the little details. The way I cream the butter and sugar until it’s practically fluffy. The addition of hot coffee that deepens the chocolate flavor without tasting like coffee at all. And the peanut butter frosting — I use a combination of creamy peanut butter and cream cheese that gives it this tangy, rich, perfectly spreadable texture. I’ve tested this recipe six times to get it exactly right. This is the final version, and it’s a winner.
What Ingredients You Will Need
This recipe uses simple, everyday ingredients to create something truly special. The magic is in how they come together. Here’s everything you’ll need, broken down by component so it’s easy to follow.
For the Chocolate Cake Layers
- All-purpose flour — 2 cups (240g). Standard flour works perfectly here. No need for cake flour.
- Granulated sugar — 2 cups (400g). This gives the cake sweetness and helps with that tender crumb.
- Unsweetened cocoa powder — 3/4 cup (75g). I recommend using a good quality brand like Ghirardelli or Hershey’s Special Dark for a deeper flavor.
- Baking powder — 1 1/2 teaspoons.
- Baking soda — 1 1/2 teaspoons. This helps the cake rise and stay fluffy.
- Salt — 1 teaspoon. Don’t skip this — it balances the sweetness.
- Buttermilk — 1 cup (240ml), at room temperature. If you don’t have buttermilk, you can make a quick substitute by adding 1 tablespoon of lemon juice or white vinegar to a cup of regular milk and letting it sit for 5 minutes.
- Vegetable oil — 1/2 cup (120ml). Oil keeps the cake incredibly moist, even the next day.
- Large eggs — 2, at room temperature. Room temperature eggs blend more evenly into the batter.
- Vanilla extract — 2 teaspoons. Pure vanilla extract makes a difference here.
- Hot coffee — 1 cup (240ml), freshly brewed. This is the secret ingredient. The coffee intensifies the chocolate flavor without making the cake taste like coffee at all. Trust me on this one.
- Chopped Reese’s peanut butter cups — 1 cup (about 8-10 mini cups), roughly chopped. Fold these into the batter for little pockets of melty goodness.
For the Peanut Butter Frosting
- Cream cheese — 8 ounces (226g), softened. Use full-fat cream cheese for the best texture and flavor.
- Unsalted butter — 1/2 cup (1 stick, 113g), softened. Let it sit out for at least an hour before using.
- Creamy peanut butter — 1 cup (240g). I prefer using a brand like Jif or Skippy for the smoothest frosting. Natural peanut butter can be too oily and cause the frosting to separate.
- Powdered sugar — 3 cups (360g), sifted. Sifting prevents lumps and gives you a silky smooth frosting.
- Heavy cream — 2-3 tablespoons, as needed. This helps adjust the consistency.
- Vanilla extract — 1 teaspoon.
- Pinch of salt — Just a small one, to enhance the peanut butter flavor.
For the Chocolate Ganache Drip
- Semi-sweet chocolate chips — 1/2 cup (90g). I like using Ghirardelli 60% cacao chips for a rich, not-too-sweet ganache.
- Heavy cream — 1/3 cup (80ml). Warm this up before pouring over the chocolate.
For Decoration (Optional but Highly Recommended)
- Mini Reese’s peanut butter cups — About 10-12, unwrapped and left whole or halved.
- Chopped salted peanuts — A handful, for sprinkling around the edges.
- Chocolate shavings or curls — Optional, but they add a nice touch.
Equipment Needed
You don’t need a ton of fancy equipment to pull this cake off, but having the right tools makes the process so much smoother. Here’s what I recommend.
- Three 8-inch round cake pans — This is the sweet spot for layer cakes. If you only have two pans, you can bake the layers in batches. Just let the pans cool completely between batches.
- Stand mixer or hand mixer — A stand mixer makes creaming the butter and sugar a breeze, but a hand mixer works just fine. You’ll need it for both the cake batter and the frosting.
- Mixing bowls — At least two medium bowls and one large bowl.
- Whisk and rubber spatula — For mixing dry ingredients and folding in the chopped Reese’s cups.
- Parchment paper — Cut circles to line the bottom of your cake pans. This guarantees the layers won’t stick.
- Cooling rack — Let those layers cool completely before you even think about frosting them.
- Offset spatula — For spreading the frosting evenly. A butter knife works in a pinch, but an offset spatula is a game-changer.
- Cake turntable — Not essential, but it makes frosting so much easier and more professional-looking.
- Piping bag and star tip — For decorating the top of the cake with rosettes or swirls. You can also just spread the frosting with a spatula if you prefer a rustic look.
If you don’t have a cake turntable, just place your cake plate on a small, inverted bowl to give yourself a makeshift spinning surface. I’ve done this more times than I can count, and it works perfectly.
Preparation Method
Alright, let’s get to the fun part. I’ll walk you through every step so you can make this cake with confidence. Take your time, and don’t rush the cooling steps — they really matter.
Step 1: Preheat and Prepare Your Pans
Preheat your oven to 350°F (175°C). Grease three 8-inch round cake pans with butter or non-stick spray, then line the bottoms with parchment paper circles. Lightly flour the sides of the pans, tapping out any excess. This extra step ensures your cake layers will release perfectly every time.
Step 2: Mix the Dry Ingredients
In a large mixing bowl, whisk together the flour, sugar, cocoa powder, baking powder, baking soda, and salt. Make sure everything is evenly combined. Break up any lumps in the cocoa powder with your fingers or the whisk. Set this bowl aside for now.
Step 3: Combine the Wet Ingredients
In a separate medium bowl, whisk together the buttermilk, vegetable oil, eggs, and vanilla extract. Whisk until the mixture is smooth and slightly frothy. The eggs should be fully incorporated — no streaks of yolk left behind.
Step 4: Make the Batter
Pour the wet ingredients into the bowl of dry ingredients. Stir with a rubber spatula or whisk until just combined. The batter will be thick and a little lumpy — that’s totally fine. Now, slowly pour in the hot coffee while stirring gently. The batter will thin out and become silky and smooth. Don’t overmix at this stage; just stir until the coffee is fully incorporated. Fold in the chopped Reese’s peanut butter cups with a few gentle strokes. The batter will be very liquidy — that’s exactly how it should be.
Step 5: Bake the Cake Layers
Divide the batter evenly among the three prepared cake pans. I like to use a kitchen scale to make sure each pan gets the same amount, but you can also eyeball it. Bake for 25-30 minutes, or until a toothpick inserted into the center of each layer comes out clean or with just a few moist crumbs attached. The cakes should spring back lightly when touched. Let the pans cool on a wire rack for 15 minutes, then run a knife around the edges and invert the layers onto the rack to cool completely. This is crucial — do not try to frost warm cake layers, or you’ll end up with a melty mess.
Step 6: Make the Peanut Butter Frosting
While the cake layers are cooling, make the frosting. In the bowl of a stand mixer fitted with the paddle attachment (or using a hand mixer), beat the softened cream cheese and butter together on medium speed until smooth and creamy, about 2 minutes. Add the peanut butter and beat for another minute until fully combined. Scrape down the sides of the bowl. With the mixer on low speed, gradually add the sifted powdered sugar, about 1/2 cup at a time, mixing well after each addition. Add the vanilla extract and a pinch of salt. Increase the speed to medium-high and beat for 2-3 minutes until the frosting is light, fluffy, and spreadable. If the frosting seems too thick, add heavy cream one tablespoon at a time until it reaches your desired consistency. If it’s too thin, add a little more powdered sugar.
Step 7: Assemble the Cake
Place one cooled cake layer on your serving plate or cake stand. Spread a generous layer of peanut butter frosting on top, about 1/2 cup. Make sure it’s even and reaches the edges. Place the second layer on top and repeat with more frosting. Add the third layer, then apply a thin crumb coat — a thin layer of frosting all over the entire cake to seal in the crumbs. Pop the cake in the refrigerator for 20-30 minutes to let the crumb coat set. This makes the final frosting layer so much cleaner.
Step 8: Frost the Cake
Once the crumb coat is firm, apply the remaining peanut butter frosting all over the cake. Use your offset spatula to create smooth sides or rustic swirls — whatever you prefer. If you want a naked cake look, you can leave some of the chocolate layers peeking through. Place the frosted cake back in the fridge while you make the ganache.
Step 9: Make the Chocolate Ganache Drip
Place the semi-sweet chocolate chips in a small heatproof bowl. Heat the heavy cream in a small saucepan over medium heat until it just begins to simmer — small bubbles around the edges, not a rolling boil. Pour the hot cream over the chocolate chips and let it sit for 2-3 minutes without stirring. Then, gently whisk until the mixture is smooth and glossy. Let the ganache cool for 5-10 minutes until it thickens slightly but is still pourable. If it’s too runny, it will drip all the way down the cake. If it’s too thick, it won’t drip at all. You want it to be the consistency of warm honey.
Step 10: Decorate and Serve
Remove the cake from the fridge. Using a spoon or a small piping bottle, carefully drizzle the ganache around the edges of the cake, letting it drip down the sides. Then pour the remaining ganache into the center and spread it evenly with a spatula. While the ganache is still wet, arrange the mini Reese’s peanut butter cups around the top edge. Sprinkle chopped salted peanuts in the center for a little crunch. If you have extra frosting, pipe a few rosettes on top for an extra special touch. Let the cake sit at room temperature for about 30 minutes before slicing and serving. This allows the ganache to set and the cake to come to the perfect temperature.
Cooking Tips & Techniques
Over the years, I’ve learned a few things the hard way so you don’t have to. Here are my best tips for making this cake absolutely perfect.
Don’t skip the coffee. I know it sounds weird, but hot coffee is the secret to the deepest, richest chocolate flavor. The coffee doesn’t make the cake taste like coffee at all — it just enhances the cocoa. If you’re really opposed, you can use hot water instead, but the cake won’t be quite as flavorful.
Room temperature ingredients matter. Cold eggs and cold buttermilk can cause the batter to seize up or not emulsify properly. Take your eggs and buttermilk out of the fridge about 30 minutes before you start baking. Same goes for the cream cheese and butter for the frosting. It makes a huge difference in texture.
Measure your flour correctly. Scooping flour directly from the bag with your measuring cup can pack it down and give you way too much flour, which leads to a dry cake. Instead, spoon the flour into your measuring cup and level it off with a knife. Or better yet, use a kitchen scale for the most accurate results.
Let the layers cool completely. This is probably the most important tip. If you try to frost a warm cake, the frosting will melt and slide right off. I’ve made that mistake before, and it’s not pretty. Give the layers at least an hour on the cooling rack, or pop them in the fridge for 20 minutes to speed things up.
Use a serrated knife to level your layers. Even if your cakes bake up perfectly flat, a quick level with a serrated knife ensures they stack evenly. Just saw gently back and forth across the top of each layer to remove any dome. Save those scraps for snacking or making cake truffles.
Chill the cake before the ganache drip. A cold cake helps the ganache set faster and gives you more control over the drips. If the cake is too warm, the ganache will just run straight down. Trust me on this one.
Variations & Adaptations
One of the best things about this cake is how easy it is to customize. Here are a few of my favorite variations.
Gluten-Free Version: Substitute the all-purpose flour with a good quality 1:1 gluten-free baking flour blend. I’ve tested this with Bob’s Red Mill 1:1 Baking Flour and it worked beautifully. Make sure your peanut butter cups are also gluten-free — most are, but double-check the label.
Dairy-Free Adaptation: Use a dairy-free buttermilk substitute (add 1 tablespoon of lemon juice to 1 cup of unsweetened almond or oat milk). Replace the butter in the frosting with a high-quality vegan butter stick, and use dairy-free cream cheese. For the ganache, use full-fat coconut cream instead of heavy cream. The texture will be slightly different, but still delicious.
Peanut Butter Swirl Variation: Before baking, drop spoonfuls of extra peanut butter (about 1/2 cup) into the batter in the pans and swirl it gently with a knife. This creates ribbons of peanut butter throughout the cake layers for an extra punch of flavor.
Chocolate Peanut Butter Cupcakes: This batter makes about 24-30 cupcakes. Bake at 350°F for 18-22 minutes. Frost with the peanut butter frosting and top with a mini Reese’s cup. Perfect for parties or lunchbox treats.
Extra Decadent Version: Add a layer of chocolate fudge sauce between the cake layers along with the peanut butter frosting. Just spread a thin layer of store-bought or homemade fudge sauce over the frosting before adding the next cake layer. It’s over-the-top in the best way possible.
Serving & Storage Suggestions
This cake is best served at room temperature — it allows the flavors to really shine and the texture to be perfectly tender. I recommend taking the cake out of the fridge about 30-45 minutes before you plan to serve it. Slice it with a sharp, serrated knife, wiping the blade clean between cuts for the neatest slices.
What to serve with it: A tall glass of cold milk is the classic pairing, and for good reason. A scoop of vanilla bean ice cream on the side takes it to another level. If you’re feeling fancy, a dollop of lightly sweetened whipped cream and a drizzle of extra chocolate sauce never hurts.
Storage: Store any leftover cake in an airtight container at room temperature for up to 2 days, or in the refrigerator for up to 5 days. The cake actually gets even more moist and flavorful on the second day as the flavors meld together. Just let it come to room temperature before serving for the best texture.
Freezing: This cake freezes beautifully. You can freeze the unfrosted cake layers wrapped tightly in plastic wrap and then foil for up to 3 months. Thaw them overnight in the refrigerator before frosting. You can also freeze the fully assembled and frosted cake (without the ganache drip) for up to 2 months. Thaw in the refrigerator overnight, then add the ganache and decorations before serving.
Reheating: If you prefer your cake slightly warm, pop individual slices in the microwave for about 10-15 seconds. The chocolate chips and peanut butter cups will get a little melty, and it’s absolutely divine.
Nutritional Information & Benefits
Let’s be real — this is a decadent celebration cake, not a health food. But that doesn’t mean we can’t appreciate what’s in it. Here’s a rough estimate per slice (based on 16 servings).
| Nutrient | Amount Per Slice |
|---|---|
| Calories | 520 |
| Total Fat | 32g |
| Saturated Fat | 14g |
| Cholesterol | 55mg |
| Sodium | 380mg |
| Total Carbohydrates | 58g |
| Dietary Fiber | 3g |
| Sugars | 42g |
| Protein | 9g |
The peanut butter in this recipe actually provides a decent amount of protein and healthy fats. The cocoa powder is rich in antioxidants called flavonoids, which are good for heart health. And let’s not forget that a slice of this cake can do wonders for your mood — sometimes that’s the most important benefit of all.
If you have peanut allergies, this cake obviously isn’t for you. But you can substitute the peanut butter with sunflower seed butter (SunButter) and use sunflower seed butter cups instead of Reese’s. The flavor will be different, but it’s a great nut-free alternative.
Conclusion
This Best Reese’s Peanut Butter Chocolate Layer Cake is everything you want in a celebration cake. It’s rich, decadent, and absolutely packed with that classic peanut butter and chocolate combination that never gets old. The cake layers are incredibly moist, the peanut butter frosting is silky and perfectly salted, and the chocolate ganache drip adds that wow factor that makes everyone think you spent hours in the kitchen.
But honestly? The best part is sharing it. Watching someone take that first bite and seeing their eyes light up — that’s what makes all the measuring and mixing worth it. This cake has become my go-to for birthdays, holidays, and those days when you just need something special. I hope it becomes one of yours too.
I’d love to hear how yours turns out! Leave a comment below and let me know if you tried any variations or if this cake made someone’s day extra special. Don’t forget to pin this recipe on Pinterest and share it with your fellow chocolate and peanut butter lovers. Happy baking, friends!
Frequently Asked Questions
Can I make this cake ahead of time?
Absolutely! You can bake the cake layers up to 2 days in advance. Wrap them tightly in plastic wrap and store them at room temperature. You can also make the frosting up to 3 days ahead and keep it in the refrigerator. Just let it come to room temperature and give it a quick whip before using.
Can I use natural peanut butter in the frosting?
I don’t recommend it. Natural peanut butter tends to be oilier and can separate, which makes the frosting grainy and less stable. Stick with a classic creamy peanut butter like Jif or Skippy for the best texture.
Why did my cake layers sink in the middle?
This usually happens if the oven temperature is too low or if you open the oven door too often during baking. Make sure your oven is properly preheated to 350°F and resist the urge to peek until at least 20 minutes into baking.
Can I use a different size pan?
You can use two 9-inch round pans instead of three 8-inch pans. Just increase the baking time by about 5-8 minutes. You can also bake this in a 9×13 inch sheet pan for a single-layer cake — bake for about 35-40 minutes.
How do I get clean slices?
Use a long, sharp serrated knife and wipe it clean between each cut. For the cleanest slices, you can chill the cake in the fridge for about 30 minutes before slicing. This firms up the frosting and ganache, making them easier to cut through neatly.
Pin This Recipe!
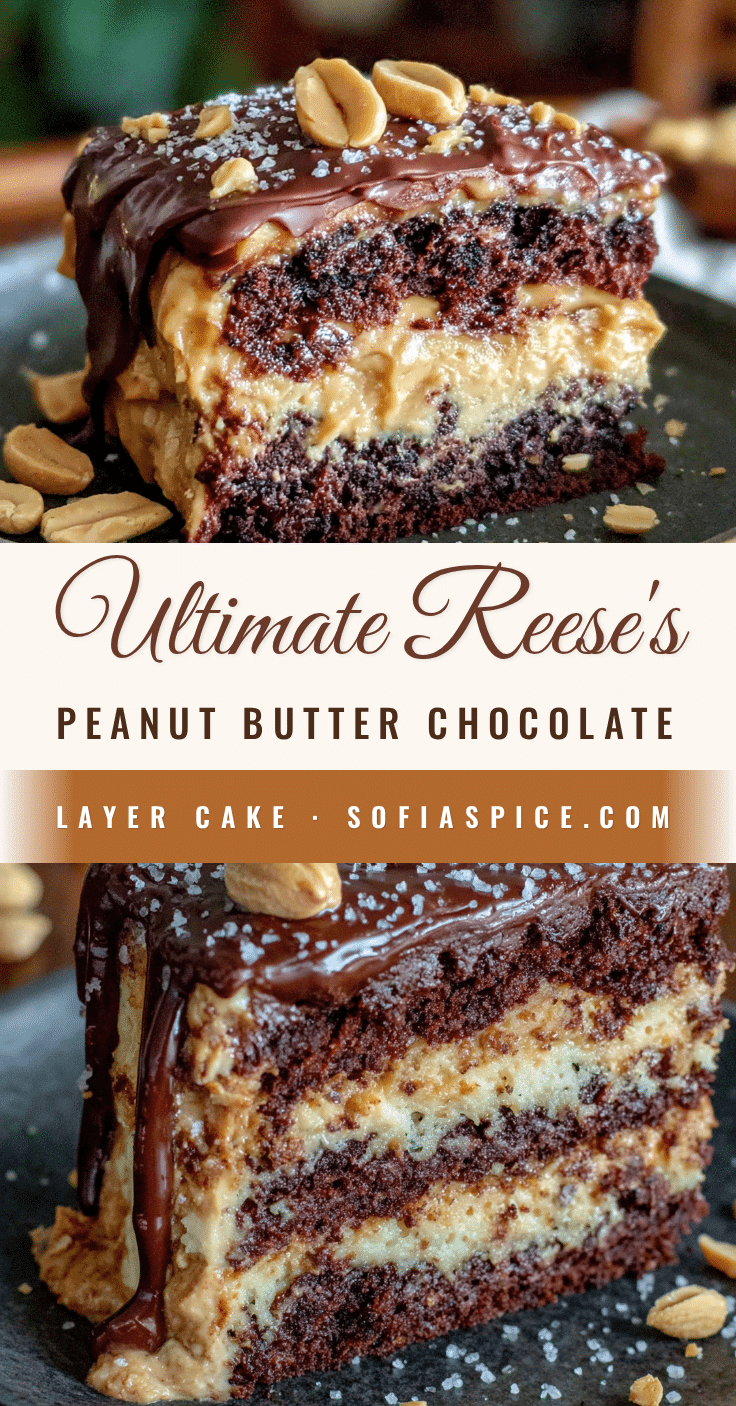
Best Reeses Peanut Butter Chocolate Layer Cake Recipe
This decadent chocolate layer cake is filled with creamy peanut butter frosting, studded with chopped Reese’s cups, and topped with a glossy chocolate ganache drip. It’s the ultimate celebration cake for peanut butter and chocolate lovers.
- Prep Time: 30 minutes
- Cook Time: 30 minutes
- Total Time: 1 hour 30 minutes (plus cooling and chilling time)
- Yield: 16 servings 1x
- Category: Dessert
- Cuisine: American
Ingredients
- 2 cups (240g) all-purpose flour
- 2 cups (400g) granulated sugar
- 3/4 cup (75g) unsweetened cocoa powder
- 1 1/2 teaspoons baking powder
- 1 1/2 teaspoons baking soda
- 1 teaspoon salt
- 1 cup (240ml) buttermilk, at room temperature
- 1/2 cup (120ml) vegetable oil
- 2 large eggs, at room temperature
- 2 teaspoons vanilla extract
- 1 cup (240ml) hot coffee, freshly brewed
- 1 cup (about 8–10 mini cups) chopped Reese’s peanut butter cups
- 8 ounces (226g) cream cheese, softened
- 1/2 cup (1 stick, 113g) unsalted butter, softened
- 1 cup (240g) creamy peanut butter (like Jif or Skippy)
- 3 cups (360g) powdered sugar, sifted
- 2–3 tablespoons heavy cream, as needed
- 1 teaspoon vanilla extract
- Pinch of salt
- 1/2 cup (90g) semi-sweet chocolate chips
- 1/3 cup (80ml) heavy cream
- 10–12 mini Reese’s peanut butter cups, for decoration
- Handful of chopped salted peanuts, for decoration
- Chocolate shavings or curls (optional)
Instructions
- Preheat oven to 350°F (175°C). Grease three 8-inch round cake pans, line bottoms with parchment paper, and lightly flour the sides.
- In a large bowl, whisk together flour, sugar, cocoa powder, baking powder, baking soda, and salt.
- In a separate bowl, whisk together buttermilk, vegetable oil, eggs, and vanilla extract until smooth.
- Pour wet ingredients into dry ingredients and stir until just combined. Slowly pour in hot coffee while stirring gently until smooth. Fold in chopped Reese’s peanut butter cups.
- Divide batter evenly among prepared pans. Bake for 25-30 minutes, until a toothpick inserted in center comes out clean. Cool in pans for 15 minutes, then invert onto wire rack to cool completely.
- For the frosting: Beat cream cheese and butter together until smooth. Add peanut butter and beat until combined. Gradually add sifted powdered sugar, then vanilla and salt. Beat until light and fluffy, adding heavy cream as needed for consistency.
- Place one cooled cake layer on serving plate. Spread about 1/2 cup frosting on top. Repeat with second and third layers. Apply a thin crumb coat over entire cake and refrigerate for 20-30 minutes.
- Frost the cake with remaining peanut butter frosting using an offset spatula. Refrigerate while making ganache.
- For the ganache: Place chocolate chips in a heatproof bowl. Heat heavy cream until simmering, pour over chocolate, let sit 2-3 minutes, then whisk until smooth. Cool 5-10 minutes until thickened but pourable.
- Remove cake from fridge. Drizzle ganache around edges, letting it drip down sides, then pour remaining ganache on top and spread evenly. Decorate with mini Reese’s cups, chopped peanuts, and optional chocolate shavings. Let sit at room temperature 30 minutes before serving.
Notes
Don’t skip the coffee—it deepens the chocolate flavor without tasting like coffee. Use room temperature ingredients for best texture. Measure flour by spooning and leveling. Let cake layers cool completely before frosting. Chill cake before adding ganache drip for better control. Store leftovers in an airtight container at room temperature for up to 2 days or refrigerate for up to 5 days. Cake can be frozen for up to 3 months.
Nutrition
- Serving Size: 1 slice
- Calories: 520
- Sugar: 42
- Sodium: 380
- Fat: 32
- Saturated Fat: 14
- Carbohydrates: 58
- Fiber: 3
- Protein: 9
Keywords: Reese's cake, peanut butter chocolate cake, layer cake, chocolate cake, peanut butter frosting, ganache drip, celebration cake, birthday cake


