Marta watched me fumbling with a pumpkin, a block of cream cheese, and a look of pure confusion on my face for a solid minute before she finally cracked a smile. I was trying to force a classic cheesecake into a tiny, temperamental oven in our shared community kitchen, and it was not going well. She just shook her head, walked over to her cupboard, and pulled out a mixing bowl. “No,” she said, her accent softening the word. “You are working too hard. Let me show you how we do it in my house.”
That afternoon, standing over a bowl of spiced pumpkin and silky cream cheese, Marta didn’t just teach me a recipe. She taught me that sometimes the best desserts are the ones that don’t need an oven, a water bath, or any of that fuss. She showed me how to fold in the pumpkin puree until it was a perfect shade of autumn sunset, and she insisted on a generous pinch of cinnamon—”for the soul,” she said. Honestly, I was skeptical at first. A dip? For dessert? But then I crushed up a gingersnap, scooped up a heap of that creamy, spiced mixture, and took a bite.
Let me tell you, it was a moment. The crunch of the cookie, the cool, velvety dip, the warmth of the pumpkin pie spices—it all clicked. I think I let out an actual little gasp. Marta just laughed and said, “See? No oven needed.”
This recipe has been my go-to for every fall gathering, every cozy night in, and every time I want the taste of pumpkin cheesecake without the stress of baking a whole cake. It’s the kind of thing you make when you want to impress people but also want to actually sit down and enjoy the party. Maybe you’ve been there—staring at a recipe that looks amazing but requires way too much effort. This one is for you. It’s the recipe that stays with you, not because it’s complicated, but because it’s just that good.
Why You’ll Love This Recipe
This pumpkin cheesecake dip isn’t just another fall dessert—it’s the one I bring to every Friendsgiving, every potluck, and every time I need a quick win in the kitchen. I’ve tested it more times than I can count, and it never fails to get that “who made this?!” reaction. Here’s why it works so beautifully:
- No-Bake & Effortless: You don’t even need to turn on the oven. It comes together in about 15 minutes of active work, which means more time for sipping cider and less time stressing over a water bath.
- Simple, Smart Ingredients: This isn’t a list of weird, hard-to-find items. You probably have most of this in your pantry right now. No fancy grocery store runs required.
- Perfect for Fall Gatherings: Whether it’s a Halloween party, a Thanksgiving appetizer, or just a Tuesday night movie, this dip fits right in. It’s the coziest thing you can put on a table.
- Always a Crowd-Pleaser: I’ve watched kids and adults alike hover around this bowl. The combination of creamy, spiced dip with a crunchy, molasses-y cookie is universally loved.
- Unbelievably Delicious: The texture is what gets everyone. It’s lighter than a traditional cheesecake filling but just as rich and satisfying. The pumpkin and spices are perfectly balanced—not too sweet, not too heavy.
What makes this recipe different from the dozens of other pumpkin dips out there? It’s the technique. Instead of just dumping everything in a bowl, we take a minute to whip the cream cheese and sugar until it’s truly light and fluffy. This one step makes a world of difference, giving you a dip that’s airy and mousse-like instead of dense and gloppy. It’s a small detail, but it’s the kind of thing that turns a good recipe into your new signature dish.
Honestly, this is the kind of dessert that makes you close your eyes after the first bite. It’s comfort food at its finest—quick, easy, and packed with all the flavors of the season. It’s perfect for impressing guests without any of the stress, or for turning a simple weeknight into something a little more special.
What Ingredients You Will Need
This recipe uses simple, wholesome ingredients that come together to create something truly special. The magic is in the combination of creamy dairy, sweet pumpkin, and warm spices. Here’s what you’ll need to grab:
- For the Dip:
- 8 oz (226g) cream cheese, softened to room temperature (I always use full-fat Philadelphia for the creamiest texture)
- 1/2 cup (100g) packed light brown sugar (adds a deep, molasses-like sweetness)
- 1/4 cup (50g) granulated sugar
- 1 cup (240g) pumpkin puree (not pumpkin pie filling—look for 100% pure pumpkin)
- 1 teaspoon vanilla extract
- 1 teaspoon ground cinnamon
- 1/2 teaspoon ground ginger
- 1/4 teaspoon ground nutmeg
- 1/8 teaspoon ground cloves
- Pinch of salt (to balance the sweetness and brighten the flavors)
- 1/2 cup (120ml) heavy whipping cream, cold (this is what gives it that light, mousse-like texture)
- For Serving:
- 1 bag (about 12 oz) of crisp gingersnap cookies (I prefer the store-brand ones from Trader Joe’s or the classic Nabisco brand—they hold up perfectly for dipping)
- Optional: apple slices, pear slices, or graham crackers for variety
Ingredient Tips & Substitutions:
- Cream Cheese: Make sure it’s really softened. If it’s too cold, you’ll end up with lumps. If you’re in a hurry, cut it into small cubes and let it sit on the counter for 20 minutes. Neufchâtel cheese (reduced-fat cream cheese) works fine too, but the dip won’t be quite as rich.
- Pumpkin Puree: Don’t grab the can of pumpkin pie filling—it’s already sweetened and spiced, and it will throw off the balance of this recipe. Stick with 100% pure pumpkin. I like Libby’s brand for its consistent texture.
- Heavy Cream: This is key for the fluffy texture. You can substitute it with 1/2 cup of thawed frozen whipped topping (like Cool Whip) if you need a shortcut, but the texture will be a little different—still good, just not as light.
- Spices: Feel free to use 2 teaspoons of pumpkin pie spice mix instead of the individual spices. I often do this when I’m feeling lazy, and it works perfectly.
- Dairy-Free Option: Use a block of vegan cream cheese (like Kite Hill or Violife) and full-fat canned coconut cream (the solid part) instead of heavy cream. Chill the coconut cream can overnight first for best results.
Equipment Needed
The beauty of this recipe is that it doesn’t require any fancy gadgets. Here’s what you’ll need to pull it off:
- Electric Hand Mixer or Stand Mixer: This is your best friend here. You could whisk everything by hand, but your arm will get a serious workout, and you won’t get the same light, airy texture. I use my trusty KitchenAid hand mixer for this—it’s perfect for small batches.
- Large Mixing Bowl: One big bowl for the cream cheese mixture and another for whipping the cream. Glass or stainless steel works best.
- Rubber Spatula: For scraping down the sides of the bowl and folding everything together. A good spatula is worth its weight in gold.
- Measuring Cups and Spoons: For accuracy. I cannot stress this enough—baking is a science, even when it’s a no-bake dip.
- Serving Bowl: Something pretty to present it in. A small ceramic or glass bowl works perfectly.
- Platter or Board: For arranging the cookies and fruit around the dip.
Budget-Friendly Tip: If you don’t have an electric mixer, you can use a whisk and some serious elbow grease. Just make sure your cream cheese is super soft, and whip the cream in a chilled bowl for best results. It’s doable—I’ve done it—but it takes about 10 minutes of solid whisking.
Preparation Method
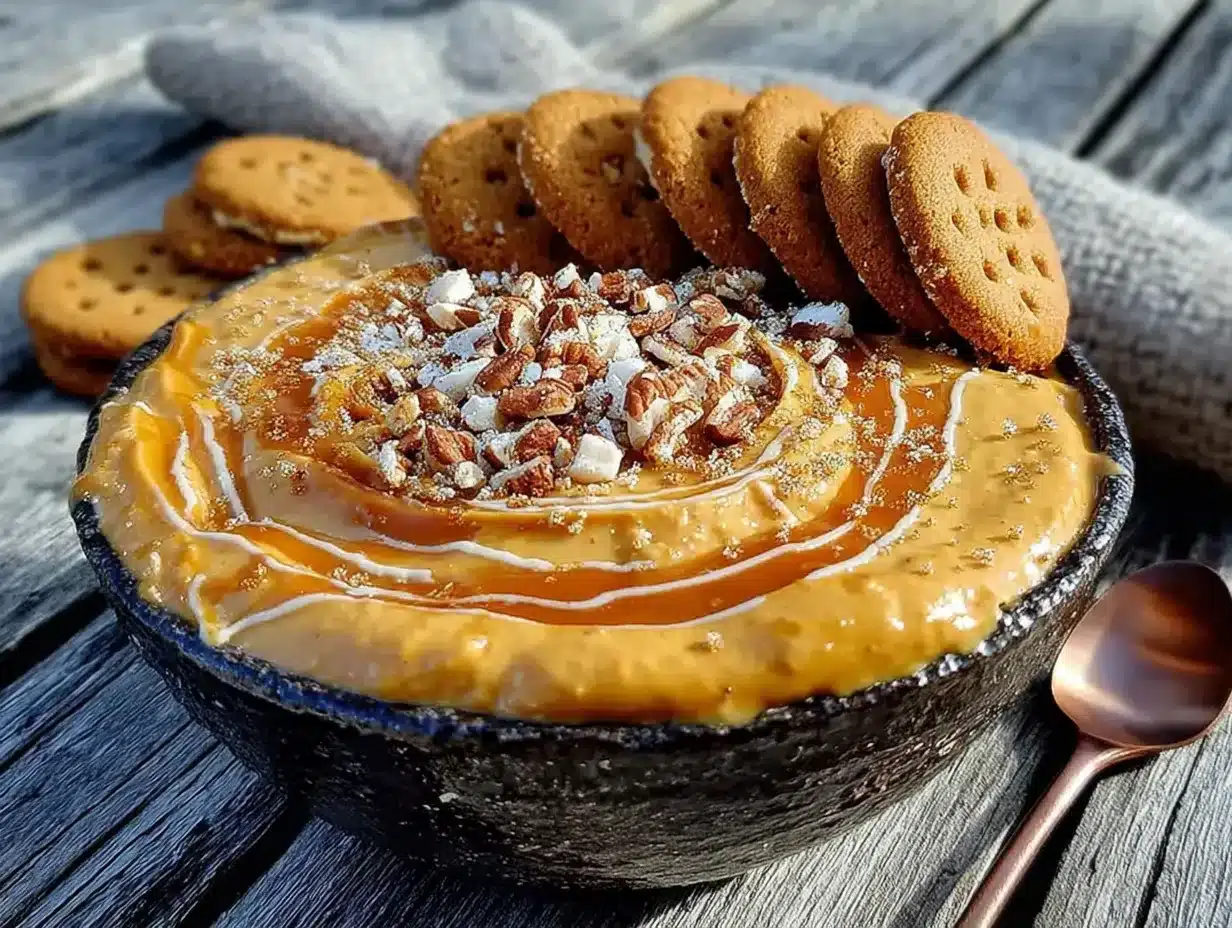
Let’s get to the fun part. This comes together faster than you think, so make sure your cookies are ready to go!
- Whip the Cream: In a medium bowl, pour in your 1/2 cup of cold heavy whipping cream. Using your electric mixer with the whisk attachments, beat the cream on medium-high speed until stiff peaks form. This takes about 2-3 minutes. You’ll know it’s ready when you lift the beaters and the cream stands up in a firm peak without flopping over. Don’t over-whip it, or you’ll end up with butter! Set this bowl aside in the fridge while you work on the rest.
- Beat the Cream Cheese: In your large mixing bowl, add the 8 oz of softened cream cheese. Beat it with your mixer (using the paddle attachments if you have them) on medium speed until it’s completely smooth and fluffy—about 2 minutes. Scrape down the sides of the bowl with your spatula. This step is crucial; no one wants a lumpy dip.
- Add the Sugars: Add the 1/2 cup of packed brown sugar and 1/4 cup of granulated sugar to the cream cheese. Beat on medium speed for another 1-2 minutes until the mixture is light and grainy. The sugars should be fully incorporated, and the mixture will look a bit like wet sand.
- Mix in the Pumpkin & Spices: Add the 1 cup of pumpkin puree, 1 teaspoon of vanilla extract, 1 teaspoon of cinnamon, 1/2 teaspoon of ginger, 1/4 teaspoon of nutmeg, 1/8 teaspoon of cloves, and a pinch of salt. Beat on low speed at first to avoid a pumpkin-splosion, then increase to medium and beat until everything is fully combined and the color is a beautiful, uniform orange. Scrape the bowl again.
- Fold in the Whipped Cream: This is where the magic happens. Take your bowl of whipped cream out of the fridge. Add about a third of it to the pumpkin mixture. Gently fold it in with your rubber spatula using a sweeping motion—cut down through the middle, scrape along the bottom, and fold up over the top. Rotate the bowl as you go. Once that first third is mostly incorporated, add the rest and fold until you see no more white streaks. The mixture will become noticeably lighter and fluffier. Don’t over-mix, or you’ll deflate all that air.
- Chill (The Hardest Part): Transfer the dip to your serving bowl, smooth the top, and cover it with plastic wrap. Pop it in the fridge for at least 2 hours. I know, it’s torture. But this resting time allows the flavors to meld and the dip to firm up to the perfect dipping consistency. If you can wait overnight, it’s even better.
- Serve: Just before serving, arrange your gingersnap cookies on a platter around the bowl of dip. If you’re feeling fancy, you can sprinkle a little extra cinnamon or a few crushed gingersnaps on top.
Sensory Cues: When you’re folding the whipped cream, you’ll feel the mixture change from a dense, heavy batter to a light, billowy cloud. It should look like a soft, mousse-like texture. When you taste it before chilling, it will be delicious but a bit loose—don’t worry, the fridge firms it up perfectly.
Cooking Tips & Techniques
I’ve made this dip more times than I can count, and I’ve definitely had my share of learning moments. Here are the things I wish I’d known from the start:
- Don’t Skip the Cream Cheese Softening: I once tried to rush this with cold cream cheese. The result? A lumpy dip that I had to pick chunks out of. Cold cream cheese doesn’t blend smoothly, and no amount of beating will fix it. Give it at least 30 minutes on the counter.
- Whip the Cream First, Then the Cream Cheese: You don’t need to wash your beaters between these steps. Just use the same beaters—it’s fine. But whip the cream first because it’s easier to get a clean bowl for the cream cheese than to try and scrape out all the cream cheese residue from the first bowl.
- The “Stiff Peaks” Test: When you’re whipping the cream, stop and check it frequently. You want it to hold its shape firmly. If you over-whip it, it will start to look grainy and separate. If that happens, don’t panic—you can still use it, but the dip won’t be as fluffy. Just add it and move on; it will still taste amazing.
- Patience with Chilling: I know it’s hard to wait, but the 2-hour chill is non-negotiable. I once served it after only 30 minutes, and it was too runny to hold a dip. It was still tasty, but it was more of a sauce. The chill time allows the cream cheese to firm back up and the flavors to really marry.
- Room Temperature is Key: If you take the dip out of the fridge and it’s too firm to scoop easily, let it sit at room temperature for 10-15 minutes before serving. It will soften to the perfect consistency.
Variations & Adaptations
One of the best things about this recipe is how easy it is to play with. Here are some ways I’ve changed it up over the years:
- Maple Pecan Twist: Swap the brown sugar for 1/2 cup of pure maple syrup (reduce the granulated sugar to 2 tablespoons to keep it from being too sweet). Fold in 1/2 cup of toasted, chopped pecans just before serving. The maple and pecan combo is pure fall heaven.
- Chocolate Pumpkin Dream: Add 1/4 cup of unsweetened cocoa powder to the cream cheese mixture along with the pumpkin. The chocolate and pumpkin are a surprisingly amazing pair. Serve with chocolate wafer cookies for a double-chocolate experience.
- Vegan & Dairy-Free Version: Use a block of vegan cream cheese (make sure it’s the firm, block-style kind, not the spreadable tub) and chill a can of full-fat coconut cream overnight. Scoop out the solid cream and whip it just like you would heavy cream. It works like a charm.
- Spiced Chai Dip: Instead of the individual spices, use 2 teaspoons of chai spice blend. You can find this at most grocery stores, or make your own with cardamom, cinnamon, ginger, cloves, and black pepper. It gives the dip a warm, aromatic kick that’s incredible with shortbread cookies.
- Savory-Sweet Surprise: Add a teaspoon of fresh, finely chopped rosemary to the dip along with the spices. It sounds weird, but trust me—the herbal note cuts through the sweetness and makes it incredibly sophisticated. Serve with thin, crisp rosemary crackers for a fun appetizer.
Serving & Storage Suggestions
This dip is best served cold, straight from the fridge, but let it sit out for about 10 minutes to soften slightly for the perfect scoopable texture. I love presenting it in a small, shallow bowl set on a large wooden board or a slate platter.
What to Dip:
- Gingersnaps: The classic choice. The spicy, molasses-y crunch is the perfect contrast to the creamy, cool dip.
- Apple Slices: Granny Smith apples are my favorite—the tartness cuts through the richness beautifully.
- Pear Slices: Bosc or Anjou pears add a delicate sweetness that pairs wonderfully with the pumpkin spices.
- Graham Crackers: For a nostalgic, s’mores-like feel.
- Vanilla Wafers or Shortbread Cookies: For a milder, buttery base.
Storage:
- Refrigerator: Store any leftover dip in an airtight container in the fridge for up to 5 days. The texture will stay perfect. Honestly, it might even be better on day two after the flavors have had more time to meld.
- Freezer: I don’t recommend freezing this dip. The texture of the cream cheese and whipped cream can become grainy and watery upon thawing. It’s best made fresh or within a few days.
- Make-Ahead: This is a fantastic make-ahead recipe. You can prepare the dip up to 2 days in advance. Just keep it covered in the fridge and give it a quick stir before serving if it looks a little separated (it rarely does).
Nutritional Information & Benefits
While this is definitely a treat, it does have some redeeming qualities! Here’s a rough estimate per serving (about 1/4 cup of dip, not including cookies):
- Calories: ~180
- Fat: 12g
- Carbohydrates: 17g
- Sugar: 14g
- Protein: 2g
- Vitamin A: 70% of the Daily Value (from the pumpkin)
Health Highlights:
- Pumpkin Power: Pumpkin is packed with Vitamin A, which is great for your eyes and immune system. It’s also a good source of fiber.
- Spice Benefits: Cinnamon and ginger are known for their anti-inflammatory properties and can help with blood sugar regulation.
- Calcium: The cream cheese and heavy cream provide a decent amount of calcium for bone health.
Dietary Considerations: This recipe is naturally gluten-free (just be sure to serve it with gluten-free cookies). It can be made dairy-free and vegan with the substitutions mentioned above. It is not low-fat or low-sugar, but it’s a wonderful indulgence for special occasions.
I believe in balance, so I love that this dip lets me enjoy a seasonal treat without feeling like I’ve overdone it. A little bit goes a long way, and the flavor is so satisfying that you don’t need a huge portion.
Conclusion
This pumpkin cheesecake dip is more than just a recipe—it’s a little moment of fall that you can create in minutes. It’s the kind of thing that makes you slow down, take a bite, and actually taste the season. The creamy, spiced pumpkin, the crunchy gingersnap, the way it all comes together in a bowl that somehow feels like a hug.
I hope you give it a try and make it your own. Maybe you’ll add a little extra cinnamon, or serve it with apple slices, or bring it to a party where people will gather around the bowl and ask for the recipe. That’s the best part of cooking, honestly—sharing something good and watching people enjoy it.
I’d love to hear how it turns out for you! Drop a comment below and let me know if you tried any variations, or tag me in your photos if you share them online. Your adaptations might just inspire someone else (and me!). Until next time, happy dipping, and may your fall be full of cozy, delicious moments.
Frequently Asked Questions
Can I use pumpkin pie filling instead of pumpkin puree?
I wouldn’t recommend it. Pumpkin pie filling is already sweetened and spiced, so it will throw off the balance of this recipe completely. You’ll end up with a dip that’s way too sweet and has a weird texture. Stick with 100% pure pumpkin puree for the best results.
My dip turned out runny. What did I do wrong?
This usually happens for one of two reasons: either the cream cheese wasn’t fully softened (which can cause it to not emulsify properly), or the dip wasn’t chilled long enough. Make sure you chill it for at least 2 hours. If it’s still runny after that, you might have over-whipped the cream or used a low-fat cream cheese, which has more water content.
Can I make this dip ahead of time for a party?
Absolutely! This is a perfect make-ahead recipe. You can prepare it up to 2 days in advance and keep it covered in the fridge. Just give it a quick stir before serving, and let it sit at room temperature for about 10 minutes to soften slightly for the perfect dipping texture.
What can I use instead of gingersnaps for dipping?
So many options! Apple slices (especially tart Granny Smith), pear slices, graham crackers, vanilla wafers, shortbread cookies, or even pretzels for a sweet-salty twist. I’ve even used it as a filling for crepes or as a topping for pancakes. It’s very versatile!
Can I freeze this pumpkin cheesecake dip?
I don’t recommend it. The texture of the cream cheese and whipped cream can become grainy and watery after freezing and thawing. It’s really best enjoyed fresh or within a few days of making it. The good news is, it keeps well in the fridge for up to 5 days, so you have plenty of time to finish it!
Pin This Recipe!
Best Pumpkin Cheesecake Dip with Gingersnaps (Easy & Cozy!)

This no-bake pumpkin cheesecake dip is creamy, spiced, and comes together in just 15 minutes. Perfect for fall gatherings, it’s a crowd-pleaser that pairs beautifully with gingersnaps, apple slices, or graham crackers.
- Prep Time: 15 minutes
- Cook Time: 0 minutes
- Total Time: 2 hours 15 minutes (includes chilling)
- Yield: 8 servings 1x
- Category: Dessert
- Cuisine: American
Ingredients
- 8 oz (226g) cream cheese, softened to room temperature
- 1/2 cup (100g) packed light brown sugar
- 1/4 cup (50g) granulated sugar
- 1 cup (240g) pumpkin puree (not pumpkin pie filling)
- 1 teaspoon vanilla extract
- 1 teaspoon ground cinnamon
- 1/2 teaspoon ground ginger
- 1/4 teaspoon ground nutmeg
- 1/8 teaspoon ground cloves
- Pinch of salt
- 1/2 cup (120ml) heavy whipping cream, cold
- 1 bag (about 12 oz) crisp gingersnap cookies (for serving)
- Optional: apple slices, pear slices, or graham crackers (for serving)
Instructions
- Whip the Cream: In a medium bowl, pour in the cold heavy whipping cream. Using an electric mixer with whisk attachments, beat on medium-high speed until stiff peaks form, about 2-3 minutes. Set aside in the fridge.
- Beat the Cream Cheese: In a large mixing bowl, beat the softened cream cheese on medium speed until smooth and fluffy, about 2 minutes. Scrape down the sides.
- Add the Sugars: Add the brown sugar and granulated sugar to the cream cheese. Beat on medium speed for 1-2 minutes until light and grainy.
- Mix in the Pumpkin & Spices: Add the pumpkin puree, vanilla extract, cinnamon, ginger, nutmeg, cloves, and salt. Beat on low speed at first, then increase to medium until fully combined and uniform in color. Scrape the bowl.
- Fold in the Whipped Cream: Take the whipped cream out of the fridge. Add about a third to the pumpkin mixture and gently fold with a rubber spatula. Add the remaining whipped cream and fold until no white streaks remain. The mixture should become light and fluffy.
- Chill: Transfer the dip to a serving bowl, smooth the top, and cover with plastic wrap. Refrigerate for at least 2 hours (or overnight for best flavor).
- Serve: Just before serving, arrange gingersnap cookies and optional fruit on a platter around the bowl. Sprinkle with extra cinnamon or crushed gingersnaps if desired.
Notes
Make sure cream cheese is fully softened to avoid lumps. Chill for at least 2 hours for proper consistency. For a dairy-free version, use vegan cream cheese and chilled coconut cream. The dip can be made up to 2 days ahead and stored in the fridge.
Nutrition
- Serving Size: 1/4 cup
- Calories: 180
- Sugar: 14
- Sodium: 120
- Fat: 12
- Saturated Fat: 7
- Carbohydrates: 17
- Fiber: 1
- Protein: 2
Keywords: pumpkin cheesecake dip, no-bake dessert, fall dessert, pumpkin dip, easy dessert, gingersnaps, Thanksgiving appetizer


