Red velvet cake is calling my name right now, and I’ve got everything but the oven preheated—which is exactly why this Decadent Layered Red Velvet Icebox Cake with Whipped Cream became my go-to. Honestly, sometimes you just want that luscious red velvet flavor without the fuss of baking, cooling, and slicing. And that’s where this icebox cake steps in, all creamy layers and that unmistakable cocoa-tangy charm, chilling out in the fridge until it’s perfectly set. I’m sitting here, spoon halfway to my mouth, realizing this cake isn’t just a dessert; it’s a moment—a sweet, velvety pause in the middle of a busy day.
What’s wild is how simple it is. You layer soft red velvet cookies or wafers with whipped cream, then let time do the magic. The cookies soak up the cream, turning into almost cake-like layers that melt on your tongue. It’s like the red velvet you love got a chill, smooth makeover that’s better for those days when you don’t want to turn on the oven or wait forever. Plus, the subtle tang from the cream cheese in the whipped cream layer reminds me of that classic cream cheese frosting but way lighter.
I remember making this for a last-minute get-together, scrambling to whip something up with what was in the fridge. It felt a little risky, but the cake came out so good that it became a permanent fixture for holidays and casual weekends alike. There’s just something about the way the layers come together, a quiet indulgence that feels like a secret treat shared among friends. If you ask me, this icebox cake isn’t just dessert; it’s a little slice of calm in a hectic world.
Why You’ll Love This Recipe
- Quick & Easy: Comes together in under 20 minutes, perfect for those busy weeknights or sudden dessert cravings.
- Simple Ingredients: No fancy or hard-to-find items—mostly pantry staples and fresh cream you might already have.
- Perfect for Celebrations: Whether a birthday, potluck, or casual hangout, this cake impresses without stress.
- Crowd-Pleaser: Kids, adults, red velvet skeptics—everyone asks for seconds.
- Unbelievably Delicious: The creamy whipped layers paired with moist cookie sheets offer next-level comfort food vibes.
- This recipe isn’t your average layered cake. Instead of baking layers separately, we use red velvet wafer cookies that soak up the whipped cream overnight, making the texture uniquely smooth and tender.
- The whipped cream is light but with a touch of cream cheese, giving it that classic tang without overpowering the red velvet flavor.
- It’s the kind of dessert that makes you close your eyes after the first bite—comfort food reimagined for those who want indulgence without the kitchen marathon.
What Ingredients You Will Need
This recipe uses simple, wholesome ingredients to deliver bold flavor and satisfying texture without the fuss. Most are pantry staples, and a few fresh items make all the difference.
- Red Velvet Wafer Cookies or Thin Red Velvet Cake Layers: About 12 ounces (340 grams). These form the cake’s layers. I prefer Keebler Fudge Stripes Red Velvet Wafers for their consistent texture, but you can also use homemade thin red velvet cake slices.
- Heavy Whipping Cream: 2 cups (480 ml), cold. This is the base for our luscious whipped cream layers.
- Cream Cheese: 4 ounces (115 grams), softened. Adds a subtle tang and richness to the cream.
- Powdered Sugar: 3/4 cup (90 grams), sifted. Sweetens the whipped cream perfectly without graininess.
- Vanilla Extract: 1 teaspoon. Brings depth to the whipped cream flavor.
- Cocoa Powder: 1 tablespoon (optional). For an extra hint of cocoa in the cream layers, enhancing that red velvet vibe.
- Salt: A pinch, to balance sweetness.
Substitutions: Use coconut cream instead of heavy cream for a dairy-free version, and swap cream cheese for a plant-based alternative. Almond flour red velvet cookies can replace wafers for a gluten-free twist.
Equipment Needed
- Mixing Bowls: One large for whipping cream and another medium for cream cheese mixture.
- Electric Mixer or Stand Mixer: Essential for whipping the cream and cream cheese to the right fluffy consistency.
- Spatula: For folding the whipped cream into the cream cheese blend smoothly.
- 9×9 Inch (23×23 cm) Square Baking Dish or Similar: Ideal for layering the cake evenly.
- Measuring Cups and Spoons: For accurate ingredient amounts.
- Plastic Wrap or Lid: To cover and chill the cake overnight.
If you don’t have a stand mixer, a handheld electric mixer works well. I’ve even done it by hand with a whisk, but it takes some muscle and patience. For budget-friendly options, basic mixing bowls and an affordable hand mixer will do just fine.
Preparation Method
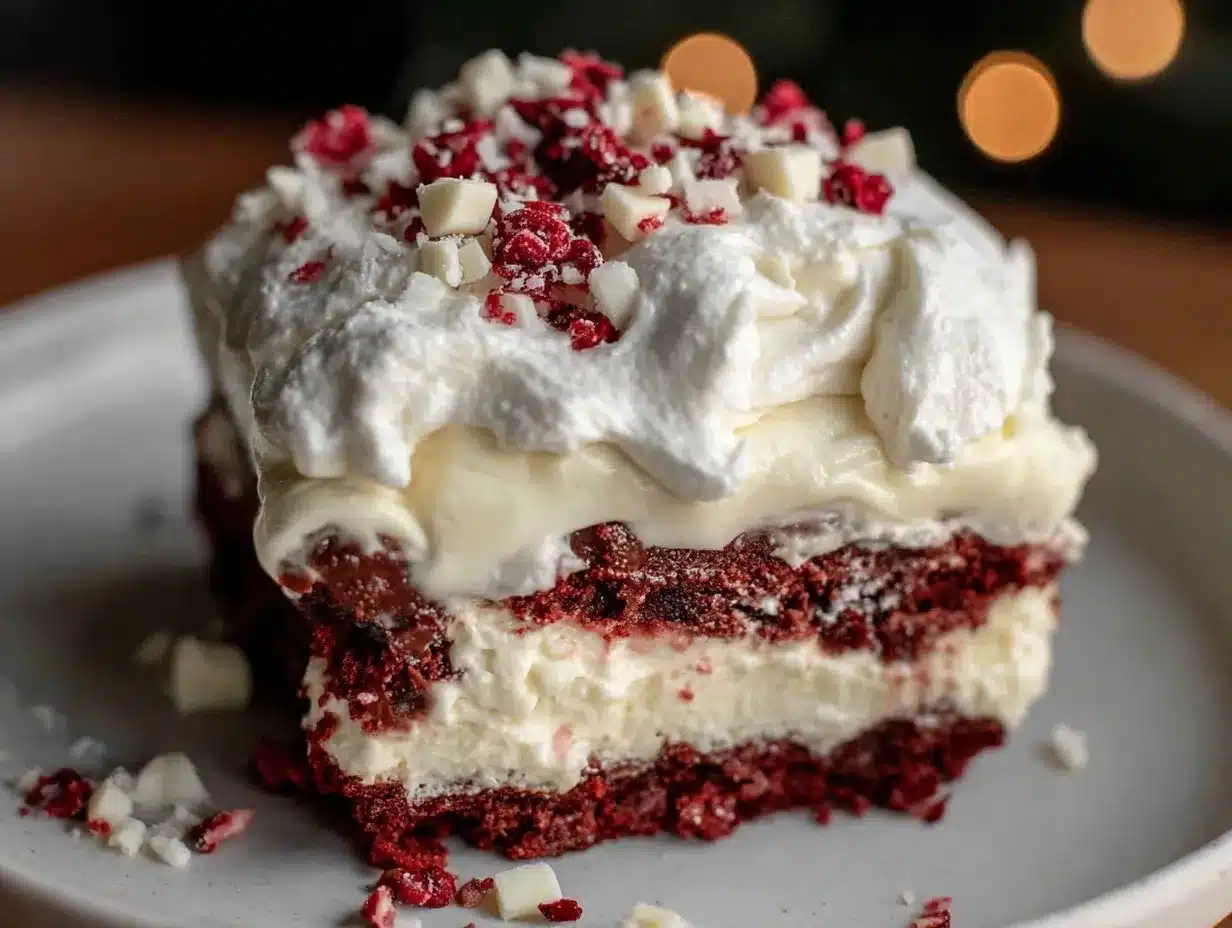
- Prepare the Whipped Cream Mixture (10 minutes): In a large chilled bowl, beat the cold heavy whipping cream on medium-high speed until it starts to thicken, about 2 minutes. In a separate bowl, beat the softened cream cheese with powdered sugar, vanilla extract, salt, and optional cocoa powder until smooth and creamy. Gently fold the whipped cream into the cream cheese mixture using a spatula, keeping as much air in as possible to maintain fluffiness.
- Layer the Icebox Cake (10 minutes): Spread a thin layer (about 1/3 cup or 80 ml) of the whipped cream mixture evenly on the bottom of your dish. Arrange a single layer of red velvet wafers or cake slices over the cream, overlapping slightly if needed. Spread another layer of whipped cream on top, smoothing it out, then repeat layering cookies and cream until you finish with a cream layer on top. Reserve some cream for the final topping.
- Chill the Cake (Minimum 6 hours or overnight): Cover the dish tightly with plastic wrap or a lid. Refrigerate the cake for at least 6 hours, preferably overnight. This step is key for the wafers to soften and meld with the cream, creating those signature melt-in-your-mouth layers.
- Final Touches Before Serving (5 minutes): Before serving, spread the reserved whipped cream evenly on top for a smooth finish. Optionally, dust with a little cocoa powder or shaved white chocolate for extra flair.
- Serving: Cut into squares with a sharp knife dipped in hot water for clean edges. Serve chilled for the best texture and flavor.
Troubleshooting tips: If your cream is too runny, chill the bowl and beaters before whipping. If cookies don’t soften enough, let the cake sit a bit longer. The texture should be creamy and tender, not crunchy.
Cooking Tips & Techniques
Whipping the cream just right is the trickiest part. You want stiff peaks but not overwhipped cream turning grainy. I usually stop when the cream holds soft peaks, then fold it gently into the cream cheese mixture to keep it airy. If you overdo it, the cream can break and look curdled.
Another tip: soften your cream cheese to room temperature before mixing. Cold cream cheese lumps up and makes blending a pain, which can ruin the smooth texture you want.
Layering evenly matters too. I find using a small offset spatula helps spread the cream nicely without tearing the wafers. Also, press the layers down gently to eliminate air gaps but don’t squish them too hard—otherwise, the cake turns dense.
Timing is essential. This cake really benefits from an overnight chill. It’s tempting to dig in early, but patience rewards you with those perfect, melded layers. When I’m short on time, a minimum of 6 hours works, but honestly, overnight is best.
One last thing—don’t skip the final whipped cream topping. It adds a polished look and an extra creamy bite that makes the whole cake feel special.
Variations & Adaptations
- Berry Twist: Add a layer of fresh raspberries or strawberries between the cream and wafers for a burst of tartness. I love this in summer—it brightens the decadence.
- Chocolate Lovers: Mix mini chocolate chips or finely chopped dark chocolate into the whipped cream for added texture and richness.
- Vegan Version: Use coconut cream whipped with powdered sugar and dairy-free cream cheese to build layers. Swap wafers for vegan-friendly red velvet cookies.
- Nutty Crunch: Sprinkle chopped toasted pecans or walnuts between layers for a pleasant crunch that contrasts the softness.
- Spiced Red Velvet: Add a pinch of cinnamon and nutmeg to the cream cheese mixture to warm up the flavors, perfect for fall or winter gatherings.
When I first tried adding fresh berries, it transformed the cake into a lighter, more refreshing dessert, perfect alongside a rich no-bake strawberry cheesecake cup for a summer party. It’s all about matching textures and seasonality.
Serving & Storage Suggestions
This icebox cake is best served cold, straight from the fridge. The layers hold their shape well, but they soften beautifully so each forkful is creamy and light. Presentation-wise, a dusting of cocoa or a few fresh berries on top adds a lovely pop of color and texture.
Pair it with a hot cup of coffee or a glass of cold milk for a classic combo. For a more indulgent treat, a drizzle of chocolate sauce or a side of fresh whipped cream can’t hurt.
Store leftovers covered tightly in the fridge for up to 3 days. The cake may soften further, but honestly, it becomes even more luscious. Freezing is not recommended because the texture changes and the cream can separate.
When reheating is needed (if you prefer it less chilled), leave it on the counter for 10-15 minutes before serving to let the cream soften slightly. This subtle change lets the flavors bloom without the chill dulling them.
Nutritional Information & Benefits
One generous serving (about 1/8 of the cake) contains approximately 320 calories, 22 grams of fat, 25 grams of carbohydrates, and 4 grams of protein. This dessert is rich and satisfying, so a little goes a long way.
The cream cheese provides calcium and a bit of protein, while the heavy cream adds healthy fats that help keep you full. If you want to lighten it up, try using half-and-half or a lighter cream variety, though texture might be slightly different.
This recipe is gluten-friendly if you select gluten-free red velvet wafers, and you can easily modify it for dairy-free diets as mentioned. Just be mindful of the sugar content if you’re watching carbs.
Conclusion
This Decadent Layered Red Velvet Icebox Cake with Whipped Cream is a sweet reminder that indulgence doesn’t have to be complicated. It’s a dessert that feels special yet is surprisingly simple, perfect for when you want rich flavor without the stress of baking. I love how easy it is to customize, and it always feels like a little celebration every time I slice into it.
Give it a try, tweak it to your taste, and I promise it’ll become a staple in your dessert rotation—just like it did in mine. If you end up loving this as much as I do, I’d be thrilled to hear about your variations or moments enjoying it.
FAQs About Decadent Layered Red Velvet Icebox Cake
Can I use regular cake instead of wafer cookies?
Yes! Thin slices of homemade or store-bought red velvet cake work well. Just make sure they’re thin and firm enough to layer without falling apart.
How long should I chill the icebox cake?
At least 6 hours, but overnight is ideal for the best texture and flavor melding.
Can I make this cake ahead of time?
Absolutely. It actually tastes better the next day. Just keep it covered in the fridge.
What if I don’t have cream cheese?
You can omit it, but the whipped cream will be lighter and less tangy. Adding a bit of mascarpone can be a good substitute.
Is this recipe suitable for kids?
Yes! It’s a crowd-pleaser for all ages, especially with the sweet, smooth whipped cream and familiar red velvet flavor.
For a delightful dinner pairing, try serving this dessert after flavorful grilled lemon herb chicken thighs with Mediterranean quinoa, where the fresh herbs and citrus balance the rich sweetness perfectly.
Pin This Recipe!

Decadent Layered Red Velvet Icebox Cake Recipe Easy Homemade Dessert
A no-bake red velvet icebox cake layered with whipped cream and red velvet wafer cookies, offering a luscious, creamy dessert perfect for busy days and celebrations.
- Prep Time: 15 minutes
- Cook Time: 0 minutes
- Total Time: 6 hours 15 minutes
- Yield: 8 servings 1x
- Category: Dessert
- Cuisine: American
Ingredients
- 12 ounces red velvet wafer cookies or thin red velvet cake layers
- 2 cups heavy whipping cream, cold
- 4 ounces cream cheese, softened
- 3/4 cup powdered sugar, sifted
- 1 teaspoon vanilla extract
- 1 tablespoon cocoa powder (optional)
- Pinch of salt
Instructions
- Prepare the whipped cream mixture: In a large chilled bowl, beat the cold heavy whipping cream on medium-high speed until it starts to thicken, about 2 minutes.
- In a separate bowl, beat the softened cream cheese with powdered sugar, vanilla extract, salt, and optional cocoa powder until smooth and creamy.
- Gently fold the whipped cream into the cream cheese mixture using a spatula, keeping as much air in as possible to maintain fluffiness.
- Layer the icebox cake: Spread a thin layer (about 1/3 cup or 80 ml) of the whipped cream mixture evenly on the bottom of your dish.
- Arrange a single layer of red velvet wafers or cake slices over the cream, overlapping slightly if needed.
- Spread another layer of whipped cream on top, smoothing it out, then repeat layering cookies and cream until you finish with a cream layer on top. Reserve some cream for the final topping.
- Chill the cake: Cover the dish tightly with plastic wrap or a lid. Refrigerate the cake for at least 6 hours, preferably overnight.
- Final touches before serving: Before serving, spread the reserved whipped cream evenly on top for a smooth finish. Optionally, dust with a little cocoa powder or shaved white chocolate for extra flair.
- Cut into squares with a sharp knife dipped in hot water for clean edges. Serve chilled for the best texture and flavor.
Notes
Chill the bowl and beaters before whipping cream if cream is too runny. Let the cake chill overnight for best texture. Use a sharp knife dipped in hot water for clean slices. Softened cream cheese is key for smooth texture. Optional cocoa powder adds extra cocoa flavor. Variations include adding fresh berries, chocolate chips, nuts, or spices.
Nutrition
- Serving Size: 1/8 of the cake
- Calories: 320
- Fat: 22
- Carbohydrates: 25
- Protein: 4
Keywords: red velvet, icebox cake, no bake dessert, whipped cream, layered cake, easy dessert, red velvet wafers


