My brother-in-law, Carlos, had sworn he hated pan de muerto for fifteen years. Fifteen years. Every October, his grandmother would make her version, and he’d dutifully take a polite bite, make a face, and reach for a store-bought cookie instead. He claimed it was too dry, too bland, and honestly, he just didn’t get the hype. Then, last November, I was testing this recipe for a Dia de los Muertos dinner party I was hosting. I had three test loaves cooling on the counter, covered in that glossy orange blossom glaze, when I found him in the kitchen at midnight. He was standing in the dark, breaking off pieces from a cooled loaf, dipping them directly into the bowl of leftover glaze. He didn’t even see me standing there. I just watched him finish half a loaf before he finally noticed me, froze with his hand in the bowl, and mumbled, “Okay, this one’s different.” That’s when I knew I had something worth sharing.
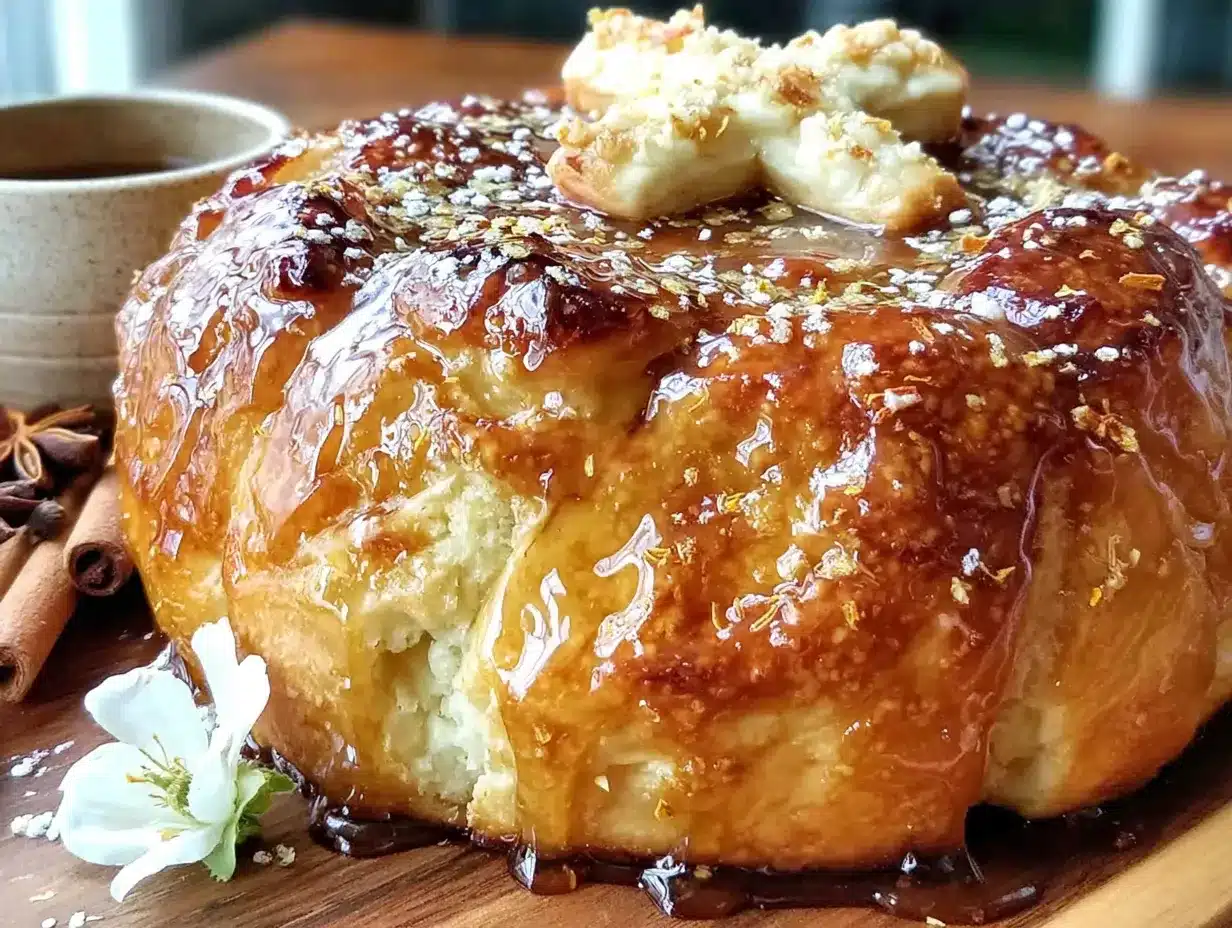
This isn’t just another bread recipe. This is the pan de muerto that makes people who “don’t like it” suddenly become believers. The secret is in the texture—a pillowy, brioche-like crumb that stays moist for days—and that fragrant, floral glaze that seeps into every crevice. It’s the kind of bread you pull apart at a party, and suddenly everyone’s talking about it. Maybe you’ve been that person who had a dry, disappointing version once and wrote it off. I get it. But this one? This one is different. It’s the centerpiece of the table, the thing guests hover around, and the recipe you’ll be asked for year after year.
Why You’ll Love This Recipe
Let me tell you why this version has become my non-negotiable party bread. I’ve tested this recipe at least eight times over two years, tweaking the hydration, the proofing times, and the glaze ratio until it was absolutely foolproof. I even had a pastry-chef friend blind-taste it against a bakery version, and she couldn’t tell the difference. That’s the level of testing we’re talking about here.
- Show-Stopping Presentation: This bread looks like you spent hours sculpting it. The bone-shaped decorations and glossy glaze make it an instant table centerpiece.
- Perfect for Hosting: You can prep the dough a day ahead, shape it the morning of, and bake it just before guests arrive. The aroma alone will set the mood.
- Incredibly Moist Texture: No dry, crumbly bread here. The orange blossom glaze locks in moisture and adds a floral sweetness that’s impossible to resist.
- Simple Ingredients: Butter, eggs, flour, sugar, orange zest—things you probably already have. No weird specialty items except the orange blossom water.
- Crowd-Pleaser: I’ve served this at potlucks, dinner parties, and casual gatherings. It disappears every single time. Kids love the sweet glaze, adults appreciate the sophisticated flavor.
Honestly, what sets this apart is the texture. Most pan de muerto leans toward a dense, almost bread-like crumb. This one is enriched with extra egg yolks and butter, giving it that cloud-like, brioche feel. The orange blossom glaze isn’t just a drizzle—it’s a soak that keeps the bread tender for three days. It’s comfort food that feels special, festive, and deeply satisfying.
What Ingredients You Will Need
This recipe uses simple, wholesome ingredients to deliver that signature soft texture and floral aroma. Most of these are pantry staples, which makes this an easy recipe to whip up even on a whim. Here’s what you’ll need, broken down by function:
For the Dough
- All-purpose flour, 4 cups (500g) – I’ve tested this with bread flour too, but all-purpose gives a softer, more tender crumb. King Arthur Flour is my go-to for consistent results.
- Active dry yeast, 2 ¼ teaspoons (one packet) – Make sure it’s fresh. I’ve had dud packets ruin a batch before—trust me, check the expiration date.
- Whole milk, ½ cup (120ml), warmed to 110°F – Warm milk activates the yeast faster. Don’t let it get too hot, or you’ll kill the yeast.
- Granulated sugar, ½ cup (100g) – This adds sweetness and helps with browning.
- Unsalted butter, ½ cup (113g), softened – I prefer unsalted so I can control the salt level. Let it sit out for 30 minutes before starting.
- Large eggs, 3 whole + 1 yolk – The extra yolk adds richness and that golden color. Room temperature eggs incorporate better.
- Orange zest, 2 tablespoons – From about 2 large oranges. This is where the flavor starts. Use a microplane for the finest zest.
- Vanilla extract, 1 teaspoon – Pure vanilla, not imitation. It makes a difference.
- Salt, 1 teaspoon – Balances the sweetness and strengthens the gluten.
For the Orange Blossom Glaze
- Powdered sugar, 2 cups (240g) – Sift it first to avoid lumps. Trust me on this one.
- Orange blossom water, 3 tablespoons – This is the star. You can find it at Middle Eastern markets or online. Nielsen-Massey makes a good one.
- Fresh orange juice, 2 tablespoons – Adds brightness and thins the glaze to the right consistency.
- Orange zest, 1 teaspoon – For garnish and extra pop of flavor.
For the Bone Decorations
- Extra dough, about ⅓ of the recipe – You’ll reserve this before shaping the main loaf.
- Egg wash, 1 egg beaten with 1 tablespoon water – For that glossy, golden-brown finish.
- Sanding sugar or coarse sugar, optional – Sprinkled on top before baking for extra crunch.
Equipment Needed
You don’t need a professional bakery setup for this. Here’s what I use, and what you can substitute if needed:
- Stand mixer with dough hook – This dough is sticky and requires 8-10 minutes of kneading. A stand mixer saves your arms. If you don’t have one, you can knead by hand, but it’ll take about 15 minutes and a lot of patience.
- Large mixing bowl – For the first proof. Glass or ceramic works best.
- Baking sheet, 13×18 inch – Line it with parchment paper for easy cleanup.
- Microplane or fine grater – For zesting oranges. A box grater works in a pinch, but the zest won’t be as fine.
- Pastry brush – For applying the egg wash. A silicone brush is easier to clean.
- Cooling rack – Essential for letting the glaze set without making the bottom soggy.
- Plastic wrap or a clean kitchen towel – For covering the dough during proofing.
Preparation Method
I’ve broken this down into clear stages so you can follow along without feeling overwhelmed. Take your time—good bread is worth the wait.
Step 1: Activate the Yeast
In a small bowl, combine the warm milk (110°F—test it on your wrist, it should feel like warm bath water) with 1 tablespoon of the sugar and the active dry yeast. Stir gently and let it sit for 5-10 minutes until it becomes foamy and smells like bread. If it doesn’t foam, your yeast is dead—start over with fresh yeast.
Step 2: Mix the Dough
In the bowl of your stand mixer, whisk together the flour, remaining sugar, salt, and orange zest. Add the softened butter, eggs, egg yolk, vanilla extract, and the foamy yeast mixture. Use the dough hook on low speed for 2 minutes until everything comes together into a shaggy mass. Increase to medium speed and knead for 8-10 minutes. The dough should be smooth, elastic, and slightly sticky—it should pull away from the sides of the bowl but still stick to the bottom. If it’s too sticky, add flour 1 tablespoon at a time, but don’t overdo it.
Step 3: First Proof
Lightly oil a large bowl and place the dough inside, turning it once to coat. Cover tightly with plastic wrap and let it rise in a warm, draft-free spot for 1.5 to 2 hours, or until doubled in size. I like to put it in my oven with the light on—it stays at a consistent 80°F. Don’t rush this step. Under-proofed dough will be dense.
Step 4: Shape the Main Loaf
Punch the dough down gently to release the gas. Transfer it to a lightly floured surface. Cut off about ⅓ of the dough and set it aside, covered with a towel, for the bone decorations. Shape the remaining dough into a smooth, round ball by tucking the edges underneath. Place it on your parchment-lined baking sheet and gently flatten it slightly into a dome shape.
Step 5: Make the Bone Decorations
Divide the reserved dough into 4 equal pieces. Roll each piece into a rope about 8 inches long. Cut each rope into two pieces—one about 6 inches, one about 2 inches. Take the longer piece and roll it into a smooth log. Then, using a knife, make two small slits on each end to create the “knobs” of the bone. Repeat with all four ropes. Place two bones across the top of the loaf to form an X, and two more to form a cross shape. Gently press them into the dough so they stick.
Step 6: Second Proof
Cover the shaped loaf loosely with plastic wrap and let it rise for another 45-60 minutes. It should look puffy and almost doubled. Meanwhile, preheat your oven to 350°F (175°C).
Step 7: Egg Wash and Bake
In a small bowl, beat the egg with 1 tablespoon of water. Gently brush the entire surface of the bread—including the bone decorations—with the egg wash. Be careful not to deflate the dough. Bake for 25-30 minutes, rotating the pan halfway through. The bread should be deep golden brown and sound hollow when tapped on the bottom. If it’s browning too fast, tent it with foil after 15 minutes.
Step 8: Glaze and Finish
Let the bread cool on the baking sheet for 10 minutes, then transfer it to a cooling rack. While it’s still warm, whisk together the powdered sugar, orange blossom water, orange juice, and orange zest until smooth. The glaze should be thick but pourable—thin with more juice if needed. Drizzle the glaze generously over the warm bread, letting it drip down the sides. Sprinkle with sanding sugar and extra zest if desired. Let the glaze set for at least 20 minutes before serving.
Cooking Tips & Techniques
I’ve made every mistake in the book so you don’t have to. Here are the things I wish someone had told me:
- Don’t skip the zest. Orange zest is where the flavor lives. The juice adds moisture, but the zest gives that bright, aromatic punch. Zest the oranges before you juice them—it’s much easier.
- Temperature matters. If your kitchen is cold, your dough will take forever to rise. I’ve had batches take 4 hours in a drafty kitchen. Use the oven-with-light trick or place the bowl on top of your refrigerator, which gives off gentle heat.
- Glaze while warm, not hot. If the bread is too hot, the glaze will just run off and pool on the rack. If it’s completely cool, the glaze won’t soak in. Aim for that sweet spot—warm to the touch, about 15 minutes out of the oven.
- Multitask smartly. While the dough is proofing, clean your dishes, zest your oranges, and measure out your glaze ingredients. It makes the final assembly so much less stressful.
- Don’t over-flour. When shaping, use just enough flour to prevent sticking. Too much flour makes the dough tough and dry. I keep a small bowl of flour nearby and dip my hands instead of dusting the surface.
Variations & Adaptations
This recipe is flexible—I’ve played around with it more times than I can count. Here are some of my favorite twists:
- Chocolate Orange Version: Add ¼ cup of cocoa powder to the flour mixture and fold in ½ cup of dark chocolate chips after kneading. The chocolate pairs beautifully with the orange blossom glaze.
- Vegan Adaptation: Substitute the butter with vegan butter (I like Miyoko’s), use flax eggs (1 tablespoon ground flax + 3 tablespoons water per egg), and replace the milk with oat milk. The texture will be slightly denser but still delicious.
- Spiced Pan de Muerto: Add 1 teaspoon of cinnamon, ½ teaspoon of nutmeg, and ¼ teaspoon of cloves to the flour. It gives a warm, holiday-like flavor that’s perfect for fall gatherings.
- Gluten-Free Option: Use a 1:1 gluten-free flour blend that contains xanthan gum. Cup4Cup works well. The dough will be stickier, so wet your hands when shaping. Reduce the kneading time to 5 minutes.
- Savory Twist: Skip the sugar and glaze, and add 1 tablespoon of dried rosemary and ½ cup of grated Parmesan to the dough. Shape into rolls instead of a loaf. Great for serving with soup.
Serving & Storage Suggestions
This bread is best served warm, when the glaze is still slightly soft and the crumb is pillowy. For a dinner party, I like to place it on a wooden board in the center of the table and let everyone pull pieces off. It’s a communal experience.
What to serve alongside: A cup of Mexican hot chocolate or a strong café de olla is the classic pairing. For a brunch spread, serve it with fresh fruit, whipped cream, and a side of scrambled eggs. The sweetness of the bread balances beautifully with savory dishes.
Storage: Store leftover bread in an airtight container at room temperature for up to 3 days. Do not refrigerate—it will dry out the bread. If you need to keep it longer, wrap it tightly in plastic wrap and freeze for up to 2 months.
Reheating: To revive day-old bread, wrap it in foil and warm it in a 300°F oven for 10 minutes. The glaze will soften again, and the bread will taste almost fresh-baked. You can also microwave individual slices for 15 seconds, but the texture won’t be as good.
Flavor development: Honestly, this bread tastes even better on day two. The orange blossom glaze soaks into the crumb overnight, making it even more moist and fragrant. I’ve had guests ask for the leftovers specifically.
Nutritional Information & Benefits
Let’s be real—this is a treat, not a health food. But it does have some redeeming qualities. Here’s the estimated nutrition per serving (1/8 of the loaf):
- Calories: 380
- Fat: 14g
- Carbohydrates: 56g
- Protein: 7g
- Fiber: 1g
- Sugar: 28g
The orange zest provides a good dose of vitamin C and antioxidants. The eggs and butter add protein and healthy fats, which help keep you full. If you’re watching your sugar intake, you can reduce the glaze by half or use a sugar substitute in the dough (though I haven’t tested that myself). This recipe contains gluten, dairy, and eggs—not suitable for those with allergies to these ingredients.
Conclusion
This pan de muerto with orange blossom glaze is more than just a recipe—it’s the bread that turned my brother-in-law from a skeptic into a fan. It’s the bread that makes people stop mid-conversation and ask, “What is that?” It’s the bread that disappears before the main course even hits the table. I love it because it’s forgiving, it’s beautiful, and it carries so much meaning. Whether you’re celebrating Dia de los Muertos, hosting a fall gathering, or just want to bake something that feels special, this recipe delivers.
I’d love to hear how it turns out for you. Did you try a variation? Did your guests love it as much as mine did? Drop a comment below and let me know—I read every single one. And if you’re looking for more crowd-pleasing recipes, don’t miss my easy Mexican hot chocolate cookies and this best 3-ingredient pumpkin bread for your fall baking lineup. Happy baking, friends—you’ve got this.
Frequently Asked Questions
Can I make the dough ahead of time?
Absolutely. After the first proof, punch down the dough, wrap it tightly in plastic wrap, and refrigerate for up to 24 hours. When you’re ready to shape, let it sit at room temperature for 30 minutes before proceeding.
What if I can’t find orange blossom water?
You can substitute with 1 teaspoon of orange extract mixed with 2 tablespoons of water, or simply use fresh orange juice and zest. The flavor won’t be as floral, but it will still be delicious.
Why did my bread turn out dense?
This usually happens for one of three reasons: the yeast was dead (it didn’t foam), the dough was over-floured during kneading, or it didn’t proof long enough. Make sure your yeast is fresh and give the dough time to double.
Can I freeze the baked bread?
Yes. Let the bread cool completely, wrap it tightly in plastic wrap, then in foil, and freeze for up to 2 months. Thaw at room temperature and reheat in a 300°F oven for 10 minutes before glazing fresh.
How do I know when the bread is fully baked?
The internal temperature should reach 190°F on an instant-read thermometer. Also, the bread should be deep golden brown and sound hollow when you tap the bottom. If you’re unsure, bake it an extra 3-5 minutes—better to overbake slightly than have a doughy center.
Pin This Recipe!

Best Pan de Muerto with Orange Blossom Glaze
This pillowy, brioche-like pan de muerto is soaked in a fragrant orange blossom glaze, making it incredibly moist and flavorful. It’s the bread that turns skeptics into believers, perfect for Dia de los Muertos or any fall gathering.
- Prep Time: 30 minutes
- Cook Time: 30 minutes
- Total Time: 3 hours 30 minutes (including proofing)
- Yield: 8 servings 1x
- Category: Bread
- Cuisine: Mexican
Ingredients
- 4 cups (500g) all-purpose flour
- 2 ¼ teaspoons (one packet) active dry yeast
- ½ cup (120ml) whole milk, warmed to 110°F
- ½ cup (100g) granulated sugar
- ½ cup (113g) unsalted butter, softened
- 3 large eggs + 1 yolk, room temperature
- 2 tablespoons orange zest
- 1 teaspoon vanilla extract
- 1 teaspoon salt
- 2 cups (240g) powdered sugar, sifted
- 3 tablespoons orange blossom water
- 2 tablespoons fresh orange juice
- 1 teaspoon orange zest (for glaze)
- 1 egg (for egg wash)
- 1 tablespoon water (for egg wash)
- Sanding sugar or coarse sugar (optional)
Instructions
- Activate the yeast: In a small bowl, combine warm milk (110°F) with 1 tablespoon of sugar and active dry yeast. Stir gently and let sit for 5-10 minutes until foamy.
- Mix the dough: In a stand mixer bowl, whisk together flour, remaining sugar, salt, and orange zest. Add softened butter, eggs, egg yolk, vanilla extract, and foamy yeast mixture. Use dough hook on low speed for 2 minutes, then medium speed for 8-10 minutes until smooth and elastic.
- First proof: Lightly oil a large bowl, place dough inside, turning to coat. Cover with plastic wrap and let rise in a warm spot for 1.5 to 2 hours until doubled in size.
- Shape the main loaf: Punch down dough, transfer to floured surface. Cut off ⅓ of dough for decorations. Shape remaining dough into a smooth round ball, place on parchment-lined baking sheet, and flatten slightly into a dome.
- Make bone decorations: Divide reserved dough into 4 equal pieces. Roll each into an 8-inch rope. Cut each rope into 6-inch and 2-inch pieces. Roll longer piece into a log, make two small slits on each end for knobs. Place two bones across loaf to form an X, two more to form a cross. Press gently to stick.
- Second proof: Cover shaped loaf loosely with plastic wrap and let rise for 45-60 minutes until puffy. Preheat oven to 350°F (175°C).
- Egg wash and bake: Beat egg with 1 tablespoon water. Gently brush entire surface of bread. Bake for 25-30 minutes, rotating halfway, until deep golden brown and hollow when tapped.
- Glaze and finish: Let bread cool on baking sheet for 10 minutes, then transfer to cooling rack. Whisk together powdered sugar, orange blossom water, orange juice, and orange zest until smooth. Drizzle generously over warm bread. Sprinkle with sanding sugar and extra zest if desired. Let glaze set for at least 20 minutes before serving.
Notes
Don’t skip the orange zest—it’s where the flavor lives. Glaze while warm, not hot, for best absorption. If your kitchen is cold, use the oven with the light on for proofing. The bread tastes even better on day two as the glaze soaks in.
Nutrition
- Serving Size: 1/8 of loaf
- Calories: 380
- Sugar: 28
- Fat: 14
- Carbohydrates: 56
- Fiber: 1
- Protein: 7
Keywords: pan de muerto, day of the dead bread, orange blossom glaze, mexican bread, brioche, fall baking, dia de los muertos


