The neighborhood Halloween block party was in six hours and I’d completely forgotten. Everyone else would be bringing elaborate themed desserts—I’d seen the sign-up sheet weeks ago. I had a box of instant pudding, some orange gelatin, and a bottle of vanilla extract staring at me from my pantry. Not exactly the stuff of party legend.
I mean, let’s be real. I was this close to grabbing a bag of store-bought cookies and calling it a day. But then I spotted the heavy cream in my fridge, and something clicked. These layered jello cups—they look like candy corn, taste like a dream, and honestly? They’re almost too easy. I threw them together in a panic, sweating over my kitchen counter, hoping they’d at least look festive.
You know that feeling when you show up to a party with something that looks like you spent hours on it, but you really just winged it? That was me. These Crowd-Pleasing Candy Corn Layered Jello Cups stole the show. People kept asking for the recipe, and I just smiled, sheepish and amused. I keep making them because they’re that perfect mix of impressive and effortless—the kind of dessert that makes you look like a hero without breaking a sweat.
Why You’ll Love This Recipe
Let me tell you why this recipe has become my secret weapon for every fall gathering. After testing these cups at three different parties (and getting asked for the recipe each time), I can confidently say they deliver every single time.
- Quick & Easy: Comes together in under 30 minutes of active prep time. The hardest part is waiting for the layers to set, but that’s just fridge time.
- Simple Ingredients: No fancy grocery trips needed. You likely already have everything in your kitchen—gelatin, pudding mix, cream, and vanilla wafers.
- Perfect for Fall Gatherings: Great for Halloween parties, Thanksgiving potlucks, or any autumn get-together where you want something festive and fun.
- Crowd-Pleaser: Always gets rave reviews from kids and adults alike. I’ve seen people go back for thirds, no joke.
- Unbelievably Delicious: The texture combo of creamy pudding, wobbly gelatin, and crunchy cookie crumbs is next-level comfort food.
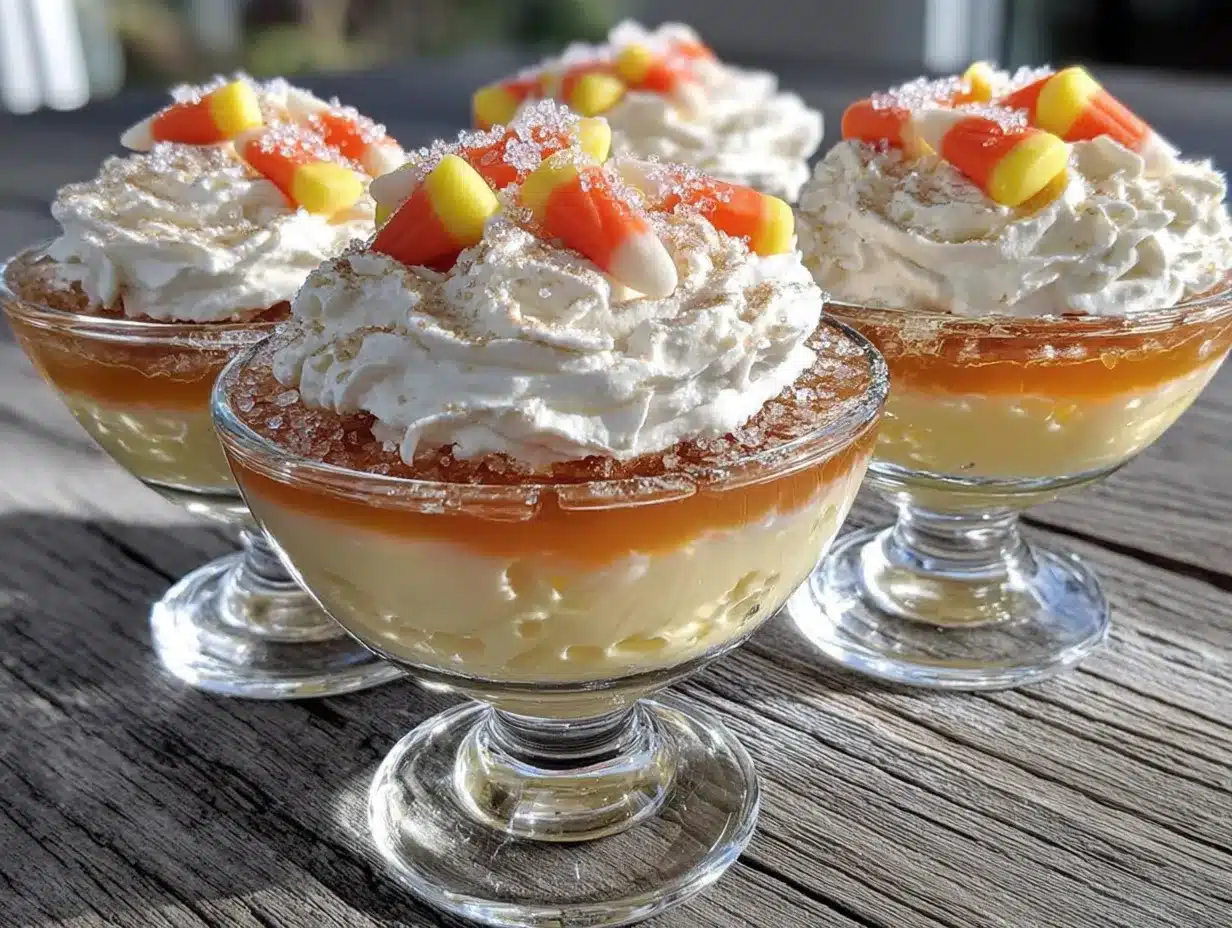
What makes these different from other layered desserts? It’s the way the flavors work together. The sweet orange gelatin, the rich vanilla pudding, and the buttery cookie base create this perfect harmony. Plus, the visual effect is stunning—those distinct candy corn colors stacked in clear cups just scream “I put effort into this.” But between us? It’s all smoke and mirrors. This is one of those recipes that looks way harder than it actually is.
This recipe isn’t just good—it is the kind that makes you close your eyes after the first bite. It’s comfort food reimagined for the holiday season: playful, pretty, and packed with that nostalgic jello salad energy your grandma would approve of.
What Ingredients You Will Need
This recipe uses simple, pantry-friendly ingredients to create something that looks like it came from a fancy bakery. Here’s what you’ll need to gather before you start layering.
For the Orange Layer (Bottom)
- 1 box (3 oz) orange gelatin (I prefer Jell-O brand for consistent results)
- 1 cup boiling water
- 1/2 cup cold water
- Ice cubes (about 4-5, to help set the gelatin faster)
For the Yellow Layer (Middle)
- 1 box (3.4 oz) instant vanilla pudding mix (Jell-O brand works great)
- 1 cup cold milk (whole milk gives the creamiest texture, but 2% works too)
- 1/2 cup heavy cream (for that extra luxurious mouthfeel)
- 1 teaspoon vanilla extract (adds warmth and depth)
- Yellow food coloring (optional, but helps achieve that candy corn yellow)
For the White Layer (Top)
- 1/2 cup heavy cream
- 1 tablespoon powdered sugar
- 1/2 teaspoon vanilla extract
For the Crust
- 1 cup crushed vanilla wafers (about 20 cookies, crushed fine)
- 2 tablespoons melted butter
- 1 tablespoon granulated sugar
A quick note on ingredient selection: Look for a good quality instant pudding mix—the store brand works fine, but I’ve found Jell-O brand gives the smoothest texture. For the gelatin, orange is non-negotiable for that candy corn look, but you could technically use lemon if you’re feeling rebellious (though the color won’t be quite right). If you’re dairy-free, swap the heavy cream for coconut cream and use a plant-based milk for the pudding. Just know the texture will be a touch lighter.
Equipment Needed
You don’t need a professional kitchen to pull these off. Here’s what I use every time I make these cups.
- 8-10 clear plastic cups (5 oz size works perfectly for individual servings)
- 2 medium mixing bowls
- 1 small saucepan (for boiling water)
- Whisk (a balloon whisk works best for smooth gelatin)
- Measuring cups and spoons
- Ziploc bag or rolling pin (for crushing cookies)
- Small spatula or spoon for layering
- Refrigerator space (you’ll need room to chill them upright)
I’ve made these with both glass and plastic cups, and honestly? Plastic is easier for parties—no worries about breakage, and guests can take them home. If you don’t have a rolling pin for the cookies, just put them in a ziploc bag and smash them with a can of beans. Works like a charm. The one thing I’d splurge on is a good whisk—cheap ones bend easily when you’re mixing gelatin.
Preparation Method
Alright, let’s get to the fun part. Here’s how to make these layered beauties step by step.
- Make the crust: Crush the vanilla wafers into fine crumbs. I like to put them in a ziploc bag and go at them with a rolling pin—therapeutic, honestly. Mix the crumbs with melted butter and sugar until it looks like wet sand. Divide this evenly among your cups, pressing down gently with the back of a spoon. Pop them in the fridge while you work on the layers.
- Prepare the orange gelatin layer: In a medium bowl, dissolve the orange gelatin powder in 1 cup of boiling water. Stir for about 2 minutes until completely dissolved—no granules left. Add the cold water and a few ice cubes, stirring until the ice melts. This speeds up the setting process. Pour the gelatin into the cups over the crust, filling about one-third of the way up. Refrigerate for at least 45 minutes, or until set. The gelatin should feel firm to the touch, not jiggly.
- Make the yellow pudding layer: In a clean bowl, whisk together the instant vanilla pudding mix and cold milk for about 2 minutes until it thickens. In a separate small bowl, whip the heavy cream with an electric mixer until soft peaks form. Fold the whipped cream into the pudding gently—you want it light and airy. Add a drop of yellow food coloring if desired, and mix until even. Spoon this over the set orange gelatin layer, filling another third of the cup. Smooth the top with a spatula. Refrigerate for 30 minutes to firm up.
- Prepare the white cream layer: In a chilled bowl, whip the heavy cream with powdered sugar and vanilla extract until stiff peaks form. Be careful not to over-whip, or you’ll end up with butter. Spoon or pipe this over the yellow pudding layer, filling the cup to the top. Use a piping bag for cleaner lines, or just dollop it on and smooth with a spatula.
- Chill and serve: Refrigerate the finished cups for at least 2 hours, or overnight. The longer they sit, the better the flavors meld. When you’re ready to serve, you can garnish with a sprinkle of crushed cookie crumbs or a tiny candy corn on top for extra flair.
A few notes from my kitchen disasters: If your gelatin layer doesn’t set properly, you might have used too much water or not stirred enough. Don’t panic—just pop it back in the fridge for another 15 minutes. If the pudding layer feels too thick, you can add a splash more milk next time. And whatever you do, don’t skip the folding step with the whipped cream—it’s what makes the pudding layer light and dreamy instead of dense and gluey.
Cooking Tips & Techniques
After making these cups about a dozen times (yes, really), I’ve picked up some tricks that make the process smoother and the results more consistent.
Patience is your friend: The biggest mistake people make is rushing the setting time. I learned this the hard way when I tried to speed things up and ended up with a muddy mess of colors. Each layer needs its full chill time—set a timer if you have to. The orange layer needs at least 45 minutes, the pudding layer needs 30, and the final chill should be 2 hours minimum. Overnight is even better.
Temperature matters: Make sure your milk and cream are cold before you start. Warm dairy won’t whip properly and can mess up the pudding texture. I keep my cream in the fridge until the last minute. Also, when you’re dissolving the gelatin, the water needs to be boiling hot—not just warm. Lukewarm water won’t dissolve the powder completely, and you’ll end up with grainy spots.
Layer like a pro: When pouring the gelatin over the crust, go slow. I use a spoon to guide the liquid down the side of the cup so it doesn’t disturb the crust. Same with the pudding layer—spoon it in gently. If you dump it in all at once, you’ll get bubbles and uneven layers. Trust me, I’ve made that mistake and ended up with cups that looked like abstract art rather than candy corn.
Timing strategy: Here’s my multitasking approach: Make the crust first, then start the gelatin. While the gelatin sets, whip up the pudding mixture and keep it in the fridge. That way, when the gelatin is ready, you just spoon the pudding on top. It saves you from standing around waiting. For parties, I make these the night before—they actually taste better the next day, and it’s one less thing to stress about.
Variations & Adaptations
One of the best things about this recipe is how flexible it is. Here are some variations I’ve tried and loved.
Dairy-Free Version: Use coconut cream instead of heavy cream—it whips up beautifully and adds a subtle tropical note that pairs surprisingly well with the orange gelatin. For the pudding, use almond milk or oat milk. Just know the texture will be slightly less rich, but still delicious. I made this for a friend with lactose intolerance, and she went back for seconds.
Adult Twist: Add a splash of orange liqueur (like Grand Marnier) to the gelatin layer before it sets. About 2 tablespoons for the whole batch gives it a grown-up kick without being overpowering. I tried this for a Halloween party for adults, and it was a hit. Just make sure you label them clearly so kids don’t accidentally grab one.
Seasonal Variations: Swap the orange gelatin for lime or berry to match different holidays. For Christmas, try red and green layers. For Easter, pastel colors work great. The technique stays the same—just change the gelatin flavor and food coloring to match the occasion. I’ve done a Fourth of July version with red, white, and blue layers that was a total crowd-pleaser.
Crunchy Topping: Instead of just the crust at the bottom, try adding a sprinkle of crushed graham crackers or crushed candy canes on top of the final cream layer. It adds texture and a little extra sweetness. My kids love this version—they call it “the crunchy one.”
Serving & Storage Suggestions
These cups are best served chilled, straight from the fridge. The contrast between the cool, creamy layers and the crunchy crust is part of the magic. If you’re serving them at a party, keep them refrigerated until the last minute—they’ll hold up for about an hour at room temperature, but any longer and the cream layer might start to soften.
Presentation tips: Arrange the cups on a tray with some festive napkins and a small sign that says “Candy Corn Cups” so guests know what they’re grabbing. For extra flair, you can add a tiny candy corn on top of each cup or a sprinkle of orange and yellow sprinkles. I’ve also served them on a bed of crushed ice for a fancy buffet look—it keeps them cold and looks gorgeous.
Storage: These cups keep well in the refrigerator for up to 3 days. Cover them with plastic wrap or pop on lids if you have them. I wouldn’t recommend freezing them—the gelatin gets weepy and the cream layer turns watery. Trust me, I tried it once and it was not pretty.
Make-ahead tip: These are perfect for prepping the day before your event. The flavors actually meld and improve overnight. Just keep them covered in the fridge, and you’re good to go. I’ve even made them two days ahead with great results—the crust stays crunchy, and the layers hold their shape beautifully.
Nutritional Information & Benefits
Let’s be honest—this is a treat, not a health food. But here’s the breakdown for one serving (based on 10 cups).
Estimated per serving: Calories: 210, Fat: 12g, Carbohydrates: 24g, Protein: 3g, Sugar: 18g. These numbers will vary depending on your specific ingredients and portion sizes.
What’s good about it: The gelatin provides collagen, which is great for your joints and skin. The cream and milk offer calcium and vitamin D. And the vanilla wafers? Well, they make you happy, and that counts for something. I like to think of these as a “sometimes food”—perfect for celebrations and special occasions.
Dietary considerations: This recipe contains dairy and gluten (from the cookies). For a gluten-free version, use gluten-free vanilla wafers or crushed gluten-free graham crackers. For a lower-sugar option, use sugar-free gelatin and pudding mixes. I’ve tested both swaps, and they work fine—the texture is slightly different, but the visual effect is the same.
I’m not a nutritionist, but I believe in balance. These cups are meant to be enjoyed, not feared. Make them for the joy they bring, not the macros they hit.
Conclusion
So there you have it—my accidental party hero recipe that turned a panic-stricken afternoon into a signature dessert. These Crowd-Pleasing Candy Corn Layered Jello Cups are proof that you don’t need hours in the kitchen or a culinary degree to impress a crowd. You just need a few simple ingredients, a little patience for the layers to set, and the willingness to look like you planned it all along.
I’d love to hear how yours turn out. Did you try a fun variation? Did your guests go back for thirds like mine did? Drop a comment below and let me know—I read every single one. And if you’re looking for more easy party desserts, check out my no-bake pumpkin cheesecake or these easy fall dessert trifle recipes. They’ve saved me more times than I can count.
Go ahead, give these a try. Your next party is calling, and you’ve got this. Happy layering!
Frequently Asked Questions
Can I make these cups ahead of time?
Absolutely! These are actually better when made a day ahead. The layers set properly, and the flavors meld together beautifully. Just keep them covered in the fridge until you’re ready to serve.
Why did my gelatin layer not set?
This usually happens if the water wasn’t hot enough to fully dissolve the gelatin powder, or if you added too much water. Make sure your water is boiling when you mix it, and measure carefully. If it still doesn’t set, pop it back in the fridge for another 15-20 minutes.
Can I use sugar-free gelatin and pudding?
Yes, you can! Sugar-free versions work fine, though the texture might be slightly less creamy. I’ve tested this with sugar-free options, and the visual effect is the same. Just follow the package instructions for measurements.
How long do these cups last in the fridge?
These cups stay fresh for up to 3 days in the refrigerator. After that, the crust might start to soften, and the cream layer can become watery. I recommend making them no more than 2 days before your event for the best texture.
Can I use different gelatin flavors?
Definitely! The candy corn look comes from the orange, yellow, and white layers, but you can experiment with other flavors. For a different color scheme, try lime, lemon, and white for a spring look, or strawberry, vanilla, and chocolate for a Neapolitan vibe. Just keep the layering technique the same.
Pin This Recipe!

Crowd-Pleasing Candy Corn Layered Jello Cups
These layered jello cups look like candy corn, taste like a dream, and are almost too easy to make. Perfect for Halloween parties, Thanksgiving potlucks, or any autumn gathering, they combine sweet orange gelatin, rich vanilla pudding, and a buttery cookie base for a stunning and delicious dessert.
- Prep Time: 30 minutes
- Cook Time: 0 minutes
- Total Time: 3 hours 45 minutes (includes chilling time)
- Yield: 8-10 servings 1x
- Category: Dessert
- Cuisine: American
Ingredients
- 1 box (3 oz) orange gelatin (Jell-O brand recommended)
- 1 cup boiling water
- 1/2 cup cold water
- Ice cubes (about 4-5)
- 1 box (3.4 oz) instant vanilla pudding mix (Jell-O brand recommended)
- 1 cup cold milk (whole milk preferred)
- 1/2 cup heavy cream
- 1 teaspoon vanilla extract
- Yellow food coloring (optional)
- 1/2 cup heavy cream
- 1 tablespoon powdered sugar
- 1/2 teaspoon vanilla extract
- 1 cup crushed vanilla wafers (about 20 cookies)
- 2 tablespoons melted butter
- 1 tablespoon granulated sugar
Instructions
- Make the crust: Crush vanilla wafers into fine crumbs. Mix with melted butter and sugar until it looks like wet sand. Divide evenly among 8-10 clear plastic cups (5 oz size), pressing down gently with the back of a spoon. Refrigerate while preparing layers.
- Prepare the orange gelatin layer: In a medium bowl, dissolve orange gelatin powder in 1 cup boiling water. Stir for about 2 minutes until completely dissolved. Add cold water and a few ice cubes, stirring until ice melts. Pour gelatin into cups over crust, filling about one-third full. Refrigerate for at least 45 minutes, or until set and firm to the touch.
- Make the yellow pudding layer: In a clean bowl, whisk together instant vanilla pudding mix and cold milk for about 2 minutes until thickened. In a separate small bowl, whip 1/2 cup heavy cream with an electric mixer until soft peaks form. Fold whipped cream into pudding gently. Add a drop of yellow food coloring if desired. Spoon over set orange gelatin layer, filling another third of the cup. Smooth top with a spatula. Refrigerate for 30 minutes to firm up.
- Prepare the white cream layer: In a chilled bowl, whip 1/2 cup heavy cream with powdered sugar and 1/2 teaspoon vanilla extract until stiff peaks form. Spoon or pipe over yellow pudding layer, filling cup to the top. Use a piping bag for cleaner lines, or dollop and smooth with a spatula.
- Chill and serve: Refrigerate finished cups for at least 2 hours, or overnight. Garnish with crushed cookie crumbs or a tiny candy corn on top if desired.
Notes
For best results, make these a day ahead so flavors meld. If gelatin doesn’t set, water may not have been hot enough or too much water used. Don’t skip folding whipped cream into pudding for a light texture. For dairy-free, use coconut cream and plant-based milk. For an adult twist, add 2 tablespoons orange liqueur to gelatin layer. Store covered in fridge for up to 3 days; do not freeze.
Nutrition
- Serving Size: 1 cup
- Calories: 210
- Sugar: 18
- Sodium: 180
- Fat: 12
- Saturated Fat: 7
- Carbohydrates: 24
- Protein: 3
Keywords: candy corn, jello cups, layered dessert, Halloween dessert, fall dessert, easy dessert, no-bake dessert, party dessert


